
How to make your own font

If you know me then you know that I LOVE Fonts! I constantly look for new fonts to add to my collection and to use, and I am always checking Creative Market for new font bundles and typefaces. If you'd like to see my favourite fonts, then you can check them out in the relevant post I've written here.
But how cool would it be if you could make your OWN font? And what if I told you that it takes only 3 to 4 easy steps to create your masterpiece?
Oh, yes it's true! As I was searching the other day, I came across this website called MyScriptFont.com where you can create a font from your handwriting. The process is quite straight forward.
Once you visit the website, then you have to download a template. You can choose between a PDF or PNG format. Then you have to print it, so that you can start writing your letters on it.

You fill in the capital letters, lower case, numbers and punctuation. There are also optional letters to fill in for languages like german, french etc. that have different punctuation on certain letters.

Make sure that your letters touch the bottom inside line like my 'e' and they don't go over it like my 'o', if you want your letters to be on a straight line when you type.

If you don't mind or you want an uneven type of font then you don't have to pay attention to that line. However, your letters should not go out of the little box or touch the sides. Make sure you're using a medium-thick black pen so that you get the desired result. I tried it with a thinner tip pen, and the letters didn't come out as vivid as I wanted. Of course you can try different things and different ways until you get what you want in the end.

Once you are satisfied with the result, then you have to scan the template and upload the file on the website. At this stage you also get to name your font (cool!) and choose a TTF or OTF format. (Of course I named my first font 'Christina' .... how creative!!!) Once you've done all this, then you click start and wait for a few seconds. And Voilà! Your font is ready to be installed in your computer!
Go to Control Panel > Appearance and Personalization > Fonts
Copy / Paste your font there and you're good to go :)
So, say hello to my very first font!

I know it's not perfect but I think it's ok for a first try. I'm sure I'm going to be creating more fonts from now on!!!! :)
Then I had a brilliant idea! What if instead of letters I put in each square a doodle?

So, I just made some doodles in a new template form and followed the above steps like before. To my surprise it worked and I present to you christina77star's doodle font ;)
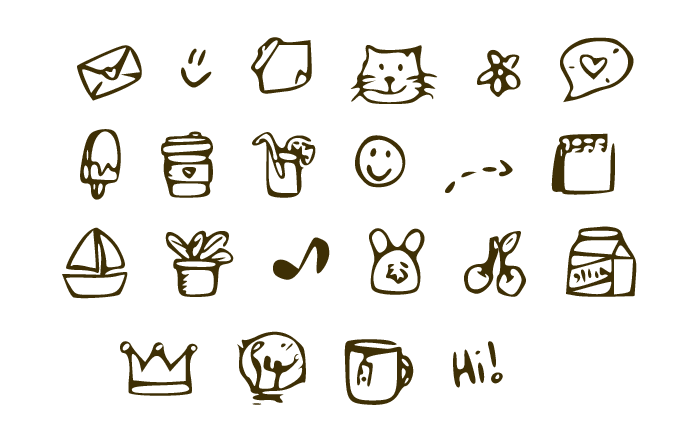
You can see that not all of the doodles came out as perfect as I'd like to. When making doodles you can certainly play with the thickness of the lines so that they come out clear, and stay away from little details cause they will not come out as good. But all in all I'm really excited with the result! If you'd like to download my doodle font please click here.
Hope I inspired you today with something new. If you create any new fonts I'd love to see them.

