Minimalistic Bullet Journal
Even though I love drawing and doodling, and it seems that my brain works better when my pages are colourful and fun, I admit that I don't always have the time (or the mood) to be creative. During those days I want my bullet journal to be simple and functional.
I've also read lots of times in the bullet journal community, comments from people who don't want or they just can't draw or sketch, and generally they are not into creating fancy and complicated pages. And that's perfectly fine. Each person is different and that is the beauty of bullet journaling - to personalise your journal in any way you want and to adjust it to your needs and wants.
So, since I found myself in the same predicament the last few days (no time to doodle!), I've decided to adopt the minimalist style to my bujo for a week or two (let's see how long I can last!), and show you that you can still be creative and fun. I'll also include some amazing spreads that some fellow bullet journalists have created, who prefer the minimalistic style.
So, for the next week or so I'll only use a black pen and only one coloured pen. No doodling, no drawing, just simple spreads that are functional.
For this week my weekly spread looks like this.

I tried to keep things as simple as possible. I included only the categories that I needed and used simple lines to separate them. You could also skip the colour if you wanted to. It just makes it easier for me to separate the space.

It took me 15 minutes to create it and fill it in, and I was done in no time at all, ready for the week ahead.

For my daily I followed the same rules and again I spend almost no time at all writing everything down. It felt quite refreshing actually!
For all the above I used only my black Staedtler Triplus Fineliner and my Tombow Dual Brush marker in no.553.
I've also created a page with minimalistic date headers to get inspired for my dailies. Because it is minimal, it doesn't mean that it has to be monotonous and boring. Simple fonts and putting things in different order, or some simple lines can make your dailies interesting without having to spend time making them fancy.

There is so much inspiration online from all these amazing fellow bullet journalists. You only have to do a little research and you'll be amazed at how many different minimal spreads there are out there.
Here I'll include some really nice minimal spreads to get inspired by:


Of course the list is endless and I've only shown a fraction of the minimal spreads out there.
What style do you prefer for your bullet journal? Do you like things simple and minimalistic, or do you prefer lots of colour and doodles? Let me know in the comments below. You can also share with us pictures of your minimalistic spreads in your bujo to get inspired!


Bullet Journal: My January Set Up
And here it is! 2017 has finally come and a whole new year is right in front of us full of possibilities!
I hope you've had a wonderful festive season and that the new year has been treating you well so far. :) I spent my two weeks off relaxing, eating far too much chocolate for me to admit, hanging around with the people I love, watching the best fireworks display I've seen in my life and making some fun plans for 2017 too!
Speaking of plans, I'd like to share with you how I've set up my bullet journal for the new year and the month of January.

Of course, I couldn't start the new year without a proper welcome for 2017. It is the year of the Rooster in the Chinese horoscope, so I thought it would be fun to portray that with a little rooster instead of the '0'.

Image inspired by Pinterest
The next page is about the word I've chosen for the year, and that is 'Change'. I had lots of other words in my head that I was thinking and contemplating of choosing, but I kept coming back to this one, so in the end I was certain that, that was the one!
Don't be afraid of change. It's leading you to a new beginning.

My word for 2016 was 'Challenge' and it surely served me well during the year. I found in many instances that I was challenging myself to do more and do better and also to do things that I wouldn't dare before. So, I'm grateful for all the challenges that I took and that have brought me to where I am now.
This year I want to change some things in my life, both personally and professionally, and to move one step further to where I want to be and who I want to become.
If you don't know how to choose one word for the next 365 days, then you can check this post I wrote last year, where I explain how I chose my word.
Also, let me know in the comments below what your word for the year is?

After reading 'Your Best Year 2017: Productivity Workbook and Creative Business Planner' by Lisa Jacobs, and also Kelsey's latest post at Paper & Oats, I knew I had to include an Annual Overview Planner in my bullet journal. This is a way to pre-plan your personal life, vacations, important dates, launches, work projects etc. in a 12 month calendar. Essentially, this should help you to brain dump and schedule all your ideas, plans and to-dos for the coming year in an organised way.
I've already filled this up with lots of things that I want to accomplish this year! You can also find a free printable version of this Annual Overview Planner in my Resources Library.
JOIN THE GANG!
Subscribe now to my Newsletter to download the FREE Printable.
Plus get access to the Resources Library!
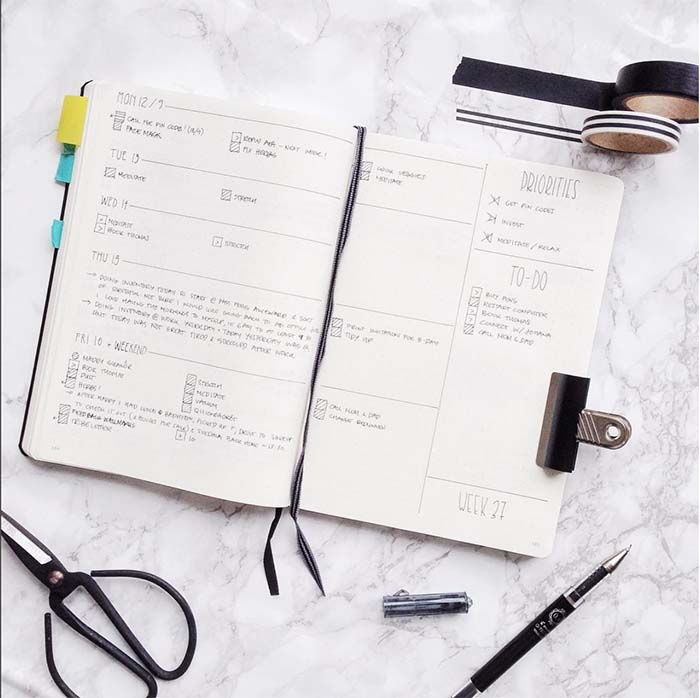
The next spread is my month at a glance that I do every month.

January was a bit tricky, and I had to start my weeks with Sunday (I'm used to having a Monday as the first day of the week), in order to fit all the days in the two-page spread. I've found that this is the best way for me to view my month. I've tried various other spreads before, but this is the one that seems to be working the best for me.

I love the little penguin! I got inspired for it online by B-Keks.

This next spread is something I've tried before (in my November set up) and it worked for me pretty well. So, I'm using it again! On the left page I basically brain dump all the things I want to do, achieve and finish during the month with steps for each one, and then I go and allocate them in the 4 weeks on the right-hand page. This helps me (and my brain!) to not get overwhelmed with all the things I (usually) want to do, and to have some sort of schedule for each one.
The next page is the spread for the #doodlewithus Instagram challenge, that me and Alexandra create every week. There is no picture for it here because it's currently an empty page... I haven't started it yet (well, at the time I'm writing this post anyway...!). Naughty, naughty, I know! But I'm going to catch up very soon and this empty page will turn into a lovely picture full of colour! Make sure you join us (it's never too late!). For all the information you need, go to this post.

From then on I start my month with my weekly spread and my dailies. I'm sharing with you here some of the spreads I created for week no.2. I was very into the superhero theme (as you can tell!) and I have to say that making those dots was quite therapeutic!

I also seem to enjoy more the one-page daily spreads, because I have so much space to add even more to-do lists, notes and of course... to doodle!
And this brings us to the end of this post. I hope you've found it interesting and inspiring. :)
How do you plan out your year? Do you use your bullet journal for it, or do you prefer other apps or digital calendars? Have you tried something new this month? Let me know in the comments below.
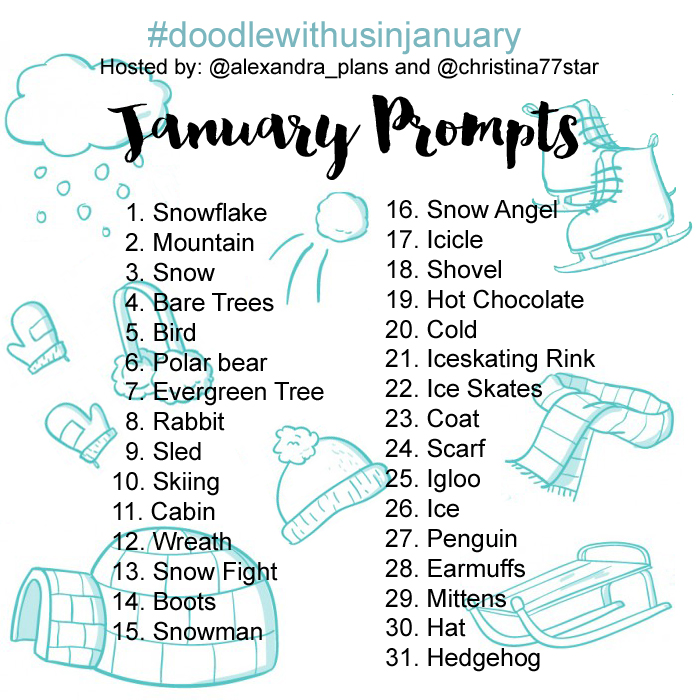
Instagram Challenge #doodlewithusinjanuary
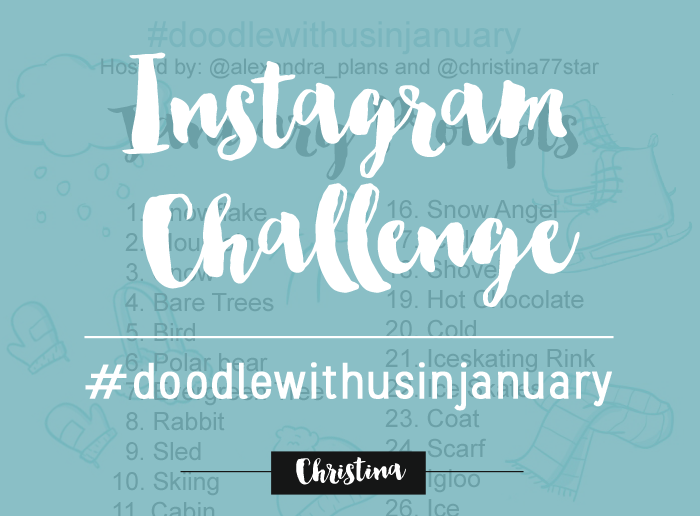
It's going to be 31 days of doodles that will hopefully get you to be creative and have fun! The theme of January's prompts is 'Winter Wonderland', and I seriously can't wait to start drawing!!!
As we did before, all the doodles are part of one big comprehensive picture. Imagine each day to be one piece of the puzzle. So, at the end of the month you will have one big doodle picture! :)
If you decide to follow this way, you'll have to create a table with 5x6 +1 boxes and you shouldn't add the days on the top. You can also make the boxes and dates in pencil, if you don't want the lines to obscure the end result. It's totally up to you.
Of course, if you prefer to draw the doodles in the traditional way, that's absolutely fine as well. The important thing is to have fun!
You can also download a free printout with the daily prompts here.

- Follow me (Christina) @christina77star and Alexandra @alexandra_plans over on Instagram.
- Download the prompts below.
- Draw something according to the day's prompt, take a photo of it, and share it with us on Instagram.
- Don't forget to add the hashtag #doodlewithusinjanuary and spread the word.
- Everyone is welcome!


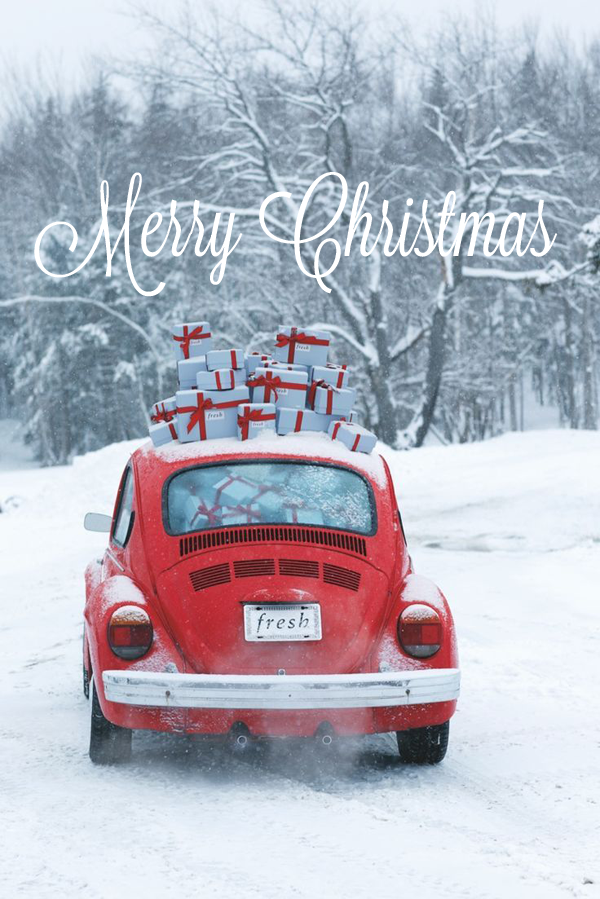
Merry Christmas & Happy New Year

I’m taking a little break to enjoy some time with my family and I hope you will be doing the same. I’ll be back January 6th with a ton of new and exciting posts (and videos) on bullet journaling, hand lettering, and blogging. 2017 looks incredibly promising with new projects, posts and so much more that I can’t wait to tell you about!
XOXO,

P.S: During January I'm planning a big giveaway to show my appreciation to all of you, so make sure you keep an eye on that! ;)
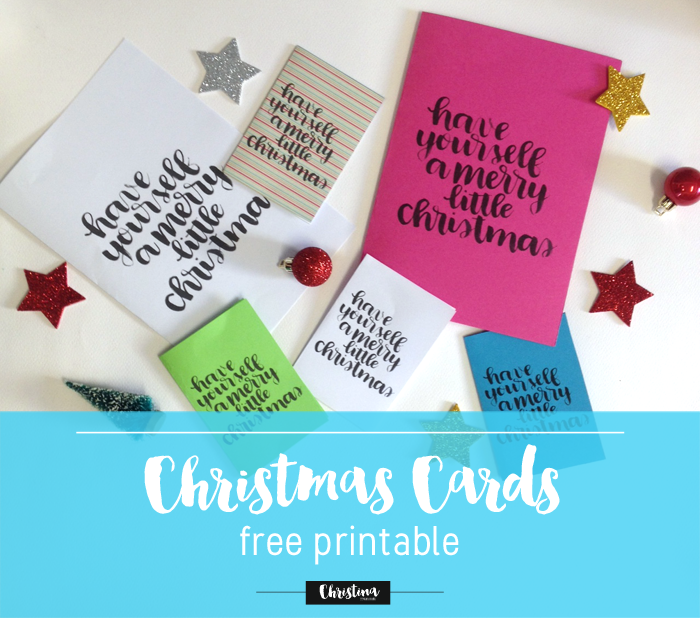
Collaboration: Christmas Card Free Printable
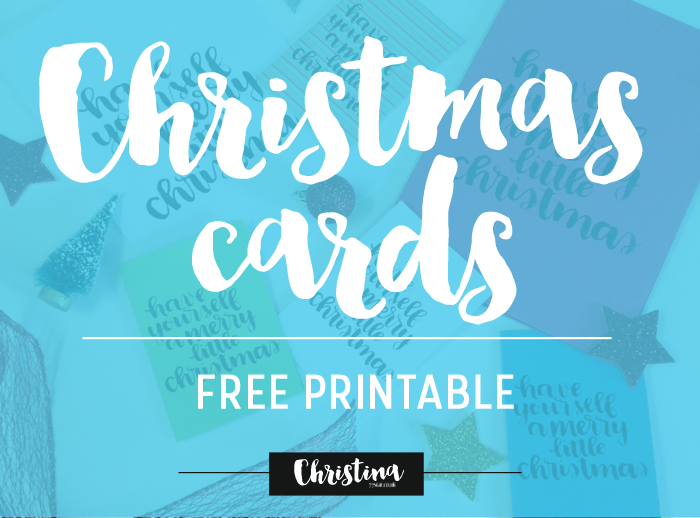
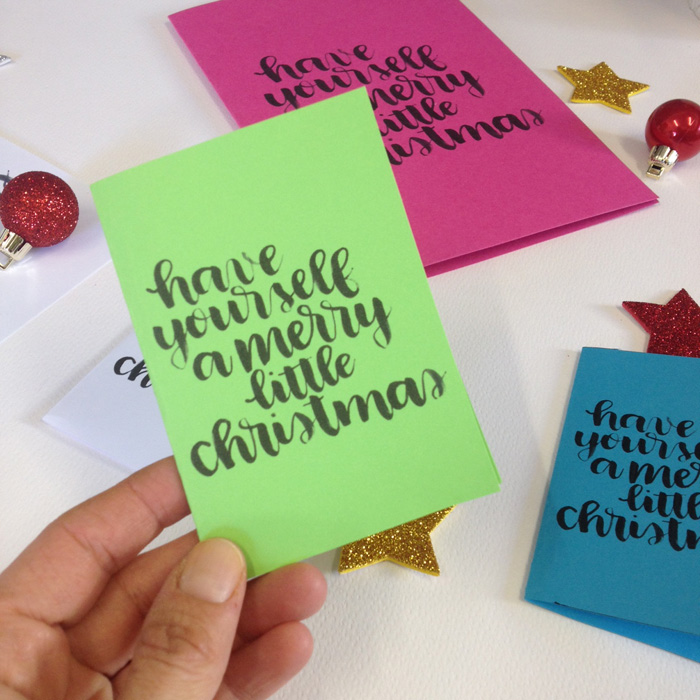
For today's post I've collaborated again with the lovely Olivia from RandomOlive to create something extra special for you. After seeing how many people enjoyed our last collaboration, with the Free Hand Lettering Practice Guide for your bullet journal, I decided to reach out to her and ask her to create a Free Christmas Card printable for all of you!
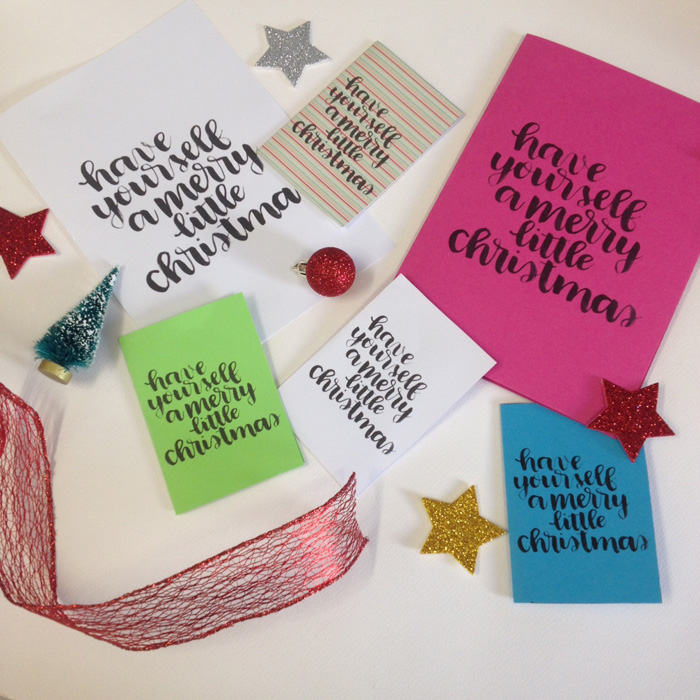
For me the most important part of giving or receiving is the card. It's what's written inside the card that matters most. Nowadays, people find it easy to go and buy expensive gifts, but they struggle to open up their heart and put it on paper. So this year, take some more time when you write your Xmas card, and make sure your message is thoughtful and meaningful for the person you're giving it to.
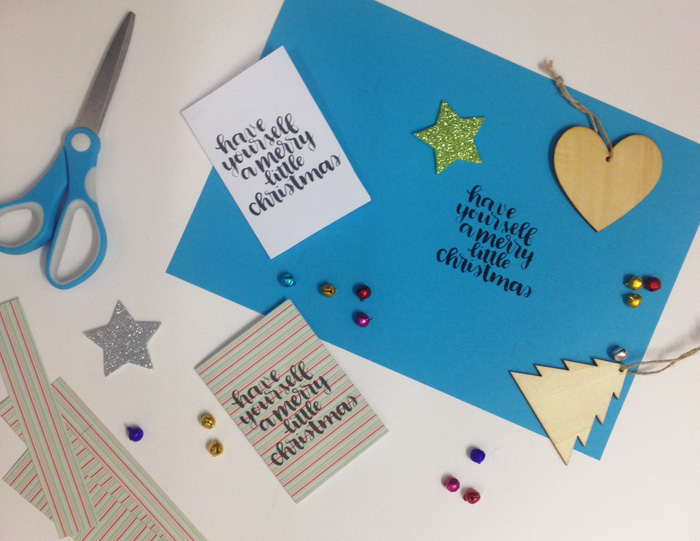
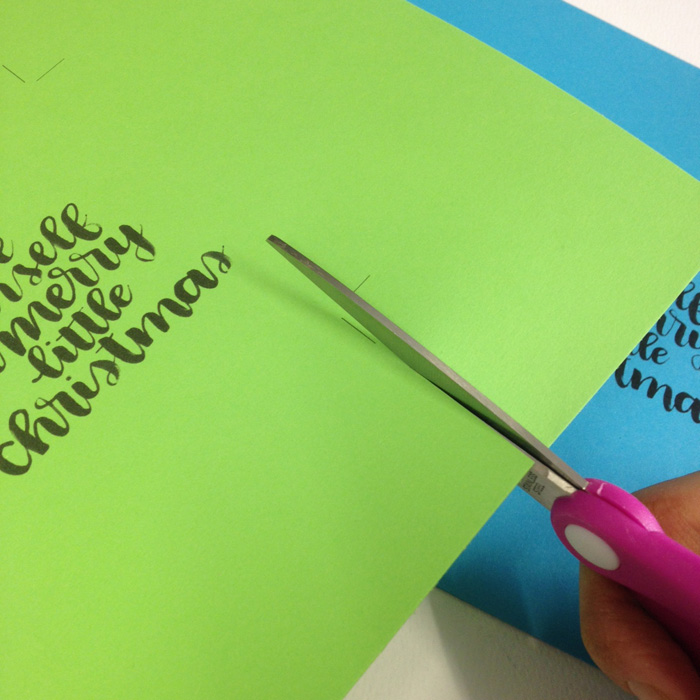
The card is super easy to make. All you'll need is some card paper (light coloured so that the message shows properly), pencil, ruler and a printer. The cards will print best on A4 size paper and they come in two sizes - A4 and 7.2x10.5cm. If you choose the smaller size, you should cut them out where it's shown on the corners like I have below. If you want a bigger card and you can go for the A4 size. You can always snip them down to the size you want, to fit your envelope.

I love Olivia's hand lettering practice sheets and I've been using them almost daily to better my hand lettering. If one of your goals is to better your brush lettering and hand lettering, then maybe you should check the Comprehensive Brush Letter Practic Guide out. It promises to turn you into a pro in 45 days! Olivia even gives you a schedule to stay on track. It's also the perfect Christmas gift!
Want to learn more about brush lettering?
Happy Holidays xoxo
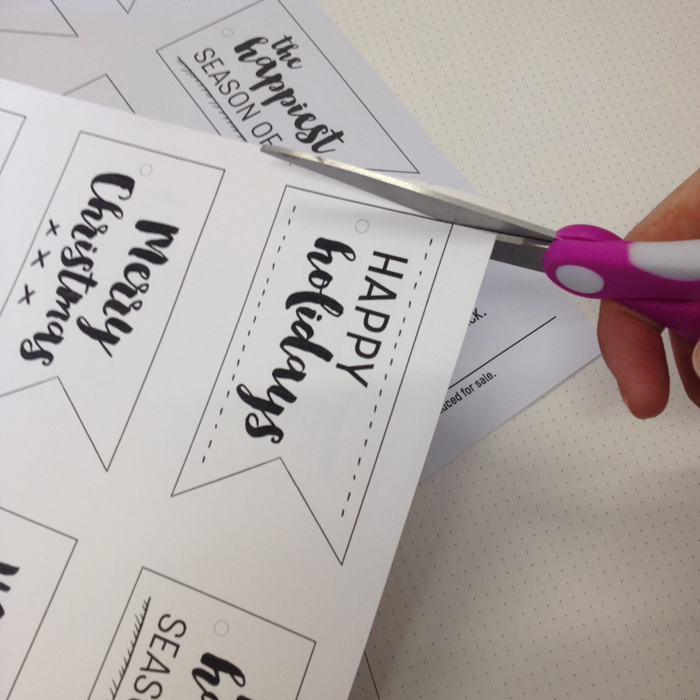
Christmas Gift Tags - Free Printable

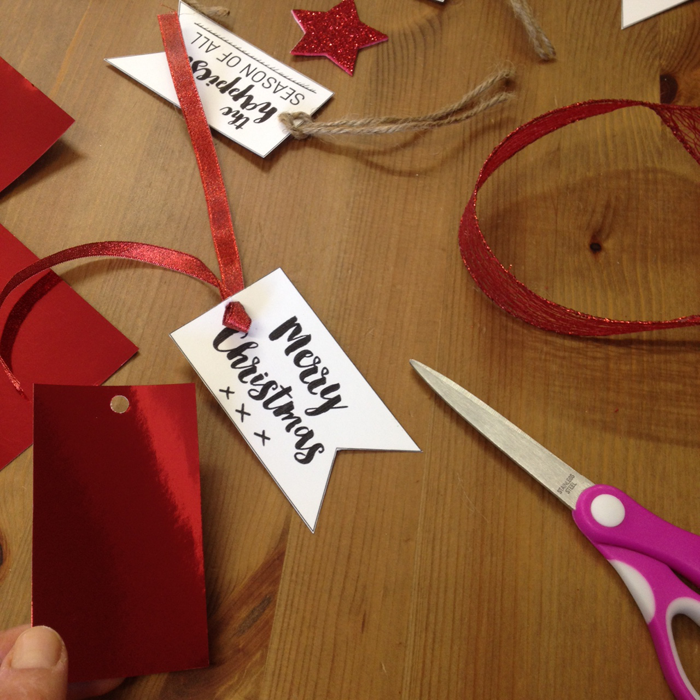
The holiday season is already here and I can't believe it's only three weeks till Christmas! I'm so excited! This is the time that I start buying the Christmas presents for all my family and friends, and I'm usually running in and out of shops with a big smile on my face or happily searching online for the perfect presents for each one. This year I've decided to make it a bit more personal with some gift tags that I've made myself. And in the Christmas spirit of giving, I'd like to share them with you too! :)
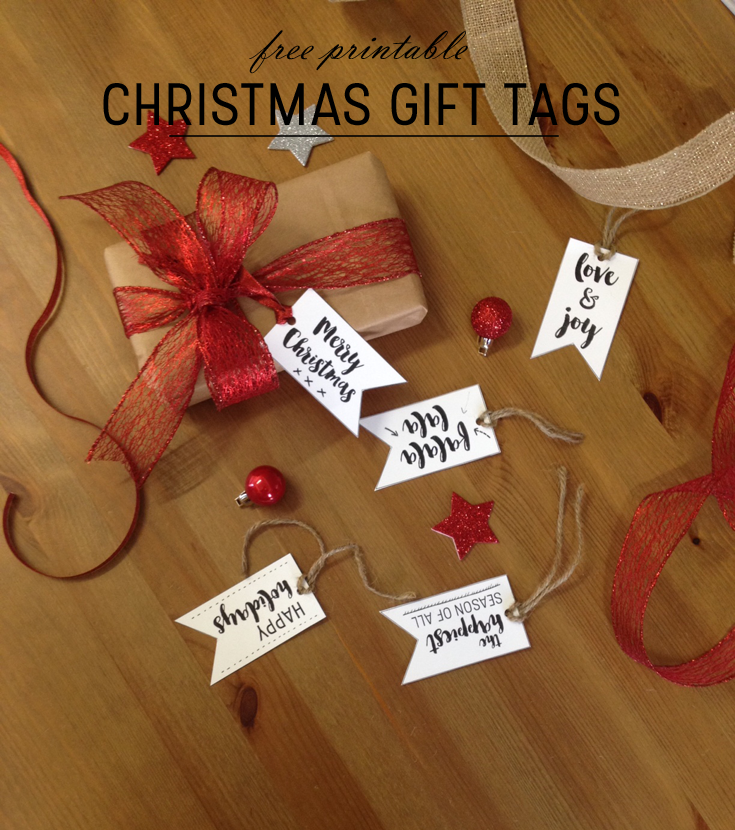
They're so easy to make and cute as a pie! All you'll need is a pair of scissors, some ribbon or twine, and a hole puncher.
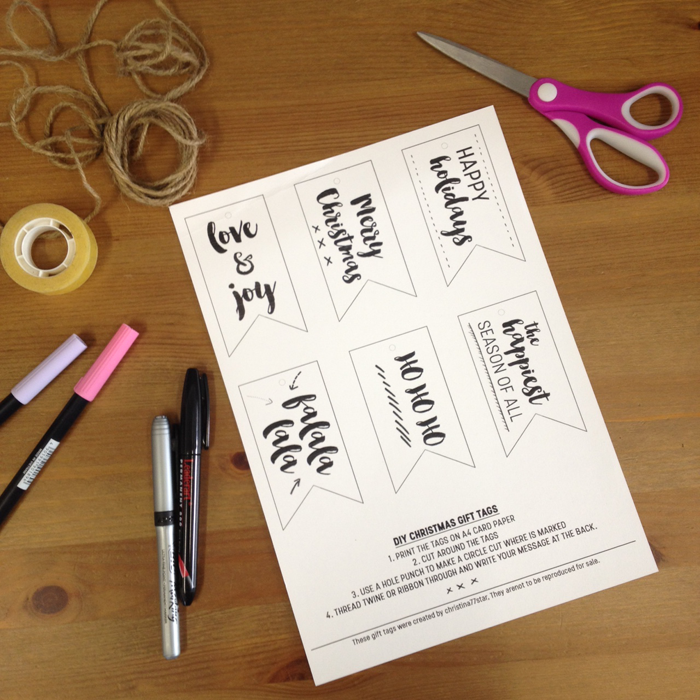
Cut the tags with the scissors, and then with a hole puncher make a circle cut where it's marked. You can leave the black line around the tag or cut through it - it's totally up to you.
You can also personalize your tags, by adding some coloured paper at the back of them that matches with the colour of your ribbon. That will make them extra festive!
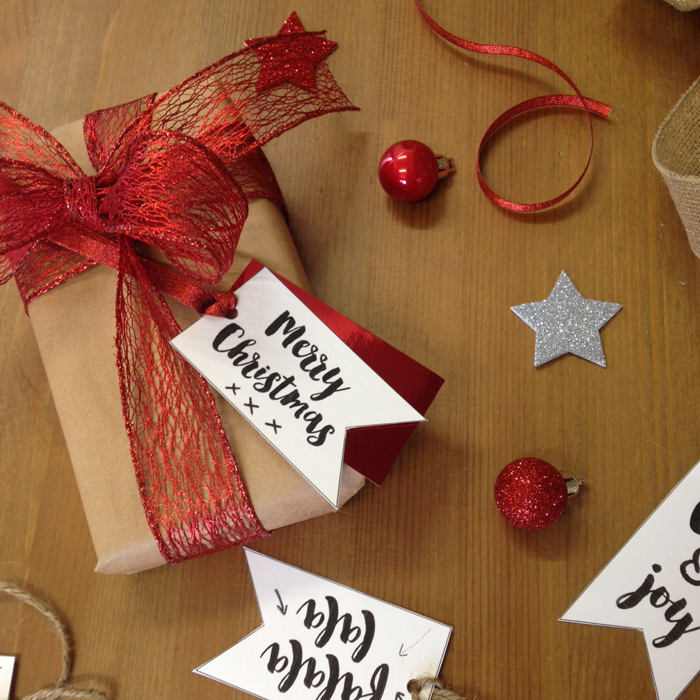
Let me know in the comments below if you liked the gift tags. You can also share pictures of your presents as well! Don't forget, the most important part is the message you'll write at the back of the tag to the people you love. ;)
Bullet Journal: My December Set Up
Another month has come to an end and of course that means a new monthly set up in my bullet journal! Yay! I can't believe that December is already here and that Christmas is only 24 nights away! Super excited about it! In today's post I'm going to share with you the basic pages and spreads I've created for the last month of the year. I have created more Christmas related spreads, and I might dedicate another post in order to share them with you. So, without further ado, let's dive in!

Another month has come to an end and of course that means a new monthly set up in my bullet journal! Yay! I can't believe that December is already here and that Christmas is only 24 nights away! Super excited about it! In today's post I'm going to share with you the basic pages and spreads I've created for the last month of the year. I have created more Christmas related spreads, and I might dedicate another post in order to share them with you. So, without further ado, let's dive in!
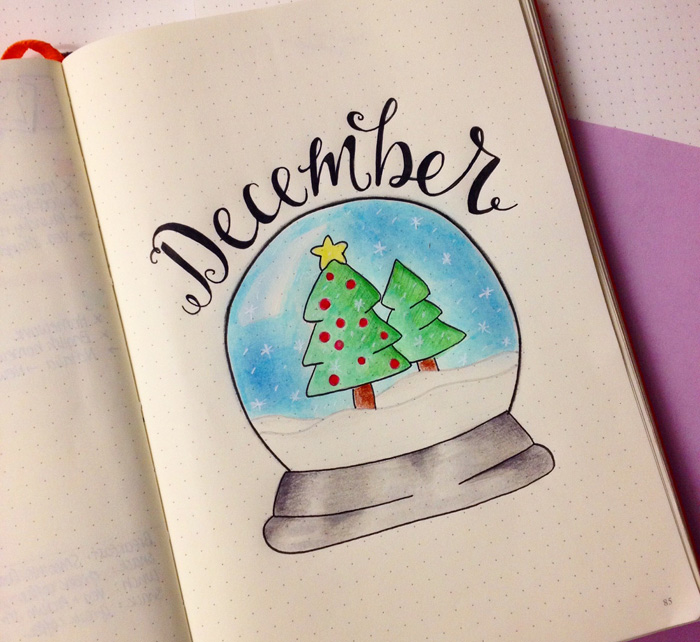
For the first page of the month I wanted something sweet and cute, and in the end I decided to go with a snow globe. I love snow globes - they are so whimsical and magical! And I was pretty pleased with the way the drawing turned out.
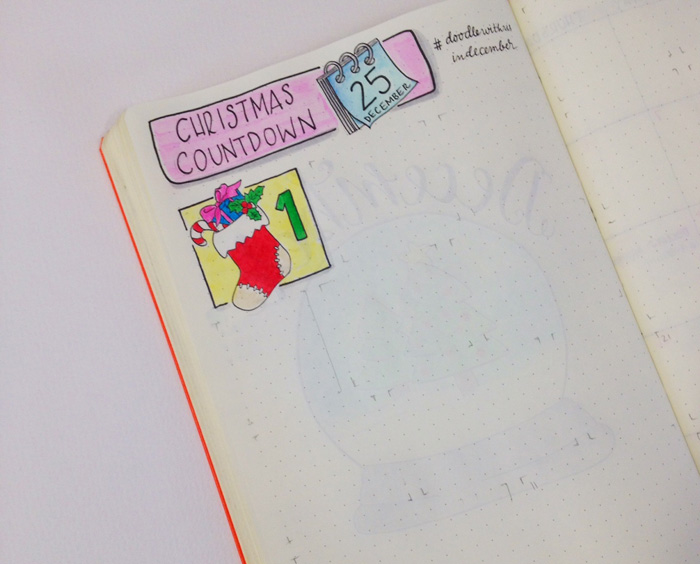
In the next two pages I'm going to have a spread for the Christmas Countdown! It's also the #doodlewithusindecember Instagram Challenge created by me and Alexandra (from @alexandra_plans). If you want to take part, you can find all the prompts here. I've already marked how my boxes will look like for the next days and here's day 1 with the prompt 'Stocking'.
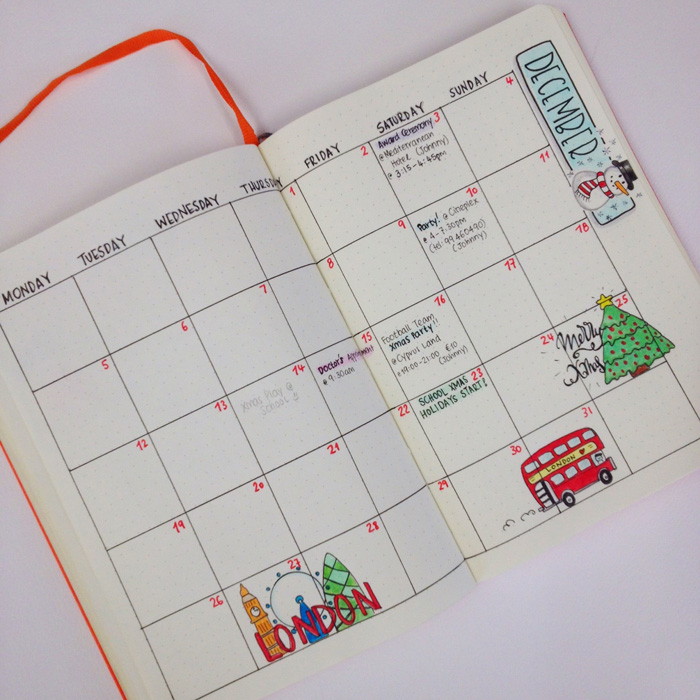
After that I have my monthly spread, which I really like how festive it looks. I'm sure that soon it will be filled with Christmas related events and fairs. I'm going to London for New Year's as well, and I thought I'd mark this down with a few doodles.

I love how my December header turned out! How cute is this snowman??!!
** By the way, would you be interested if I created stickers with similar headers for the various spreads of the bullet journal?? Let me know in the comments below ;) **
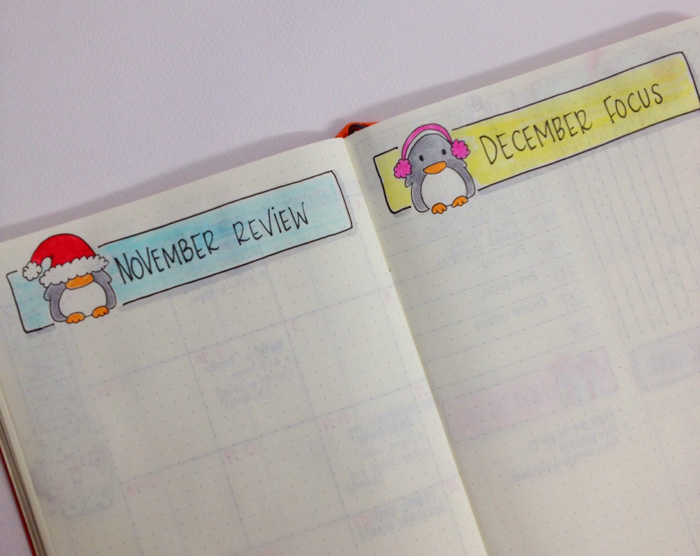
The next spread was dedicated to my November Review and my December Focus. I'm only sharing with you the two headers that I've created, because I wanted to write some very personal things in these two pages. But you get the idea. I just included my Big Wins, What Didn't Work and How I'll Improve categories for November. And for the focus part, I just wrote how and what I should do in each week of December. (It's pretty similar to my November Focus if you want to see here.)
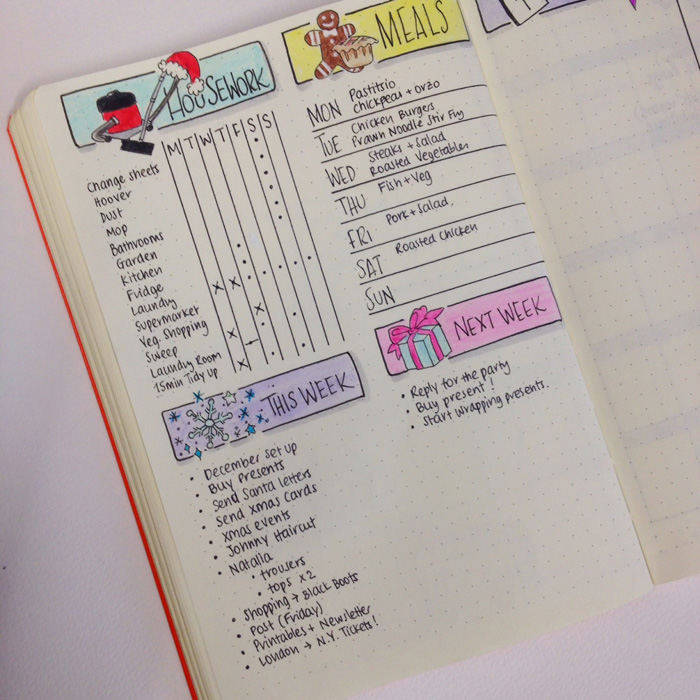
Then I started with my first weekly, that I tried to make as festive as possible with the little headers. And I continued the Christmas theme in my dailies as well.
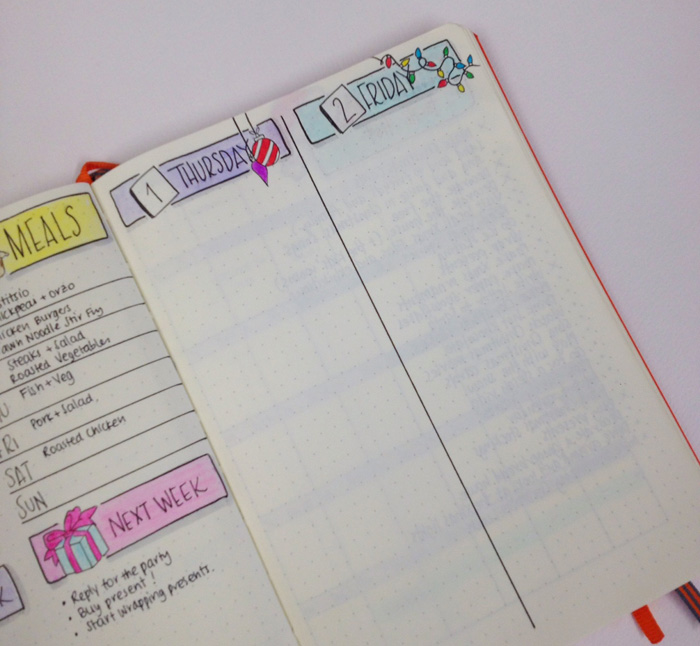
I've been enjoying the vertical layout for my dailies. It's functional and practical and I can create 7 days in advance (usually on Sundays that I create my weekly spreads).
You might have noticed that I didn't add a Gratitude spread for this month. That's because I wanted to try and write my daily gratitude in each daily spread. I think it's going to work better, because I always forget to go back to the gratitude page and fill it up at the end of the day. I'll let you know how this will go ;)
So, there you have it. This is my monthly set up for December. How did you decorate yours, and what changes did you do?
Have an amazing month full of lovely memories!

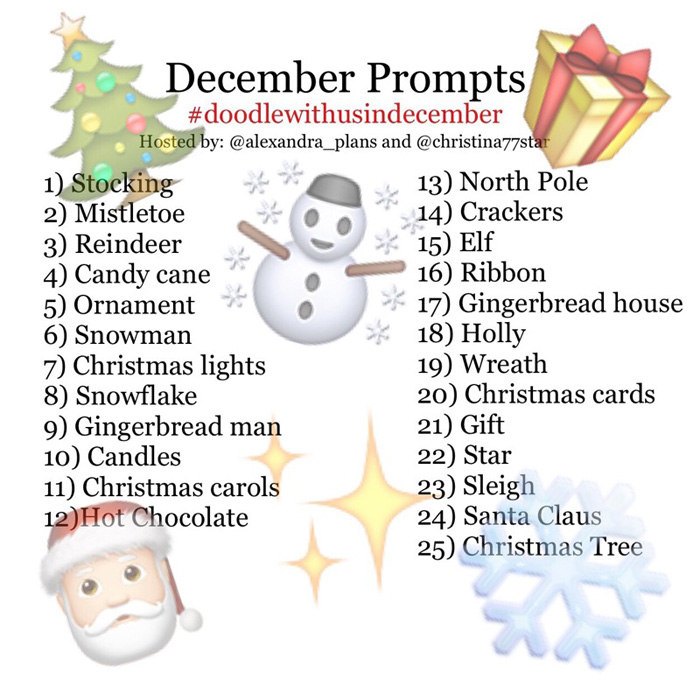
Instagram Challenge #doodlewithusindecember
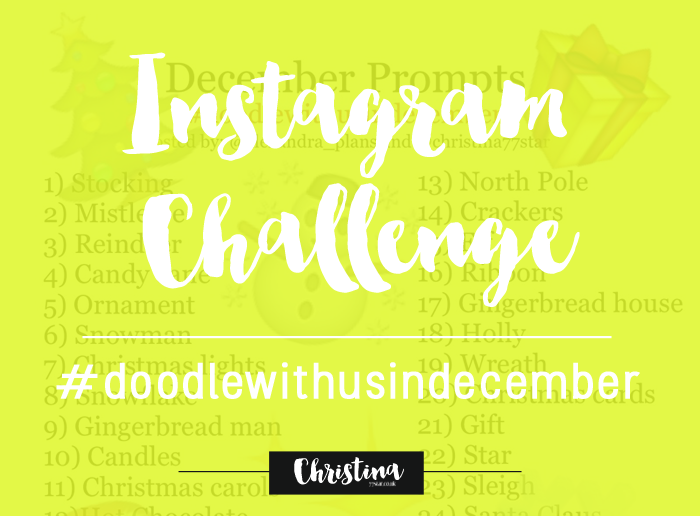
November is almost finished and I'm excited to announce our Instagram Challenge for the month of December! It's the #doodlewithusindecember Instagram Challenge created by me and Alexandra (from @alexandra_plans).
The theme for December's prompts is ''Countdown to Christmas" 🎄 and for that reason it's going to be only 25 prompts. We believe that this will make it easier to catch up with the challenge during the busy holiday season!
Because of the nature of the theme, this month we are not doing the big comprehensive picture. Instead, we are going back to the original design with 25 squares, a grid of 5x5 boxes, one per prompt. So, in the end you'll have 25 doodles that will lead you to Xmas day! Yay!
- Follow me (Christina) @christina77star and Alexandra @alexandra_plans over on Instagram.
- Download the prompts below.
- Draw something according to the day's prompt, take a photo of it, and share it with us on Instagram.
- Don't forget to add the hashtag #doodlewithusindecember and spread the word.
- Everyone is welcome!