Collaboration: Christmas Card Free Printable

For today's post I've collaborated again with the lovely Olivia from RandomOlive to create something extra special for you. After seeing how many people enjoyed our last collaboration, with the Free Hand Lettering Practice Guide for your bullet journal, I decided to reach out to her and ask her to create a Free Christmas Card printable for all of you!

For me the most important part of giving or receiving is the card. It's what's written inside the card that matters most. Nowadays, people find it easy to go and buy expensive gifts, but they struggle to open up their heart and put it on paper. So this year, take some more time when you write your Xmas card, and make sure your message is thoughtful and meaningful for the person you're giving it to.

The card is super easy to make. All you'll need is some card paper (light coloured so that the message shows properly), pencil, ruler and a printer. The cards will print best on A4 size paper and they come in two sizes - A4 and 7.2x10.5cm. If you choose the smaller size, you should cut them out where it's shown on the corners like I have below. If you want a bigger card and you can go for the A4 size. You can always snip them down to the size you want, to fit your envelope.


I love Olivia's hand lettering practice sheets and I've been using them almost daily to better my hand lettering. If one of your goals is to better your brush lettering and hand lettering, then maybe you should check the Comprehensive Brush Letter Practic Guide out. It promises to turn you into a pro in 45 days! Olivia even gives you a schedule to stay on track. It's also the perfect Christmas gift!
Want to learn more about brush lettering?

Happy Holidays xoxo


Christmas Gift Tags - Free Printable

The holiday season is already here and I can't believe it's only three weeks till Christmas! I'm so excited! This is the time that I start buying the Christmas presents for all my family and friends, and I'm usually running in and out of shops with a big smile on my face or happily searching online for the perfect presents for each one. This year I've decided to make it a bit more personal with some gift tags that I've made myself. And in the Christmas spirit of giving, I'd like to share them with you too! :)

They're so easy to make and cute as a pie! All you'll need is a pair of scissors, some ribbon or twine, and a hole puncher.

Cut the tags with the scissors, and then with a hole puncher make a circle cut where it's marked. You can leave the black line around the tag or cut through it - it's totally up to you.

You can also personalize your tags, by adding some coloured paper at the back of them that matches with the colour of your ribbon. That will make them extra festive!


Let me know in the comments below if you liked the gift tags. You can also share pictures of your presents as well! Don't forget, the most important part is the message you'll write at the back of the tag to the people you love. ;)


Bullet Journal: My December Set Up
Another month has come to an end and of course that means a new monthly set up in my bullet journal! Yay! I can't believe that December is already here and that Christmas is only 24 nights away! Super excited about it! In today's post I'm going to share with you the basic pages and spreads I've created for the last month of the year. I have created more Christmas related spreads, and I might dedicate another post in order to share them with you. So, without further ado, let's dive in!
Another month has come to an end and of course that means a new monthly set up in my bullet journal! Yay! I can't believe that December is already here and that Christmas is only 24 nights away! Super excited about it! In today's post I'm going to share with you the basic pages and spreads I've created for the last month of the year. I have created more Christmas related spreads, and I might dedicate another post in order to share them with you. So, without further ado, let's dive in!

For the first page of the month I wanted something sweet and cute, and in the end I decided to go with a snow globe. I love snow globes - they are so whimsical and magical! And I was pretty pleased with the way the drawing turned out.

In the next two pages I'm going to have a spread for the Christmas Countdown! It's also the #doodlewithusindecember Instagram Challenge created by me and Alexandra (from @alexandra_plans). If you want to take part, you can find all the prompts here. I've already marked how my boxes will look like for the next days and here's day 1 with the prompt 'Stocking'.

After that I have my monthly spread, which I really like how festive it looks. I'm sure that soon it will be filled with Christmas related events and fairs. I'm going to London for New Year's as well, and I thought I'd mark this down with a few doodles.

I love how my December header turned out! How cute is this snowman??!!
** By the way, would you be interested if I created stickers with similar headers for the various spreads of the bullet journal?? Let me know in the comments below ;) **

The next spread was dedicated to my November Review and my December Focus. I'm only sharing with you the two headers that I've created, because I wanted to write some very personal things in these two pages. But you get the idea. I just included my Big Wins, What Didn't Work and How I'll Improve categories for November. And for the focus part, I just wrote how and what I should do in each week of December. (It's pretty similar to my November Focus if you want to see here.)

Then I started with my first weekly, that I tried to make as festive as possible with the little headers. And I continued the Christmas theme in my dailies as well.

I've been enjoying the vertical layout for my dailies. It's functional and practical and I can create 7 days in advance (usually on Sundays that I create my weekly spreads).
You might have noticed that I didn't add a Gratitude spread for this month. That's because I wanted to try and write my daily gratitude in each daily spread. I think it's going to work better, because I always forget to go back to the gratitude page and fill it up at the end of the day. I'll let you know how this will go ;)
So, there you have it. This is my monthly set up for December. How did you decorate yours, and what changes did you do?
Have an amazing month full of lovely memories!


Instagram Challenge #doodlewithusindecember

November is almost finished and I'm excited to announce our Instagram Challenge for the month of December! It's the #doodlewithusindecember Instagram Challenge created by me and Alexandra (from @alexandra_plans).
The theme for December's prompts is ''Countdown to Christmas" 🎄 and for that reason it's going to be only 25 prompts. We believe that this will make it easier to catch up with the challenge during the busy holiday season!
Because of the nature of the theme, this month we are not doing the big comprehensive picture. Instead, we are going back to the original design with 25 squares, a grid of 5x5 boxes, one per prompt. So, in the end you'll have 25 doodles that will lead you to Xmas day! Yay!
- Follow me (Christina) @christina77star and Alexandra @alexandra_plans over on Instagram.
- Download the prompts below.
- Draw something according to the day's prompt, take a photo of it, and share it with us on Instagram.
- Don't forget to add the hashtag #doodlewithusindecember and spread the word.
- Everyone is welcome!


New Bullet Journal Flip Through (+ Video)
Today I'll share with you the pages and spreads that I've created in my second bullet journal until now. This time I've chosen a bright orange Leuchtturm1917 in A5 with dotted grid. (You can see my first bullet journal here). I started my second bullet journal in the beginning of September and I've managed to transfer most of my favourite spreads in it by now.
Today I'll share with you the pages and spreads that I've created in my second bullet journal until now. This time I've chosen a bright orange Leuchtturm1917 in A5 with dotted grid. (You can see my first bullet journal here). I started my second bullet journal in the beginning of September and I've managed to transfer most of my favourite spreads in it by now.

Watch the Video here!

Moving to a new bullet journal can be a bit of a pain with all the spreads you have to recreate. However, I quite liked it, because this time I got to choose which spreads to add, put them in the beginning of the journal, so that I can have easier access to them (having all the important spreads in the beginning, rather than having them spread in different places in the journal), and put them in the order that I liked.
I also got to make any changes that I thought were necessary and change the layout or the way I decorated the pages. All in all I'm really happy with the result and I love all the pages that I've recreated.
So, let's get started!
The first page after the index pages was a page that I wanted to decorate with a nice phrase or a quote. There is a phrase that I picked up from Pam Grout's book "E-Cubed: Nine More Energy Experiments That Prove Manifesting Magic and Miracles Is Your Full-Time Gig" that I say every morning, and that is 'Something amazing is going to happen today' I really wanted to include this in my bullet journal, so I created this page and I love it because it's the first thing I see when I open my bullet journal.
In the next page I wanted to include my Word of the Year and my Mission Statement, but I wanted to do something a bit different than before. I got inspired by Nicole and her lovely air-balloon drawings and created the above page, which is definitely one of my favourites.
I always include a page of Useful Numbers for me but also for my kids. They know that in a case of emergency they can go to this page and call the number they need.
I simplified my Key completely. Now I only use a dot for everything. I only use more specific symbols for bithdays and anniversaries. I found that using various different symbols for your activities can be a bit confusing some times, and I also thought that it made my pages a bit messy. The Colour Code has all the colours that I use for my dailies and for my time management bar, and it has stayed the same.
I wanted a Year at a Glance spread. In my previous journal I created this spread in 4 pages, but this time I wanted to condense everything in only 2 pages. I really like how it turned out. This is the page I use to note down holidays, birthdays, anniversaries, various events and school related days. Now I can see how my schedule is looking for the next 12 months.
* There is a printable version of the above 2-page Year at a Glance spread for 2018. You can find it here.
In the next spread I created my Future Log where I note down all the appointments, events and other important dates. I have a full blog post dedicated to this one if you want more information about it. So, having these two spreads together is really functional, because I can see straight away what I have to do in each month.
Then I created my Level 10 Life / Level 10 Goals spread, which I've changed up a bit. I talked about it thoroughly in this post if you want to check it out. But it's basically an assessment of your life as it is now in 10 different areas. Then you set up your goals in each one of those areas and you establish the ways and habits that will help you get there. I loved it when I read about it in Hal Elrod's book 'The Miracle Morning' and it has helped me a lot in my goal setting.
The next two spreads are about the books I want to read and the books that I have read during 2016. On the first page I'll write previous publications that I really want to read - my top picks from my wishlist. Then I have new publications per month and lastly I note down all the books I've read in 2016. By the way, a little update about my reading goal that I mentioned in the '17 before 2017' post. I had to changed it because it was completely unreasonable.... There was no way could have read 20 books by the end of the year, especially with my schedule as it is now. So now, my reading goal is 60 books in 2016 which is definitely more achievable..
Moving further, the next spread is about my Planning Routine. This is the only spread that I didn't change a thing. I literally copied it from my first journal.
The next page is my Housework Schedule. This is the basic weekly schedule that I tend to follow. Of course, I can change things around depending on the things I need to do each week.
My Menu Planning is almost the same. I changed the banner at the top a bit, but generally I followed the same layout as my previous one. I need to add more food ideas for each category. It's a very helpful page if you're stuck each week and you don't know what to cook!
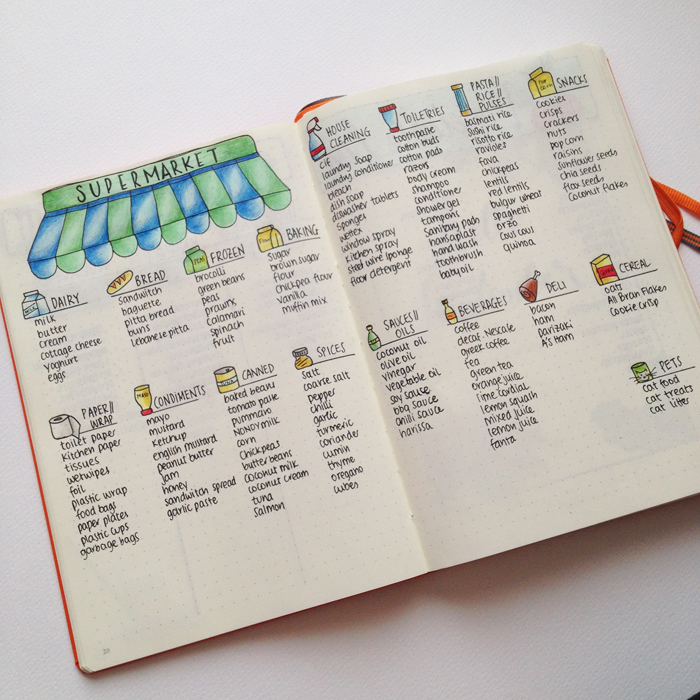
My Supermarket List looks neater and cleaner. Again I changed the banner at the top and rearranged the items a bit, but all in all it's the same spread. Very functional and practical.
Lastly, I also recreated a spread for my Vegetable List. Basically the same - just changed the top part a bit. The rest of the pages I've already shared them with you. You can look back in my September and October set ups to see how I prepared my bullet journal for each month.
So, there you have it. My new bullet journal set up. Which spreads do you recreate when you change journals?


JOIN THE GANG!
Get all the inspiration delivered to your inbox twice per month.
Plus get access to the Resources Library!
Collaboration: Free Brush Letter Practice Guide for your Bullet Journal

For today's post I collaborated with the lovely Olivia from RandomOlive. I've talked in a previous post about my obsession with handlettering, so when Olivia asked me to share a Free Brush Letter Practice Guide on my blog I was over the moon!
When I had to think of the phrases or words I'd like to have in this Free Printable, I knew I had to make it relevant to my bullet journaling. So, I've chosen titles that are very often used in various spreads like: gratitude log, monthly focus, future log, habit tracker and monthly challenges. The idea is to practice (and then practice some more!) in order to be able to recreate these titles in your bullet journal. :)

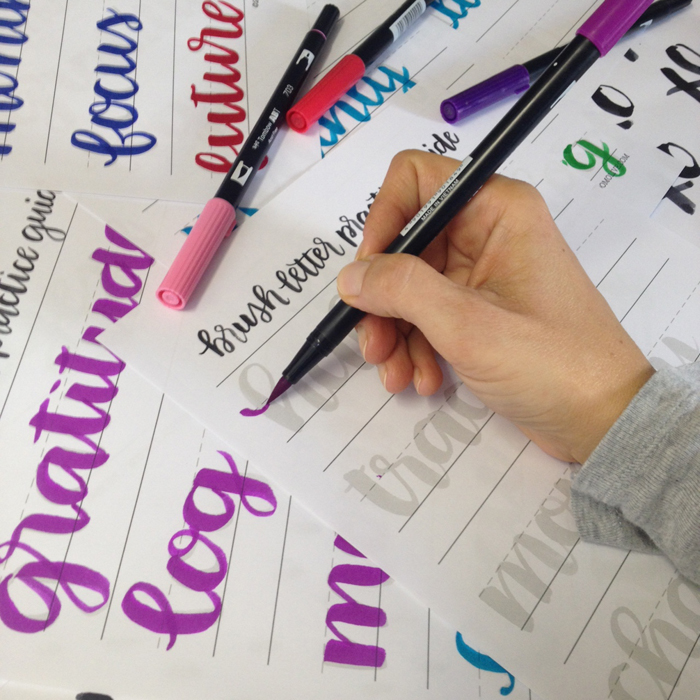
I decided to use my Tombow Dual Brush pens in order to practice my hand lettering. I know Olivia uses paint brushes and paint (and I love it!), but I think they are not that practical for a bullet journal, so I prefer using my Tombow markers instead.
The trick is to hold the marker in a 45 degree angle. I also hold it quite far up - that helps with the thick downward strokes.

If you like this, Olivia also has a Practice Guide for the days and months, which I think can be really usefull for your dailies and monthlies. You can make them look pretty and colourful in no time ;)
Lastly, if one of your goals is to better your brush lettering and hand lettering, then maybe you should check the Comprehensive Brush Letter Practic Guide out. It promises to turn you into a pro in 45 days! Olivia even gives you a schedule to stay on track. Perfect!
Download your FREE Brush Letter Practice Guide:
JOIN THE GANG!
Subscribe now to my Newsletter to download the FREE Printable.
Plus get access to the Resources Library!
Brush Lettering Practice Guide
This practice guide has everything you need to practice and improve your brush lettering skills. In formats both for printing and for your iPad.
What do you think of brush lettering? Have you tried practicing it?


Goal Setting Program - 10-Step Formula to Achieve your Goals

I'm on a mission to achieve as many goals as I can before 2016 (take a look at my post '17 before 2017') and I'm already planning ahead for 2017 (with 'Your Best Year 2017' by Lisa Jacobs). Therefore, I'm always looking for ways, formulas and techiniques that will bring me closer to my dreams. While I was reading Edwene Gaines' book 'The Four Spiritual Laws of Prosperity', I came across her 10-step formula for successful achievement, that I'd like to share with you today.

Those 10 Steps are as follows:
- In a notebook dedicated to your goal setting programme, write down all of your desires, no matter how large or small.
- Choose your most important desires and list them in order of importance to you. Be very specific.
- Consider what changes you might need to make in order to achieve your goals.
- Choose the date by which you desire to achieve each goal.
- Read your list of goals at least three times every morning and every night.
- Imagine yourself achieving each goal.
- Act as if you have already achieved your goals. Believe that you receive.
- Don't tell others. Keep your goals private.
- Cross off the goals as they are achieved and continue to add new ones.
- Remember, the Universe's highest law is LOVE.
I had some issues with #8 of the list. For me it's important to share your goals and dreams with your family, friends and the people you love. But that's exactly what Edwene Gaines means. She mentions that you can share your goals with people that you can trust and who are going to encourage and support you. But you should not tell the people that might judge you, discourage you and make you doubt yourself.
'Desire is the onward impulse of the ever evolving soul.'
Charles Fillmore
Even though I've heard or read all of the above at some point in my life, putting everything in a list with strategic steps makes it easier for me to take action. And even though I've been writing my goals and I tried to visualise them from time to time, I've just left it at that and expected things to just happen! Well not any more! Now I'm planning for the future taking conscious and deliberate steps towards my goals.
What is your winning formula for achieving your goals? Have you tried any of the above?


Bullet Journal: My November Set Up
I know I've been saying the same thing every month, but seriously it feels like October just flew by! Maybe it's because October was a very exciting month for me (both personally and professionally). But also, as we're getting closer to Christmas (can you believe that it's only 54 days till Xmas??), the days get busier and time just seems to fly.
I know I've been saying the same thing every month, but seriously it feels like October just flew by! Maybe it's because October was a very exciting month for me (both personally and professionally). But also, as we're getting closer to Christmas (can you believe that it's only 54 days till Xmas??), the days get busier and time just seems to fly.
I've (FINALLY!) made my first YouTube video, and I'm really excited about that. I'm still learning about editing and all that new and interesting stuff! I hope you like the video and you'll give it a thumbs up :)
PS: I don't know why, but in the video I sound like a robot. I swear I speak normally in real life!
As always, at the end of the month I prepare my montly set up in my bullet journal. I did some changes this month, that hopefully will help me stay more focused in order to achieve my goals.

The first change was in the month at a glance spread. I didn't find the previous spread practical, so I changed it to this one. My issue with the one I used in October was that there was not enough space to add more that one things per day. It seems that I enjoy this month's spread more already. I think my brain functions better in squares :)

I've changed my monthly focus spread too. This time I'm very specific in the tasks I want to tackle and more organised in the actions I need to take for each one. I've narrowed it down to 10 goals for November, and I've writen next to each one what needs to be done.

The next page I've separated it into 4 rows, one for each week of November. These will act as a funnel, so that I can allocate the steps and tasks for each goal to one of the 4 weeks. That way, when I'm doing my weekly spread, I can visit this page and see exactly what I need to do in the next 7 days.

The only thing that's stayed the same this month is my gratitude log that I continue to add in every monthly spread.
So, this is how my November Set Up looks up until now in my bullet journal. Have you done yours yet? Did you make any changes this month?


PS: Let me know what other videos you'd like me to make next :)


