

How to use Acrylic Paint in your Bullet Journal
I love using colour in my bullet journal. Colourful pages makes me happy, put a smile on my face and funny enough help me focus more on the tasks I need to complete during the day. (weird, I know, but totally true!)
My regular tools that I like to use with my bujo, are my Pelikan coloured pencils and my Tombow markers. (Click here to see the list of all my favourite resources) However, I recently purchased a box of acrylic paint and I wanted to experiment with them in my bullet journal.
I love using colour in my bullet journal. Colourful pages make me happy, put a smile on my face and funny enough help me focus more on the tasks I need to complete during the day. (weird, I know, but totally true!)
My regular tools that I like to use with my bujo, are my Pelikan coloured pencils and my Tombow markers. (Click here to see the list of all my favourite resources) However, I recently purchased a box of acrylic paints and I wanted to experiment with them in my bullet journal.
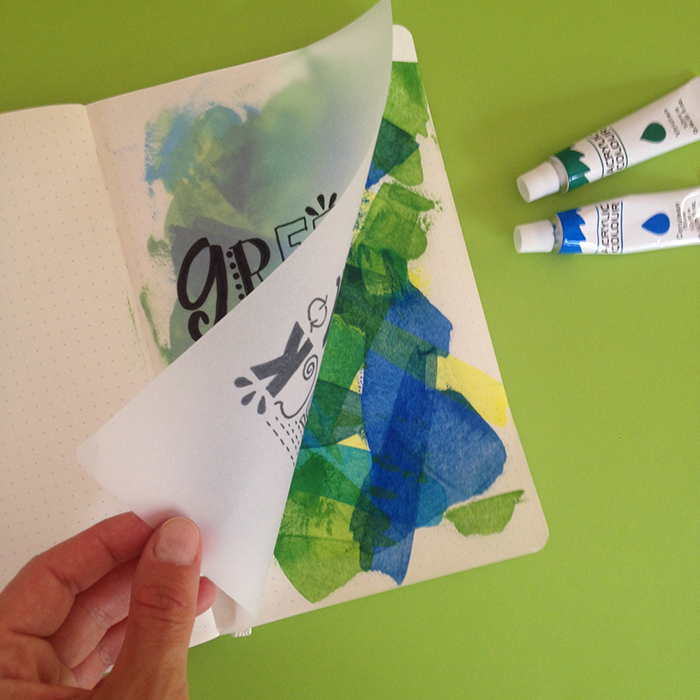
Acrylic paint generally is a difficult medium to use, especially in journals with thin pages, without getting them ruined. Usually, the pages get wrinkled and damaged and the end result is not as neat and pretty.
After doing some research online, I found that the solution to this is to place as less paint as possible on the page. And in order to achieve that, all you have to do is to use a plastic card. (* light bulb moment! *)
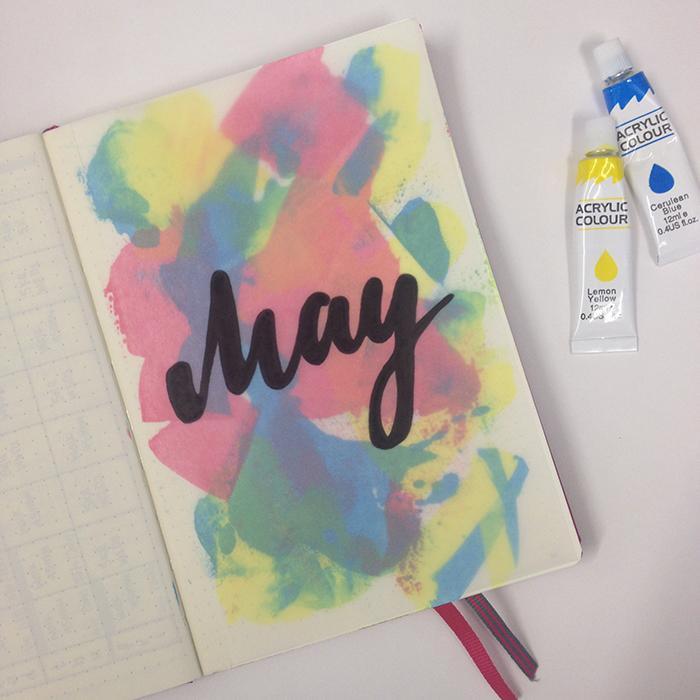
So, I started playing around and I’m in love with the result! I used this technique to create the front page of my May Set Up in my bullet journal.
How to create an abstract background with acrylic paints in your journal:
Before you start:
Choose the colours you want to use. Keep in mind that when a colour goes over the other, they will naturally create another shade. So, I’d advice to not use more than 3-4 colours.
Start with the lightest colour first. It’s easier to cover it, if you choose to change things around. A darker colour is usually more difficult to make changes on.
Don’t think about it. Just start creating and you’ll be amazed at what you’ll create ;)
What you’ll need:
Your journal, your acrylic paints and a plastic card.
How to do it step by step:

- Take your card and add a small amount of acrylic paint.

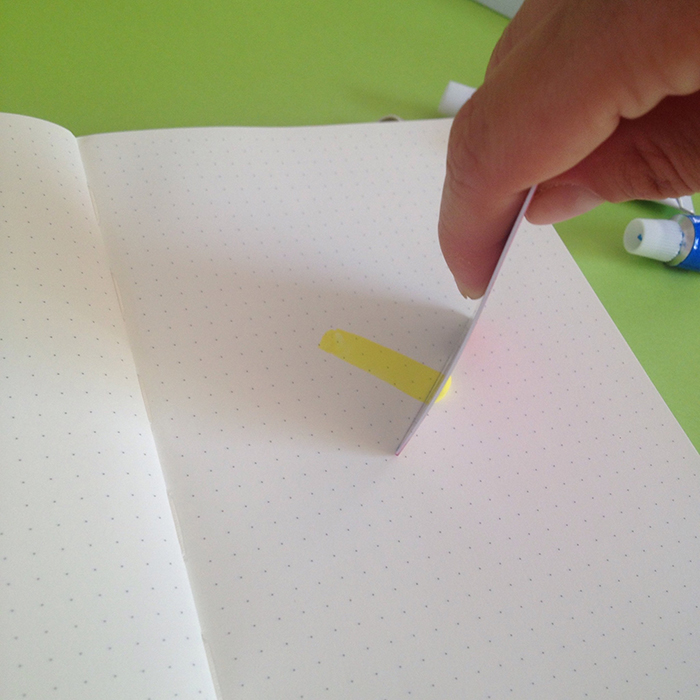
- Hold your card vertically on the page and drag along towards you.
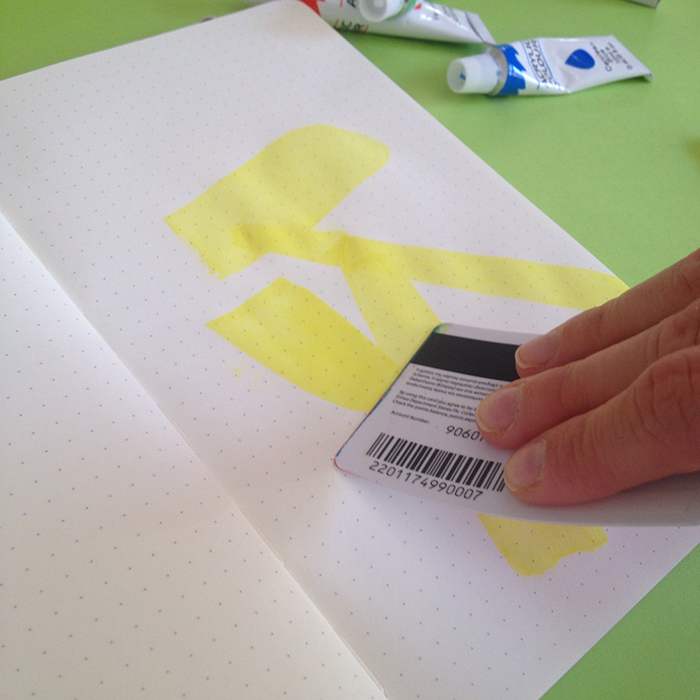
- Change the angle of the card to change the amount of paint you add on the page. The more upright and vertical you hold the card, the less paint you’ll get on the page. The more you tilt the card, the more the paint you’ll get.
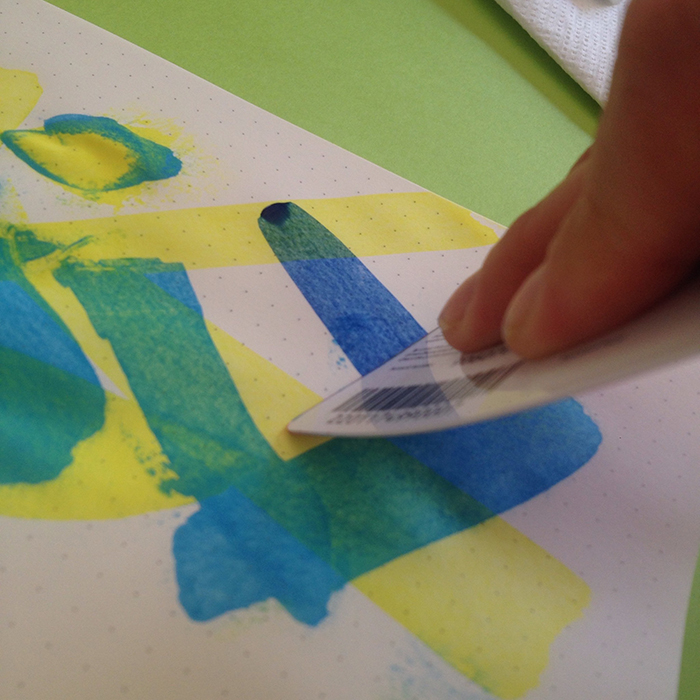
- Once you’ve finished with one colour, clean the edge of the card with some paper and add then next colour.

- Continue until you’re satisfied with the result.
- Give it 5-10 minutes to dry. Pat it with your fingers carefully to check.
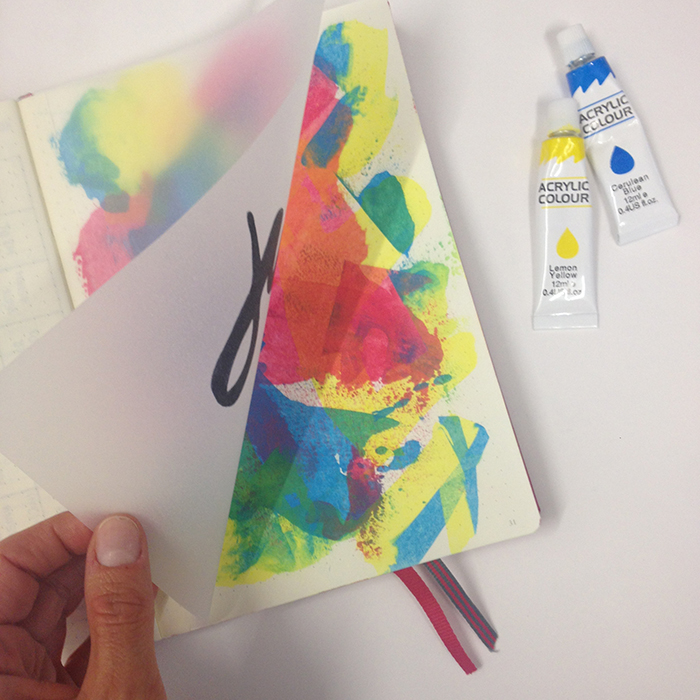
To add the tracing paper overlay:
You’ll need some tracing paper, double sided sticky tape and a marker.

- Measure the dimensions of your page and cut the tracing paper accordingly. I personally prefer the tracing paper to be a bit smaller than the actual page, so I made it approx. 2mm smaller on each side.
- Check that everything is correct and you’re happy with the dimensions of the page.

- Since it’s a tracing paper, you can copy anything you want on it. Go online, and find doodles, quotes or anything else you want to add to it. Print it and copy it on your tracing paper. (For this page, I copied a design by Kathy R. Jeffords). Of course, you can also be creative and make one of your own designs :)
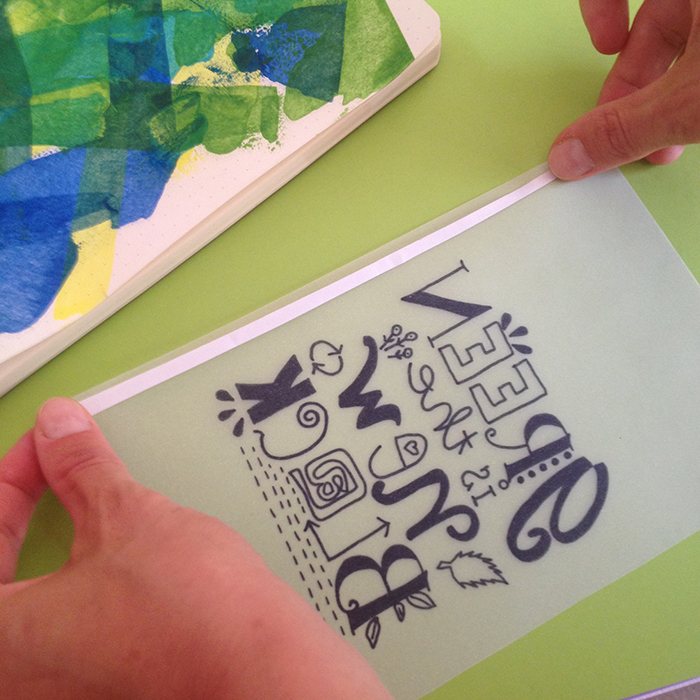
- Once you’re happy with the page, turn it around and add the double sticky tape on the edge. (be careful to do it on the right edge! - believe me I’ve been there and done this mistake myself!)
- Hold the page from both ends and stick it as close to the inside of the journal as possible, making sure it sticks properly with no bumps.
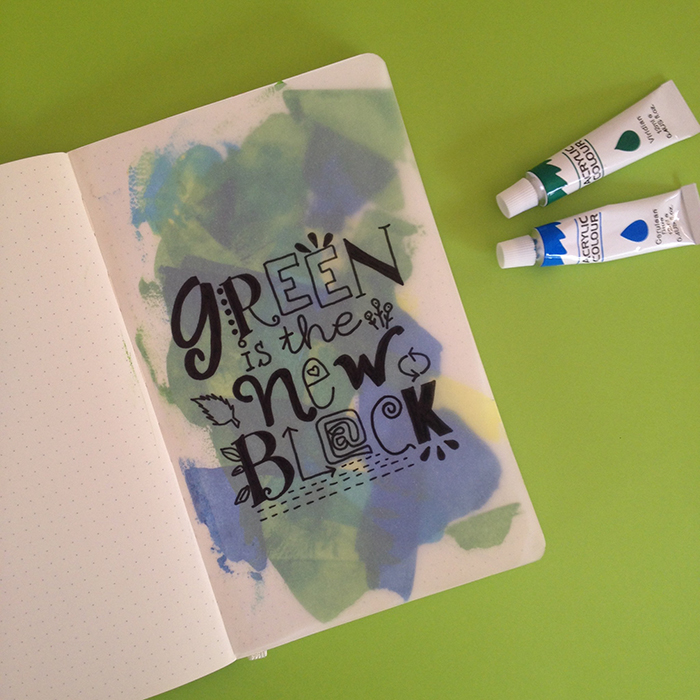
- Sit back and admire your creation!
If you try this technique in your journal, make sure to share with me your creations ;)
Have fun!
Christina x
I was thinking of creating Colouring Secrets: an e-course that will cover tips and techniques on how to colour using coloured pencils, markers and watercolours.
If you'd be interested in a fun and affordable ($20) e-course on colouring, enter your info below and I'll notify you when it launches!
COLOURING SECRETS E-COURSE
If this is a product you'd be interested in buying, enter your email below and I'll notify you when it launches!

Bullet Journal: My May Set Up
I know I'm pretty late with my May Set Up, but the last few days have been crazy busy!! To tell you the truth I was contemplating whether to actually write this post or not. As you'll see, my May set up is very VERY minimum! I didn't know if it was worth it. But I wanted to continue doing the monthly set up series as I normally do, and to be honest, even though there's not much to share with you, I still believe that they are very functional pages and you could still get something out of this ;)

I know I'm pretty late with my May Set Up, but the last few days have been crazy busy!! To tell you the truth, I was contemplating whether to actually write this post or not. As you'll see, my May set up is very VERY minimum! I didn't know if it was worth it. But I wanted to continue doing the monthly set up series as I normally do, and to be honest, even though there's not much to share with you, I still believe that they are very functional pages and you could still get something out of this ;)
So, my very first spread for May is the front page of the month. I usually do my little doodle with the penguin, but this time I wanted to experiment with something new and different. And this is the result:

I used some tracing paper for the front part, where I wrote 'May' for the month. And I used double sided sticky tape to attach it to the page. For the background, I used various colours of acrylic paint as I mentioned before, and I used a technique to layer the colour very thinly so that it doesn't damage the page. If you'd like me to create a tutorial for this technique, let me know in the comments below.

The next spread is my monthly spread for May. I decided to change things around a bit and this is the end result.
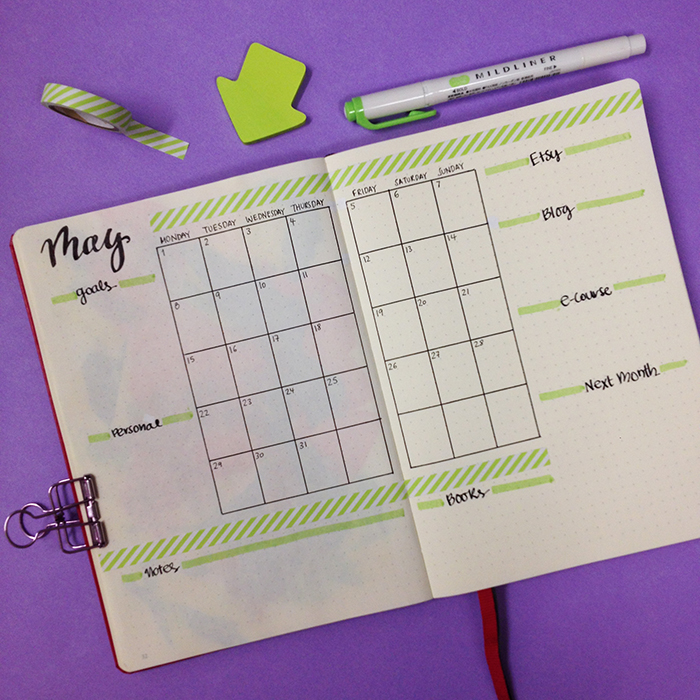
I added a smaller version of the month at a glance layout in the middle and lots of different categories around it. This way I have everything I need in one page and that really makes me focus and plan my month ahead. For this layout, I was inspired by @amanda_plans_ on Instagram.
I decided to not include any of my usual spreads this month. I've been so busy the last weeks that I never got around to even look at these spreads and fill them in during April. So this time, I decided to leave them out completely - just for May.
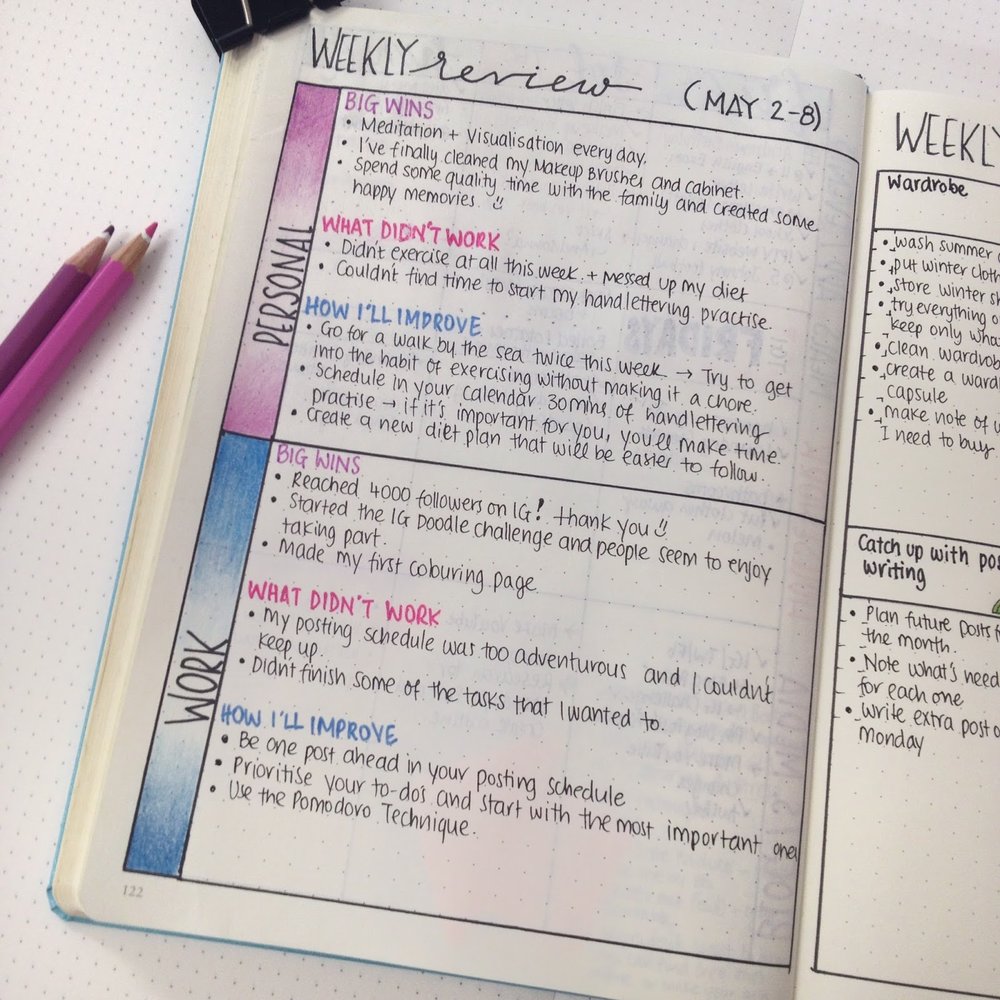
The only other spread I've created after that, is my weekly spread for the first week of May.

Believe it or not, it's the first time I'm using washi tape in my bullet journal! (shocking!!! I know!!!). I usually like to draw and doodle around, but this time I wanted to try something else. I got inspired for this layout by @bulletbyjulia on Instagram and for the little pictures idea by @studywithinspo.

I tend to prefer a vertical to a horizontal layout for my weeklies, and this turned out perfect for me. I might make some changes next week and add a bit more colour, but generally this is a very functional layout. :)
So, there you have it. My very minimal but still very functional and fun May Set Up in my bullet journal. What changes have you made this month?


How I've set up my 3rd Bullet Journal
I've finally moved to my 3rd Bullet Journal! Yay! My last one coincidently happened to fill up completely as April was coming to an end, so I managed to start a brand new bujo at the beginning of May! If you want to see how I set up my 2nd bullet journal, you can follow this link. For my 3rd bujo I decided to go for a berry A5 dotted Leuchtturm1917 and seriously I'm in love. This colour is amazing!
In today's post I'll share with you how I've set up my new bullet journal, what changes I've made and which spreads I've decided to transfer from my previous one. So, make yourself some coffee (or tea) and sit comfortably cause it's going to be a looooong post!
I've finally moved to my 3rd Bullet Journal! Yay! My last one coincidently happened to fill up completely as April was coming to an end, so I managed to start a brand new bujo at the beginning of May! If you want to see how I set up my 2nd bullet journal, you can follow this link. For my 3rd bujo I decided to go for a berry A5 dotted Leuchtturm1917 and seriously I'm in love. This colour is amazing!
In today's post I'll share with you how I've set up my new bullet journal, what changes I've made and which spreads I've decided to transfer from my previous one. So, make yourself some coffee (or tea) and sit comfortably, because it's going to be a looooong post!

I decided to continue using the Leuchtturm1917 notebooks, which are very good for bullet journaling. I love that they come in so many different colours and the plan is to choose a different colour each time I move bullet journals.

The first thing you see as you open the notebook is a spread with the words 'Live. Love. Sparkle. Ignite.' I love that these 4 words combine exactly how I want to live my life, so I wanted to add them in my new notebook.

On the opposite page, I played a bit with watercolours and some lines, and I created this diamond shape with a colourful background. There's no deep meaning behind this. I just got a bit creative and I love the result.
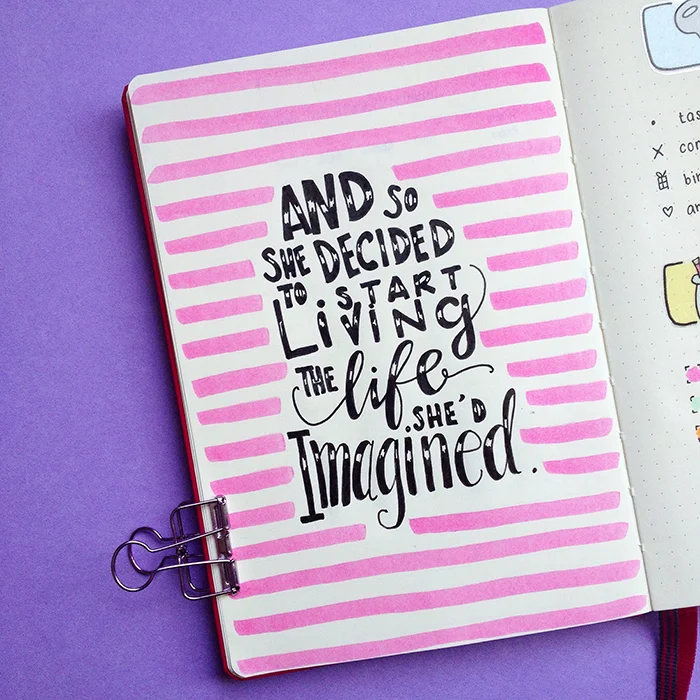
The first page after the Index, is this quote I wanted to include in the beginning of my journal. It says: 'And so she decided to start living the life she'd imagined'. The last 2-3 years I've taken control of my life and I try to live each day doing the things I love and trying to live as I've always wanted to, so that's why I like this quote, to remind me. I also find that quote pages can be very handy when you have single page spreads and you don't know what to add to the other page!

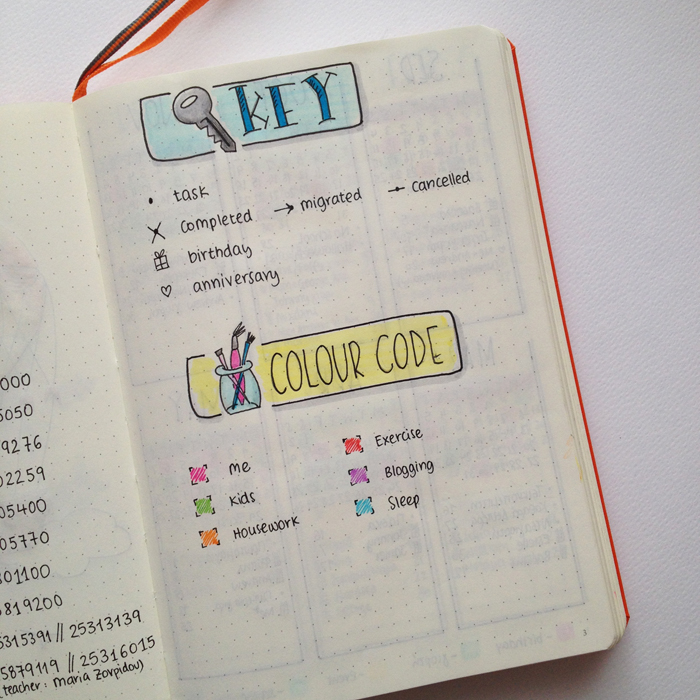
Moving forward, the next page has the Key and the Colour Code for the whole journal. These are the colours I've been using all the time and they make my dailies so much more organised. I managed to finish this page super quick, since I used these stickers from my Etsy Shop. 😘

I totally changed the layout for my yearly log of Birthdays and Holidays. I chose this circle design that I've seen a lot on Instagram and added lots of colour. I have to say that I really like how it turned out and I really enjoy trying new things and spreads.
I've created a FREE Printable of this Birthday and Holiday spread, both in black + white and coloured for you.
JOIN THE GANG!
Subscribe now to my Newsletter to download the FREE Printable.
Plus get access to the Resources Library!

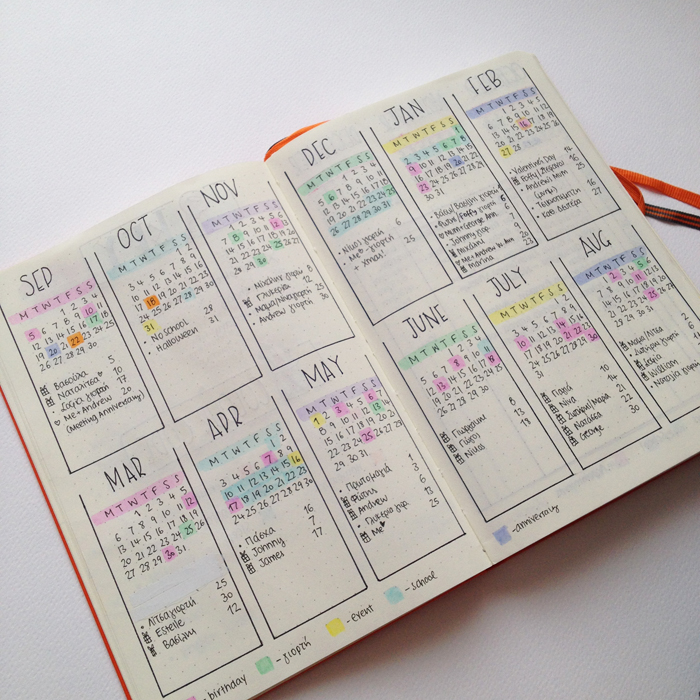
I've also changed my Future Log layout as well. I like how colourful it is and so far it works pretty good for me. I've only added the next 8 months, since each bullet journal usually lasts me 6 months or so. Plus, I don't really plan that much ahead, and even if something comes up, I'll use the post it technique.

The next spread is my Annual Overview Planner. (You can find a printable of this as well in the Resources Library). This is where I plan all my projects and various tasks during the year. It helps me to see at a glance what I have to do each month. I like to write on this spread with a pencil, because I keep on changing my mind, or I like to move things/projects around! I usually try to add 1-2 big tasks/projects each month, and so far, this year has been one of the most productive EVER! Give this a try, I assure you you'll see results! 😉
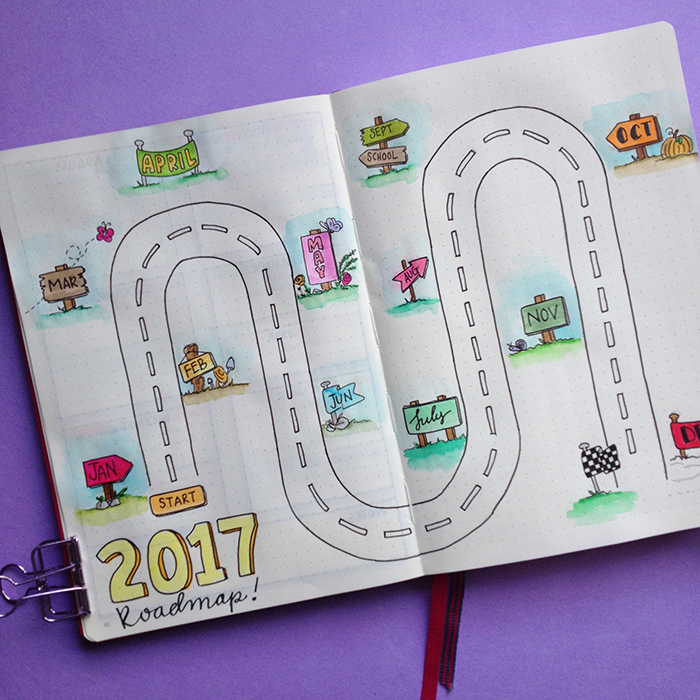
The next spread is really cool and I had so much fun creating it. It was inspired by the lovely @helloiamprince. It's a 2017 Roadmap. Basically the road represents the whole year, and each flag is one of the months. You use this spread to write down the best memories, events, successes and generally anything you want to remember from each month. I really really like it, and I love that I can see straight away what I've achieved each month!

Moving forward, I have my Reading Challenge List. I basically have made a challenge for myself over on Goodreads, to read 77 books this year. And on this page I write the title when I finish a book. I am a bit behind on that, not because I didn't have time to read, but because I couldn't find anything nice to read!!! However, right now I'm reading King's Cage and I love it!!!!

The next two pages have to do with books as well. The first one is all the new publications that I want to read each month. I like to keep track on that and it's also an easy way to find books to read. The second page is a list with past publications and books that I want to remember to read at some point. I haven't finish updating them yet, but May is looking pretty good!!! 😉
The next few spreads have to do with shopping and menu planning. I like to keep all these spreads together, because it makes my life sooooo much easier when I menu plan for the week and I make my shopping list!
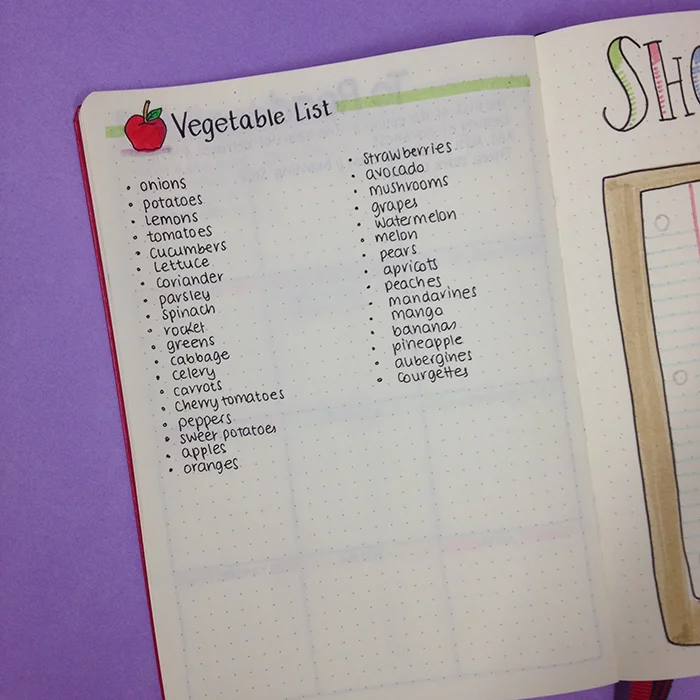
The first page is my Vegetable Shopping List. A simple list to remind me of the fruit and the veg I usually buy.
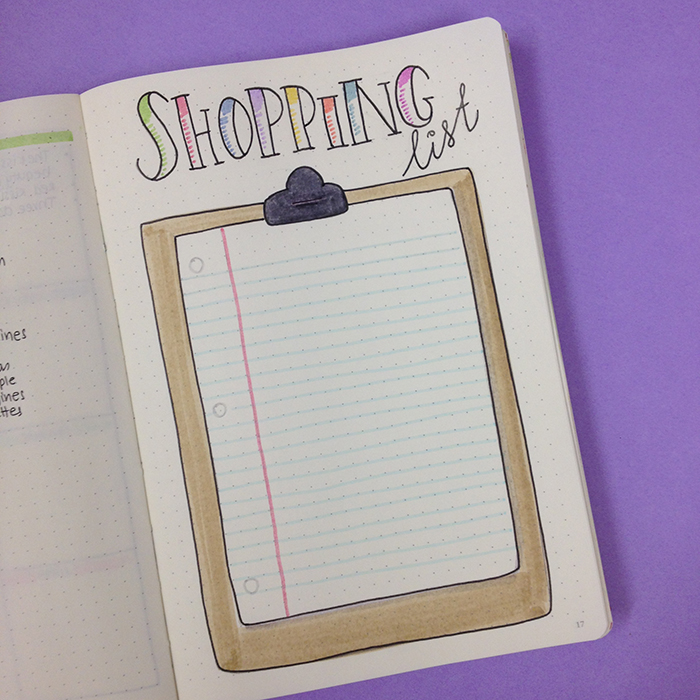
The other page is something that I saw Sarah Churchill do in her bullet journal and I thought it was such a great idea, that I had to recreate in my new bujo! It's basically a page for your Shopping List(s). I've drawn a notepad and on top of it you place your post it note(s) for your shopping list(s). Once the list is done and you're ready to go shopping, you simply take the post it with you! Genius!!!

After that, I added my Menu Planning. (I made a mistake there, cause I wanted to add my Supermarket List first, but what can you do???). I've used exactly the same layout as before, because I like how it looks and it's very functional.

Next comes my Supermarket List, which is by far one of the most used list in my bullet journals! This is the list I check to see if I have these things in my pantry/fridge/house when I am making my shopping list each week. No major changes here either, apart from the header.
The next few spreads are the ones that I've talked about in my Diet Loss Plan in my Bullet Journal II, so you can head over there to check them out.
So, this is the way I've set up my new bullet journal and I am very pleased with the result. One of the things I like about bullet journaling, as I've said before, is that you can change things around. So, I'm actually enjoying this whole process! If you want to learn more about how to transition to your next bullet journal, check out this post.
How many bullet journals have you used so far? Which are the spreads/pages/layouts you always transfer to the new journal?


Diet Loss Plan in my Bullet Journal II
I have a confession to make: I haven't exercised for over a month and I've been binge eating constantly for the past two months. Naughty-naughty! I can definitely see the kilos piling up, and I felt AWFUL the other day when I tried my favourite pair of jeans on and realised that it felt quite very tight at the waist (and other places I don't want to think about!)!

I have a confession to make: I haven't exercised for over a month and I've been binge eating constantly for the past two months. Naughty-naughty! I can definitely see the kilos piling up, and I felt AWFUL the other day when I tried my favourite pair of jeans on and realised that it felt quite very tight at the waist (and other places I don't want to think about!)!
For some weird reason for the past two months or so, I've been trying to go on a diet and have been failing miserably!!! I start my day pretty good and when the afternoon comes I have these cravings for sweet things that I just give in to and then, since I've already spoiled the diet, I continue eating! And the same continues the next day!
But, I've had enough! Since the summer time is approaching really quickly here in Cyprus, and at one point I will have to wear my bikini (only the thought of that now gives me shivers!!) I knew I had to do something to take control of my eating habits and my workout schedule.
So, I opened up my Bullet Journal and started creating a diet plan for the next 8 weeks that will help me get back on track and lose all the extra kilos I've put on in time for the summer.

The first thing I did was to create a page where I track my progress. I find that seeing the results makes me try even harder, so it was really important for me to create this type of spread. Here I track my measurements in a table I created for the next 8 weeks. I also created a graph to track my weight loss progress. I can't wait to see the line go down!

On the next page, I created a general and simple Diet Plan. I want everything to be easy and simple so that I don't get discouraged with measuring quantities or complicated food. So, I have the general principles I've set for myself, and the foods I should stay away from in order to stick to the plan. I also created a list for each one of the meal categories, so that I can refer to this page each time I am meal planning or want to eat something and I need some ideas. There is not a big variety and that is on purpose. I want to give myself enough options so that I don't get bored of the same foods, but limit them so that my actions become automatic.

Lastly, I know that in order to succeed I have to get back to my workout plan. I want to start exercising 5 times per week (Monday to Friday) and I know I can do that if I put my mind to it. So, I created a very specific workout plan for the next 8 weeks in order to know exactly what I have to do each day. I might add some weights or other exercises as I go along, but this is the basic plan that I should follow.
I've also created some weight loss stickers to add to my bullet journal when I keep track of things or plan my week.

I also thought that it would help to talk about it online, in order to make myself accountable and give me that extra push that I might need. 😉 So, I'm starting on the 17th of April and I'll be finishing on the 12th of June.
How do you keep yourself motivated when you are on a diet? What spreads do you create in your bullet journal to help you along your journey?


** I'm not a dietician and this diet plan and workout schedule is created for my personal needs. You should consult your doctor before you start any type of diet plan.

Bullet Journal: My April Set Up
March is almost finished and that means that I'm ready to share my April set up in my bullet journal with you. Pretty busy month ahead, with lots of things to do, a few birthdays plus the Easter holidays, which means that the kids will be off school for almost half of the month!!!! 😐
So, I have to make sure to do most of my projects before then and arrange for things to do while the kids are at home. Also I have to plan what to do for Easter! I'm sure that my lovely bujo will be there to help me focus and organise things in advance. 😉
Here are the pages/spreads I've created for the month of April:
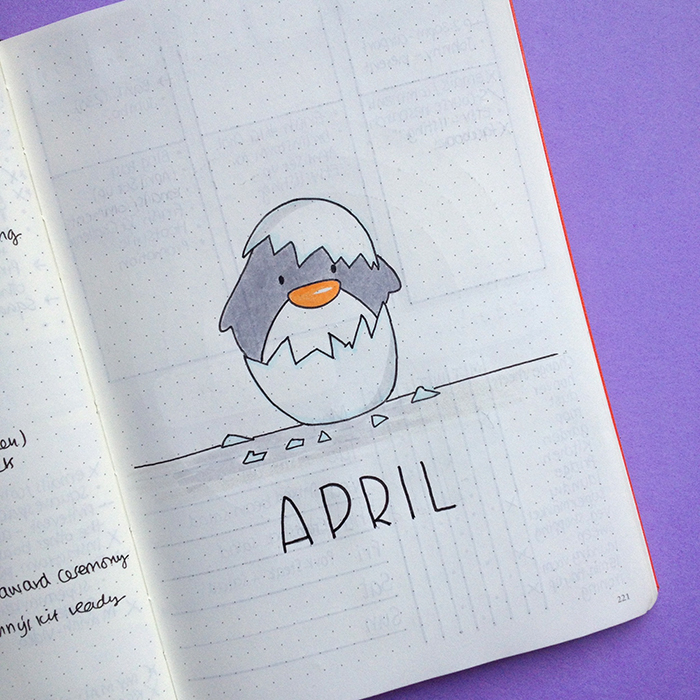
My little penguin decorates the first page of the month yet again! I thought it was a fun way to start the month.
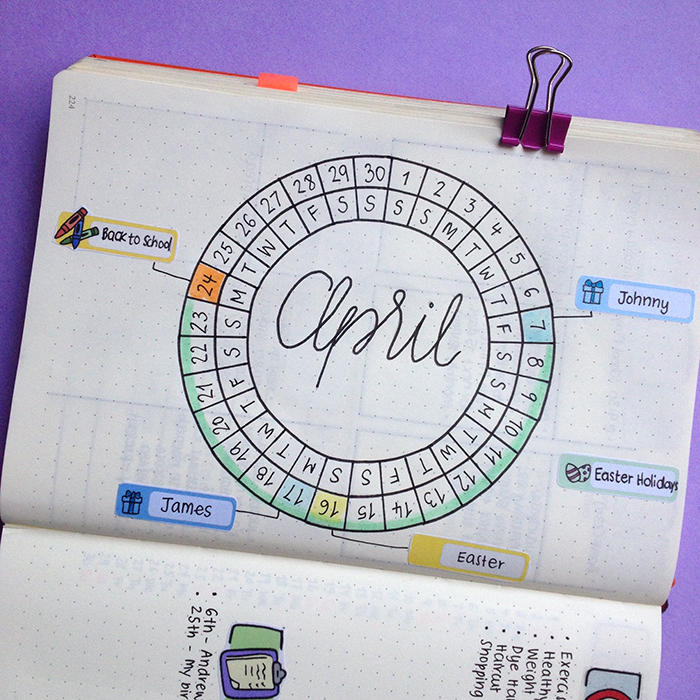
I decided to try this month at a glance layout that I've seen a lot of people using on Instagram. If I'm not mistaken the calendar wheel was created by Dee from @decadethirty and I've always wanted to give it a try. So far I love it! Such a fun way to see what you've got for the month ahead. I decided to use my stickers to add more colour and to colour code as well the different events.

The next page is my monthly focus, where I write all the main things I want to do this month. Plus a section for the next month where I basically brain dump everything I want to remember to do in May. By the end of the month this page is usually filled up!
(stickers used: Bullet Journal Title Stickers)

Moving on, the next page has my habit tracker. I have to say that habit trackers have grown on me, and even though I wasn't sure about them in the beginning, now I really like to draw the little boxes. It also feels good to see how you've done at the end of the month!
(sticker used: Bullet Journal Title Stickers)

As always I have a page for my gratitude log, which I like to fill in each month.
(sticker used: Bullet Journal Title Stickers)

Lastly I wanted to create a page with all the Easter activities I wanted to do with the kids during the holidays. I really like how it turned out and I think that little penguin is very cute!
So, I'm ready for the month ahead and I'm sure I'll managed to focus on my projects and finish all my tasks with the help of my trusty bullet journal. It's also the last month in my orange Leuchtturm1917. I've already started setting up my 3rd bujo. The new one is a berry Leuchtturm1917, and I can't wait to start writing in it! Don't you get excited when you start a new journal?

7 Things I Learned in my First Year of Bullet Journaling
As I've mentioned already in a previous post, in the beginning of March I had my 1 year anniversary since I started bullet journaling. Oh my! Time really flies by! I can't believe it's been one year already! I still remember the excitement of receiving my very first bullet journal and creating my first pages in it. This has been an incredible year for me full of colour, creativity and new opportunities! I'm grateful for this amazing system and for being a member of the best online community! :)
Today, I'll share with you 7 things about bullet journaling that I learned during the past year.
#1
DON'T BE AFRAID TO TRY NEW THINGS
One of the things about bullet journaling that I love, is that it’s flexible and that you can adjust and change it the way you want. You can try one thing this week and if it doesn't work for you, you can change it and try something else! So, don't be afraid to try something new.
#2
MAKE IT YOUR OWN
Get inspired and copy the spreads / pages that you like. But make sure that you personalise them and that you change them around to meet your needs.

You can personalise your pages in any way you want. You can use cursive writing, stickers, washi tape, doodles or you can just keep it simple and minimal. That is the beauty of this system: you can create the planner you want and change it around whenever you want!
After you’ve used your bullet journal for a while, you’ll be able to see what works and what doesn’t, and from there you'll be able to add or subtract things from your journal accordingly.
#3
INDEX IS YOUR NEW BEST FRIEND
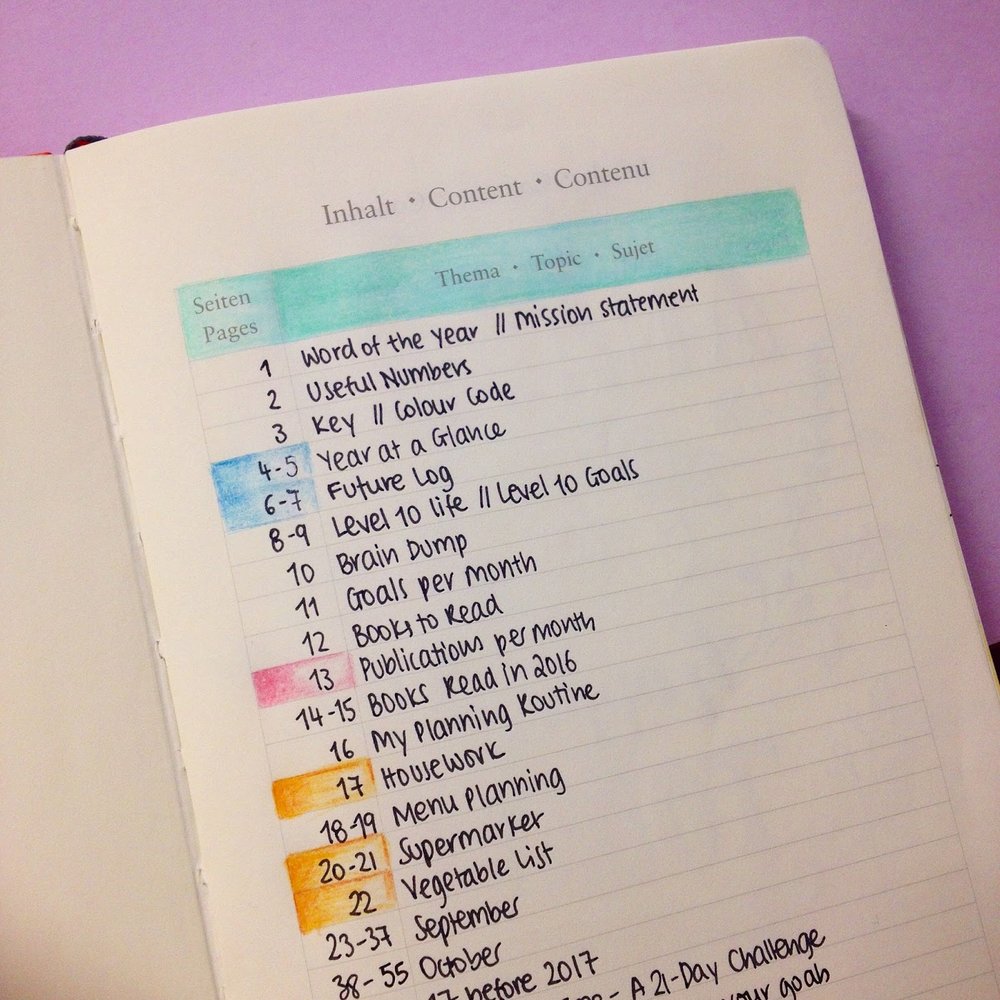
The Index page is the core of your Bullet Journal. It's where you archive all your entries so that you can easily find them when needed. However, not many people talk about the Index page and I know a lot of people neglect to fill in the entries as they create their spreads in their notebook.
Take advantage of the Index in your bullet journal. Fill it in as you go along, and make it even more functional with these Index hacks.
#4
CREATE ONLY THE COLLECTIONS / SPREADS THAT YOU NEED
When you fist start bullet journaling it's natural be overwhelmed with the amount of inspiration and creativity that you see online. And that can make you want to add everything you see on
Instagram or Pinterest in your own bullet journal. Believe me, I know how it feels... I've been there!
However, you don't have to spend all your time creating pages that then you forget all about and eventually don't use again. You want to create collections that will help you and that are relevant to you, your lifestyle and your needs.

I have created this list with 150 different Collections / Spreads you can create in your journal. Go through it, mark the ones that you think are the most interesting / useful to you, and then start creating them in your bullet journal.
JOIN THE GANG!
Subscribe now to my Newsletter to download the FREE Printable.
Plus get access to the Resources Library!
Try to choose simple layouts for the type of spreads you’ve chosen to create, that you can easily recreate or that you can adjust to your needs.
#5
CREATIVE OUTLET
With a willingness to learn and desire to start, you can be creative. You can use your bullet journal to express your creativity, even if you think that you're just not good enough. There is no one there judging you or criticising you and your work. It's just you and your notebook.
Look around you, get inspired and just do it!
#6
ACHIEVE YOUR GOALS
Since I started using my bullet journal to write down my goals and the steps I need to take towards them, I've noticed that I am way more productive and that I actually started seeing results! I'm more focused and I am actually working towards achieving my goals. So, your bullet journal can be more than a simple planner - it can be your way to plan your future, organise your strategies and document your results!
#7
IT'S OK TO HAVE A BREAK
You shouldn't feel bad if you want to stop bullet journaling for some time. It happens to everybody! There have been days that I didn't want to plan anything or to create any pages in my bullet journal. And that's fine. Don't push yourself to do something you don't want to. Take a break if you need to and come back to bullet journaling when the time is right for you :)
So, there you have it. My 7 lessons I've learned during the first year. How long have you been bullet journaling? What is one thing you've learned that you'd like to share?

How to Colour Code your Bullet Journal
Colour coding is one of the best ways to further organise your bullet journal and have a clear view of the different categories/topics you create in it. It was one of the first things I incorporated in my planner and it has made a huge difference in my planning and my productivity!
Today I'll share with you how and where to use your colour coding system in your bullet journal.
Create your own Colour Coding System:
Decide which categories you'd like to colour code in your planner. To make things easy, take a look back at your previous to do lists, and then you'll notice that some of the categories keep on coming up again and again. So, these are the ones that you need to include in your colour coding system. Try to make them as general as possible, so that you can keep things simple. I'd say that 6-7 categories are more than enough. Any more could make things a bit complicated and confusing at times, and we don't want that!
Once you've chosen your categories, then you can allocate a colour to each one. Choose colours that are not too bold, but that they are still quite bright to stand out from your notes. Also choose colours that are a bit different from each other. For example, we don't want to have two different shades of pink that can get mixed up.
Add your colour coding system in one of the first pages in your planner, so that you can refer to it any time you want to use it. I like to add mine in the first page, under my key.
You can also create a flip out guide that can help you remember what colour is allocated to what category, without having to go back and forth the pages each time you need it.

Where and how to use your Colour Coding system in your planner:
There are lots of places where you can use your colour coding system in your planner. You don't have to use it in all of them. Try things out and decide which ones work for you.
1. Index

You can use your markers or highlighters to mark specific entries and spreads according to your colour coding system. This makes it easier to find things.
2. Year at a Glance Spread / Future Planning Spread
There is a printable version of this Year at a glance spread in my Etsy store.


Colour coding can be very helpful, especially when you do your future planning. Whether you use the Calendex or any other of the 6 different types of future planning in your bullet journal, you can still use your colour coding system with them. This way you can see straight away what you have to do and organise your days accordingly.
3. Monthly Spread
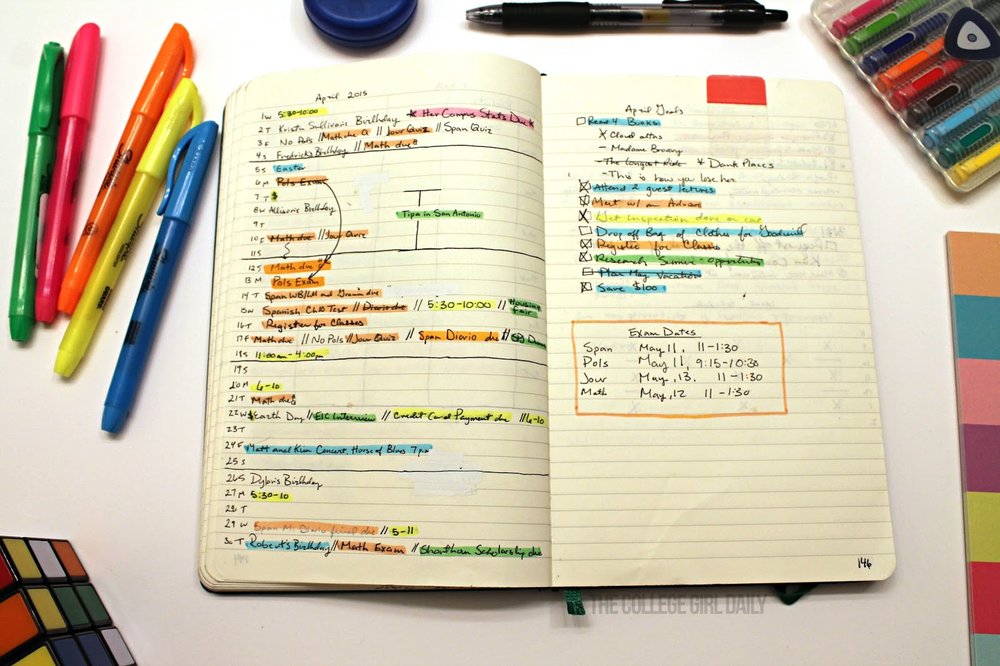
You can mark the days in your monthly log according to what's going on on each day. Alternatively, you can mark the entries you add on each day and colour them accordingly.
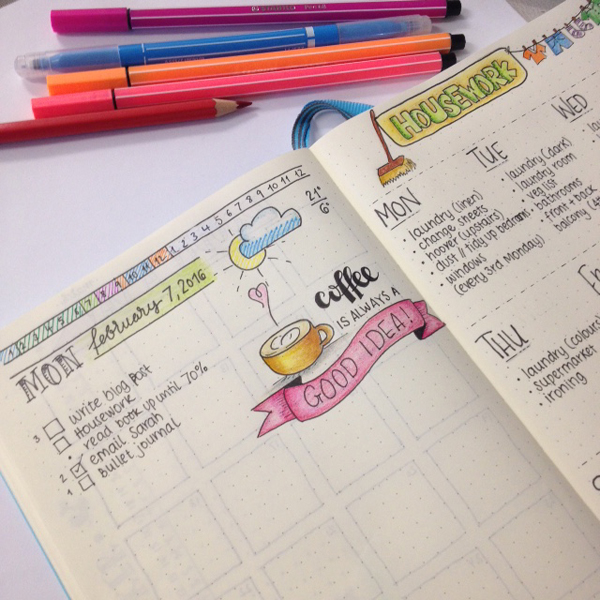
4. Weekly Spread

When you add all the things you need to do in your weekly spread you can use different coloured pens to write each task, according to your system, instead of using highlighters.

You can also block sections in your weekly planner to indicate different appointments, events or tasks. This works really well if you are a student and you want to mark your schedule for each subject.
5. Daily Spread

Use colour to categorise the different tasks you have during the day. That way you'll have an idea of what's in store for the day ahead. You can also work in batches, where you set a time frame to finish the tasks in one category at a time. This is actually a very productive way of getting things done!
6. Planning Routine
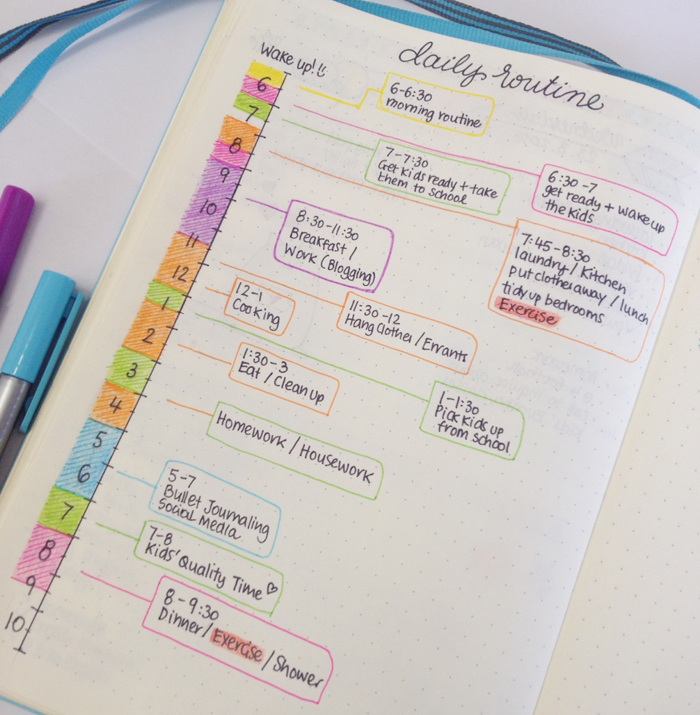
Plan your ideal day and use your colour coding system to highlight it accordingly. This is very helpful when you want to do some block scheduling or batching.
7. Time Tracker

Tracking the way you plan to spend your time during the day can be very helpful to see how much time you are allocating for each task. It helps you to have a very clear view of the day ahead and the tasks at hand.
8. Habit Tracker

You can even use your colour coding system in your habit tracker and see exactly how many times you're doing something or how may hours you spend on a specific task.
Colour Coding Trips & Tricks:

- Use your markers or coloured stickers to mark part of your pages according to the category that they belong. This creates a very easy flip through guide.
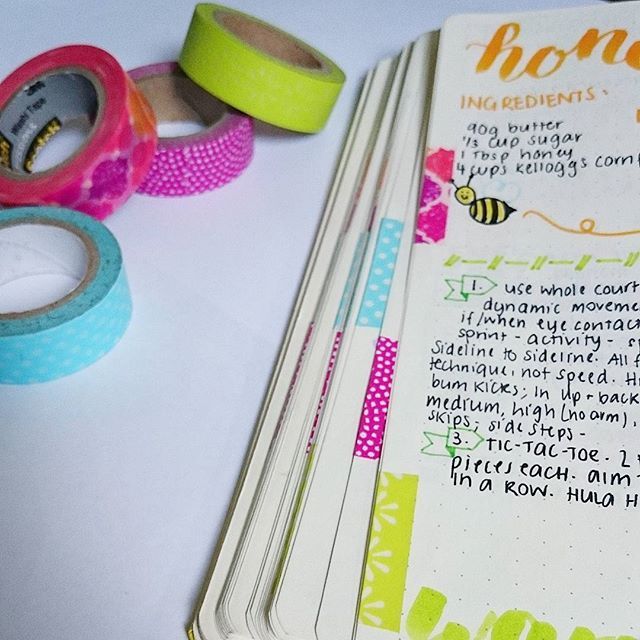
- You can also use washi tape instead of highlighters to mark the pages. You can do part of the page (like the example above), or you can add the washi tape all along the edge of your pages (see below).

Colour Coding Tools:
Markers:
By far, my most used markers for colour coding and for categorising my tasks are my pastel Tombow Dual Brush Markers. I use them every day and I love that they add the right amount of colour without bleed through.
Highlighters:
I love using the Pilot Frixion highlighters, because they are not too vibrant and they are erasable too. I have already placed an order for the Zebra Mildliners that I've seen lots of people using in their planners.
Pens:
You already know that the Staedtler Triplus Fineliners are my favourite pens to use in my planner and in my habit and time tracker. They add vibrant colour with no bleed through and I like the way they write as well.
Lately, I've been hearing a lot about the Paper Mate Ink Joy Gel pens as well, and I'd love to try them out.
Washi Tape:
You can find washi tape in all the colours, sizes and with any design you can think of. Personally, I find that the washi tape is the easiest and cutest way to colour code your planner, while at the same time you personalise it and you add some decoration in it.
Stickers:
Various coloured stickers in all shapes and sizes can help you in your planner. I personally like these pastel round ones for the flip through guide I mentioned above.
So, there you have it. Everything you need to know about how to colour code your bullet journal. Do you use a colour coding system for your planner?

Bullet Journal: My March Set Up
Happy March everybody!
Spring has definitely made it's appearance in Cyprus already and I'm really excited! March is also an important month for me, because on the 7th it'll be exactly 1 year since I've started bullet journaling! This has been an amazing year for me and I'm very grateful to have found this planning system. :)
The focus for March is to finish 1-2 projects I already have in the pipeline, and meet their deadlines. So, the layout for this month has been quite simple and I've only kept the important pages and layouts that work for me. This is how I've set up my bullet journal for March:

This is the first page of the new month. I love how the little penguin/Leprechaun turned out! It puts a smile on my face :)

I'm keeping the gratitude page. It really keeps me grounded and focused on the important things in my life. I decided to add a bit of colour and I'm really happy with the result! I was inspired by the amazing @heartistic.jess :)
I've created a FREE printable of the gratitude page just for you :)
JOIN THE GANG!
Subscribe now to my Newsletter to download the FREE Printable.
Plus get access to the Resources Library!

I'm changing up the monthly spread again. The one I did last month didn't work that well for me. So, I changed the layout and I'm focusing more on the tasks and the to-dos for the month.

Last month, I decided to include a habit tracker again in my set up, but to focus on the 5 most important things for me, only. And I'm glad to inform you that it did work. I managed to fill it in every single day, whilst I was forgetting to come back to that page all the other times I tried to use a habit tracker in it's own page.
It did keep me motivated (apart from the 'clean diet' category....!), so I'm using it again this month for the same 5 things. Hopefully, I'll manage to stick to my diet this month!
The last page of my set up is my Instagram #doodlewithus challenge page for March, which as you know currently is completely blank. If you'd like to follow along, you can get all the prompts and info here.
As you can see there's lots of colour this month, which always makes me happy! Have you set up your bullet journal for March? Do you do it in the beginning of the month, or do you prefer to pre-plan everything before the previous month is finished?