

Q & A - Your Questions Answered (part 2)
This is the second part of the Q&A series, where I'll be answering all the questions you've send me from my Newsletter. You can find part 1 with all the questions from Instagram here.
So, again get comfortable and let's get started!

This is the second part of the Q&A series, where I'll be answering all the questions you've send me from my Newsletter. You can find part 1 with all the questions from Instagram here.
So, again get comfortable and let's get started!
Mairead What do you think of Etsy so far for selling your products? I am creating stencils (from high quality acrylic) for bullet journalling and am not sure how to market them?
Openning my Etsy shop was one of the best decisions ever! I get to be creative, create a bit of income for myself and at the same time help people to organise and add colour in their bullet journal with my stickers and layouts. Etsy takes care of all the administration things and since all of my products are digital, it really runs on an autopilot - which is awesome for me! Also, there is such a big market out there and Etsy promotes my products on it's own, which is also a plus. However, I still have to market them myself as well, through my social media and my blog, to bring even more people to my shop. But all in all, Etsy makes it so easy to set up a shop and start selling. I'd highly recommend that you give it a go. And your product sounds perfect for Etsy as well.
I was thinking of creating a blog post where I'll share with you tips and advice on setting up your shop on Etsy and ways to promote your product. If that's something that would interest you, let me know in the comments below. :)

Visit my Etsy Store
BUT FRIST, CAN I GIVE YOU A 20% DISCOUNT COUPON?
Caitlin Hi, as you know, back to school season is coming up for many of us and I am thinking of setting up a school bullet journal. I would like to keep it separate from my home/personal bujo which means starting from scratch again. Do you have any tips or ideas of what pages I should include and also I really don't want to end up forgetting about my home bullet journal!! Thanks so much!!
As I've mentioned in the first part of the Q & A, I am planning to do a whole blog post on how to use your bullet journal for school. That post should be up very soon. I totally agree with having a bullet journal specifically for your school, and keeping your home bullet journal separate. The way to not neglect either one, is to use each one to organise and plan those two separate parts of your life, but to choose only one to have your daily spreads. So, your dailies should be combining the to-dos for both your personal and school life. You can use colour coding to separate them.

Some examples of pages you can add are: Future log, Semester Schedule (where you can colour code each class), Information Page (with details on each class/subject), Weekly Schedule, Project Planning etc. I promise I'll have the blog post really soon with lots of ideas and inspiration ;)
Christina Really need to get start with my bullet journal but with all the inspiration out there still don’t know where to start. I’m trying to do a little drawing each day along with other hobbies and my graphics course but decided need to stop trying to perfect drawings and just do pencil drawing (colouring can be done another day). Looking for page layout / trackers to manage family better including spenditure.
I know that when you first start bullet journaling, you might find yourself being bombarded with various styles and ways of doing things online. That can make you feel a bit overwhelmed and you may not know where to start. Or, all this can scare you and prevent you from starting at all! My advice is to keep things simple and start slowly. You don't have to add everything in your bullet journal straight away. There is no right order, or right and wrong.
I've also created a FREE email course on 'How to set up your Bullet Journal in 5 days', which can really help you to start your bullet journaling adventure.

How to set up your Bullet Journal
FREE 5-day Email Course
There is a blog post on Trackers where you can get lots of inspiration.

I'm also finishing a blog post on how to track your finances with your bullet journal, which I think would interest you, so stay tuned ;)
Maria I’ve just started blogging. I’d like some advice on how to promote my blog. I’ve read that Pinterest is a very important tool, but I don't know how to use it properly. Any advice for new bloggers is welcome!
Blogging can be so much fun, especially when you blog about something that you're passionate about. However, nowadays with the plethora of blogs out there, it's very difficult to stand out from the crowd. So, any help you can get to promote your blog is a plus.
My advice for any blogger is to:
- create a blog on a specific topic. General blogs that talk about this and then a bit of that don't work any more. The more specific your niche is, the better.
- In the beginning focus more on creating really good content. If you provide valuable information and advice on a topic, then you'll come up in the first pages of google search and more people will find your blog.
- Use keywords - in your blog posts and your images.
- Choose 2-3 social media and focus on them only. You can't be everywhere at once and to tell you the truth not all social media are good for all niches. For example, my main focus is Instagram and Pinterest. Twitter and Facebook are done on autopilot through the those two social media (you can connect your other social media accounts to them) or through Hootsuite.
Specifically for Pinterest:
- Take good pictures for each blog post. Make sure they are long ones (best size: 735 pixels x any height you want)
- Add good descriptions under each picture. Pinterest is an image search engine and works as google does. So, make sure you include keywords in your descriptions and link them back to your blog.
- Add 'pin it' button in your blog
- Create specialised boards in your Pinterest account
- Join group boards on similar topics and add your images there too.
I could honestly talk forever on blogging, because it's something that I'm very passionate about! If you'd like me to make more posts on blogging, then let me know in the comments below.
Sissypl16 i want to ask if your are finishing every notebook or you have unwritten pages ???…and how many books do you have per year???
Yes, I do finish every bullet journal. I don't usually like to leave half used notebooks, unless there's something wrong with them and I don't enjoy using them any more. But so far, yes I've used up all the pages before moving on the the next one. Usually it takes me around 6 months per notebook (I'm using a Leuchtturm1917).
Mae-Mae Han How/why did you get into blogging?
I've started blogging in 2008 and back then I was a beauty blogger. I was really passionate about makeup and all things beauty related. Since I had my first kid and I couldn't go to back to work for some time, my blog was my way out :) I kept my blog for a few years and it was quite successful, especially for the greek market. However, when I moved to Cyprus I stopped blogging all together. In 2016 I came across the bullet journaling system and it completely changed the way I was organising and planning my day. It also helped me to be more creative and I really wanted to share what I was doing and learning through this system with the rest of the world. That's why I started blogging again, and I love every minute of it :)
I'd like to thank again every one that sent me their questions. I really want to help everyone as much as I can, so keep those questions coming!


Q & A - Your Questions Answered (part 1)
Two weeks ago I asked you in my Newsletter and on Instagram to ask me any question you wanted and today I’m going to answer every single one! I’d like to thank everyone who has send me their questions :) I really want to help you as much as I can. So, grab a cup of coffee (or tea, lemonade, hot cocoa… ) and get comfy ;)

Two weeks ago I asked you in my Newsletter and on Instagram to ask me any question you wanted and today I’m going to answer every single one! I’d like to thank everyone who has send me their questions :) I really want to help you as much as I can. So, grab a cup of coffee (or tea, lemonade, hot cocoa… ) and get comfy ;)
This Q&A will be uploaded in two different posts - one for the Instagram and one for the Newsletter questions. In this blog post, I'll answer all the questions that were left on my Instagram account.
nelesluismansmy drawing and writing skills aren't that good. even just normal letters don't look that nice. do you have any tips for someone like me?
I always believed that drawing and writing are skills that you improve through constant practice. I always looked at the way other people wrote and I tried to copy their handwriting. In the end, I came to adopt a handwriting that was my own, but it still had elements from other people’s handwriting too. I remember back at school that I kept on practicing and practicing constantly when I was writing my notes or exercises, with any chance I got.

I have written a blog post with Tips for Better Handwriting where I share lots of tips and ways to improve your handwriting.
I’ve also created a Handwriting Practice Guide, with lots of practice sheets for your daily practice routine, in order to see your handwriting improve and become better and better.

Handwriting Practice Guide
Practice sheets to help you improve your handwriting
bujo.mariaWhy penguins?🐧And I also have a serious one - do you plan the night before or in the morning? What is you favourite time for planning?⏰
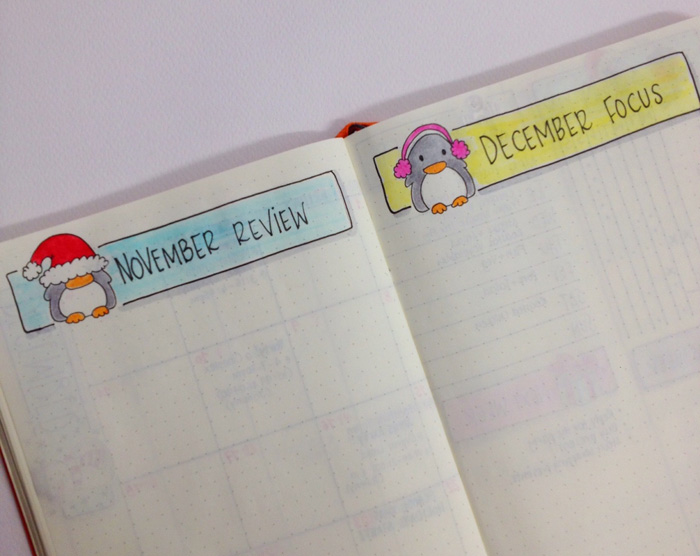
Back in November I was looking online for some inspiration for my bullet journal. I wanted something related to Christmas and I came across some very cute penguins. I started using the little penguin in my bujo and he has become some sort of mascot since then! :)

I prefer to plan the night before. When everyone is up to bed, I spend some time by myself thinking of what I want to accomplish the next day. I go through various pages in my bullet journal (like my monthly and weekly spreads) and then I create my daily spread for tomorrow.
I’ve shared my Bullet Journal Planning Routine in this blog post if you’d like more details on what exactly I do.
I’ve also created a FREE printable of my Planning Routine page. You can use it as an inspiration to create your own, or if you’d like to follow the same steps, you can print it on sticker paper and add it in your bullet journal :)
JOIN THE GANG!
Subscribe now to my Newsletter to download the FREE Printable.
Plus get access to the Resources Library!
jessicadb2How do you stay on top of journaling each day instead of letting it get away from you and you end up missing days/week?
Bullet journaling for me is very important to keep on top of things in my day to day life. It helps me keep my brain and my house in order, plus it’s my way of expressing myself through my creativity, drawing and journaling. So, because it’s so functional for me, I keep on going back to it every day in order to stay organised.
However, I won’t lie to you - there are days that I don’t have a lot of things to do, or that I just don't feel like it, and I don't use my bujo. And that’s fine! I just had to accept that and take it as it is, without feeling bad about it. But I keep on coming back to it, because it is very essential to my every day planning. :)
If you find yourself that you can’t keep up with your bullet journaling, I’d suggest to try and get inspired and start doing things a bit differently. If you keep on doing the same things over and over, then it can get boring. Instead, try to use different layouts, create new spreads and go on Pinterest and Instagram to get inspired. :)
closer2heartI'm sure you already did this but a link to your favorite tools.
I keep on trying lots of new things when I’m bullet journaling. However, there are some staples that are my must haves and I keep on using them all the time! If you want to see my favourite Resources that I use every day with my Bullet Journal, click here to find out what I love to use.
Resources
This is a list of tools, websites and programs I use and recommend for your bullet journal experience and for building and optimising your blog. I only recommend products that I use and love!
closer2heartWhat do you do if you don't have your planner and need to write something down in it.
I usually carry a small notebook in my bag at all times, so if I have something that I need to write down I use it, and when I come home I transfer it in my bullet journal. There’s also been times that I don’t have my bag with me, but I always have my phone. In those cases I either use the “Notes” application on my phone to write it down, or if it’s something really important I write it in an email and send it back to myself. That way I know for sure I will see it and transfer it in my bullet journal.
fitgirldulce825How can you save on supplies? Best places to buy and best sites for coupons please
Because I live in Cyprus, lots of times companies don’t deliver or their shipping charges are just outrageous! Therefore, I tend to buy things on Amazon or Ebay most of times. For example, I use the Leuchtturm1917 notebook for my bullet journaling, but unfortunately they don’t deliver to Cyprus??? (Why, oh why!???) So, I buy my notebooks either on Amazon or on Ebay.
Also, you can find lots of deals and really nice and cute products and accessories for your bullet journal on Etsy.

Visit my Etsy Store
BUT FRIST, CAN I GIVE YOU A 20% DISCOUNT COUPON?
I also buy lots of cute accessories from the kawaiipenshop.com They offer free delivery worldwide and I’m very pleased with everything I've bought from them so far.
Make sure you use the code ‘christina77star’ in your next order to get 10% discount. ;)
You can also take part in giveaways that you can find on Instagram. There’s lots of them that take place all the time and you can certainly try your luck with them. ;)
regonzo1Perhaps this is too basic, but there are some aspects of social media I haven't figured out... how to attach photos for instagram AND Twitter is totally foreign even tho I have an acct. Just wondering. Know there are probably YouTube videos but is there specific formats we would use
Keeping up with all the social media and how they work can be hard! Believe me, I know :) So, I’ll quickly guide you on how to add pictures on both Instagram and Twitter.
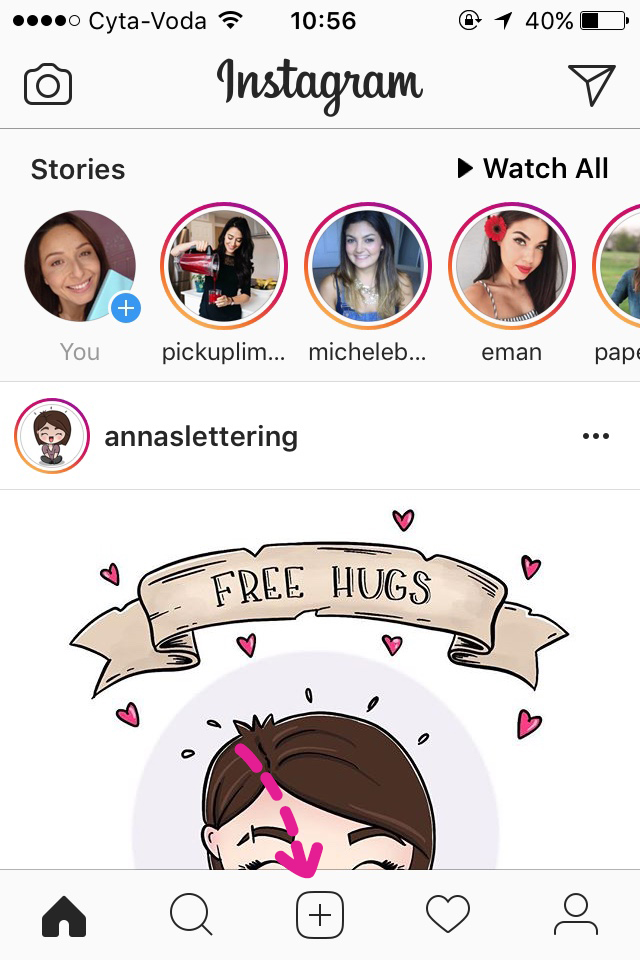

1. Log in your Instagram account.
2. Click on the + icon in the middle (image 1)
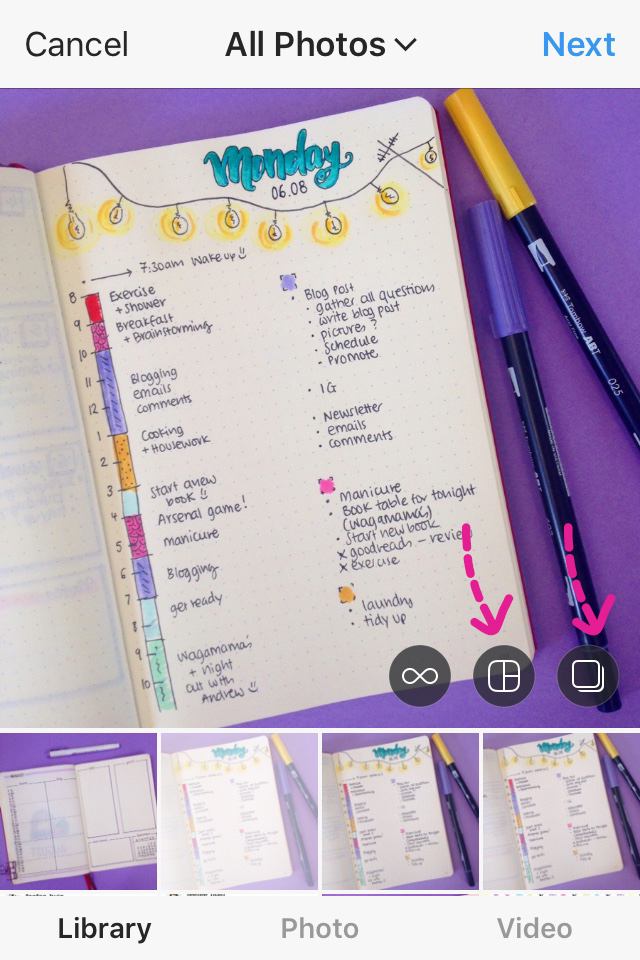
3. If you already have the picture you want to upload in your phone's library, then click on the 'Library' on the bottom left. If you want to take a picture or a video now and then upload it, then you can click either on 'Photo' or 'Video' at the bottom of your screen. In the case that your picture is already in your Library, you can access it if you scroll down through your pictures (see arrow - image 2)
4. Click on the picture that you want and it will appear on your main screen (image 3).
5. At this point you can also create a collage if you want (click on the middle icon) or you can create a carousel (click on the right icon). If you choose any of those options, you'll have to add more images in your selection. Again, you can go through your library as before and select the ones you want. There'll be little numbers on the images as you are choosing them, showing you the order they'll appear on your feed. Once you're ready with all the images you want, click on 'Next' (top right corner).
6. You can now choose any of the filters you see at the bottom of your screen to change your picture. Click on each one to see how it transforms your picture. If none of those suit you, click on 'Normal'.
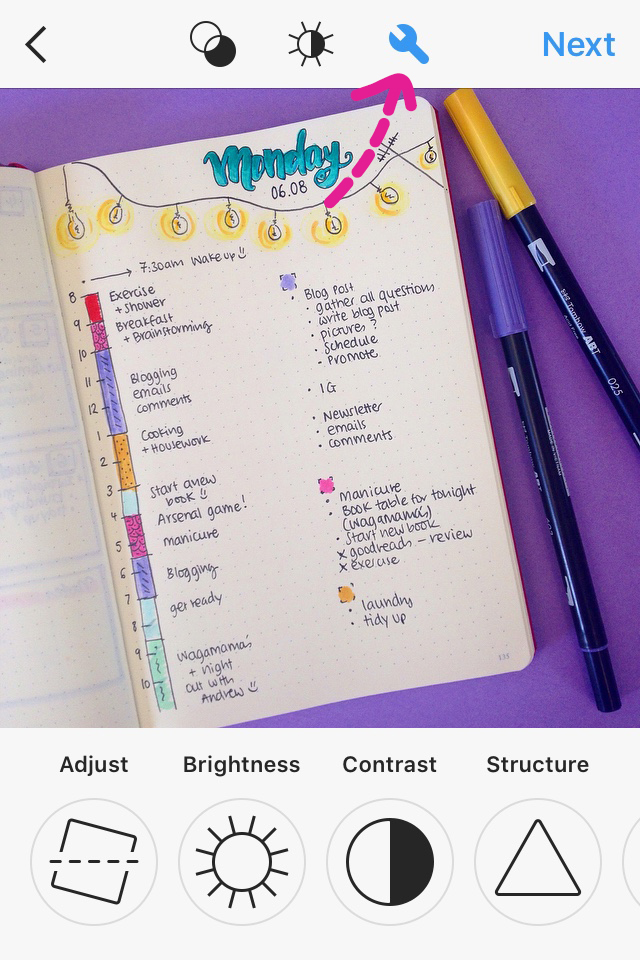
7. You can also manipulate your picture manually, by clicking on the tool icon (see arrow - image 4). You can scroll through and change any elements you want, i.e. the brightness, contrast, saturation etc. Once you're happy with the result, click on Next (top right corner)
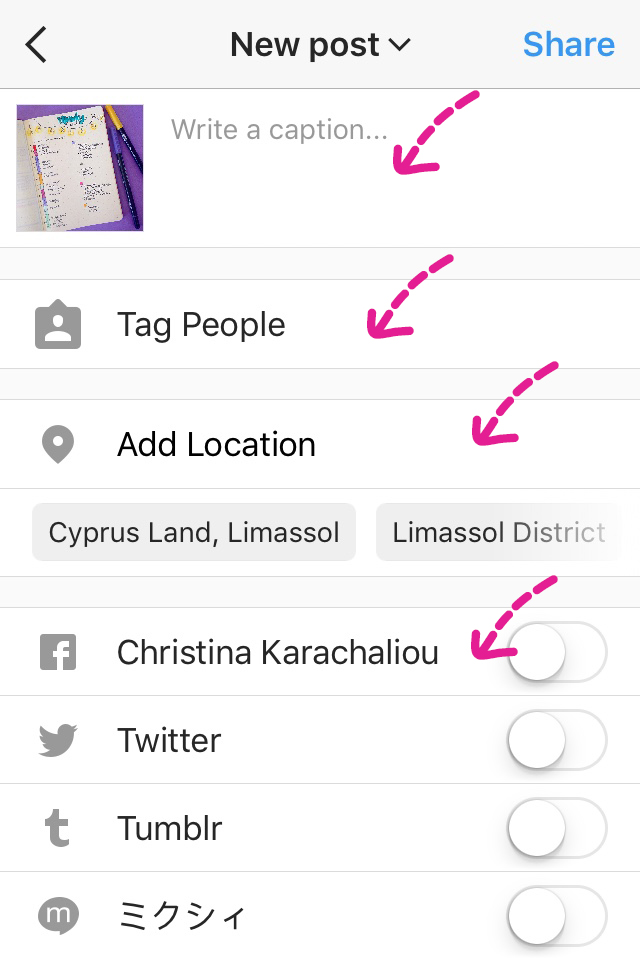
8. On this last page you can write a caption that will be added under your image when you upload it, you can tag people, add location (if you want) and connect to other social media, like your Facebook or your Twitter, so that the same image will upload on there as well automatically. (Image 5). Once you're happy with everything click on 'Share' (top right corner).
With Twitter is easier to upload your images.
1. Go on and login in your account.

2. Click on 'Tweet' on the top right-hand corner. (image above)

3. Write your tweet in the little window that appears. Then you can add your image by clicking on the little icon at the bottom (see arrow above).
4. When you're ready, click on the 'Tweet' at the bottom right corner and you're done! :)
5. It's the same when done on your phone too. You just have to click on the top right-hand icon to write a tweet.
If you’d like, I could write a more analytical post on how to use Instagram and how to edit your pictures. Let me know in the comments below.
Also, @regonzo1 don’t forget to let me know once you start uploading your pictures on Instagram or Twitter :)
abby.haggardhow did you come up with your bullet journeling layout? and also, what journal should i buy for starting?

After trying lots of different layouts and practicing around with them, I ended up with something that is very functional for me, but also a layout that I can call my own. You just need to play around with various layouts you find online, see what works for you and what doesn’t, and then bring the elements you want together to create something that is unique to you.
This is the beauty of bullet journaling and one of the reasons why I love this system so much. It can be anything YOU want it to be and you can adjust it to your needs.
As far as the journal that I'd suggest for you to buy, as you know I love the Leuchtturm1917, but there are so many options nowadays out there... I have a whole blog post dedicated on how to choose the perfect bullet journal for you in order to start your journey. You can check it out here.
abby.haggardhow would you suggest bullet journaling for school & staying organized that way?

@feefee_bujo
I’m actually planning to write a separate blog post on how to use your bullet journal for school, and I should have it up very soon. There are loads of different layouts that you can use to keep up with all your school work and make sure you are focused and organised.
I promise it will be up very soon with lots of ideas for you to get inspired :)
karrot_top_3.19.16How do you stay motivated to keep up with your journaling and scheduling? How much of the day do you put towards this? And what type of journal is that?

I'm currently using a Leuchtturm1917 A5 dotted bullet journal in berry colour. It's my 3rd bullet journal and you can see exactly how I've set it up here.
For me bullet journaling is a necessity in order for me to stay organised in my day to day life, and to keep up with all the projects, events and generally everything that's happening in my life. So, I find myself getting back to it again and again. However, I am not too hard on myself. If I don't feel like planning one day, I just don't do it. If I don't feel like creating fancy spreads or collections, again I give myself permission to opt for something more minimal or to completely skip those pages.
However, I need my bullet journal in my life. I tend to spend 15-30 minutes every night planning the next day. It relaxes me to know exactly what I have to do, and keeps my head in order! From there, I keep on checking on my bullet journal throughout the day to see what's on my to-do list and tick things off as I complete them. Whenever I have time, I create spreads or collections depending on my mood, or I might doodle a bit :)
Every Sunday, I spend a bit more time on it when I create my weekly spread and start planning for the week ahead.
Also, at the end of each month I get a bit more creative and start setting up my bullet journal for the next month, with all the spreads and pages I need. I tend to go through Pinterest, Instagram and my phone for more inspiration.
So, these are the answers for the Instagram questions. If you have any more questions, please leave them in the comments below :)


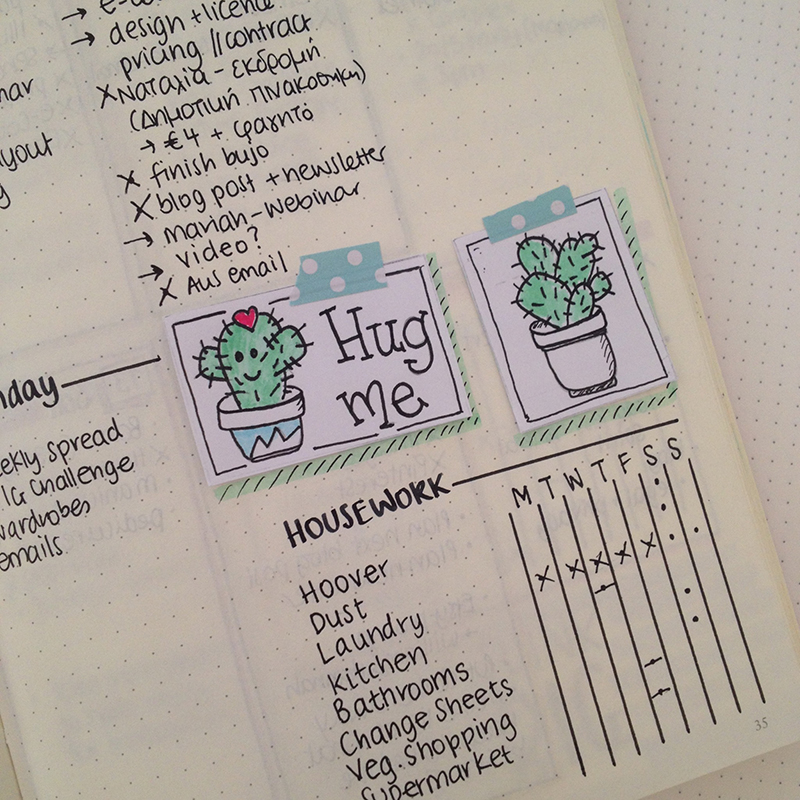
Bullet Journal: My August Set Up
July has been an amazing month for me! I created the Handwriting Practice Guide, went on vacation and my mum came to visit from Greece! So, now that I'm relaxed, full of love and lots of good food (!) I'm ready to be more creative and more productive. So, August I'm ready for you! 😊
This is how I've set up my bullet journal for the month of August.

July has been an amazing month for me! I created the Handwriting Practice Guide, went on vacation and my mum came to visit from Greece! So, now that I'm relaxed, full of love and lots of good food (!) I'm ready to be more creative and more productive. So August - I'm ready for you! 😊
This is how I've set up my bullet journal for the month of August.
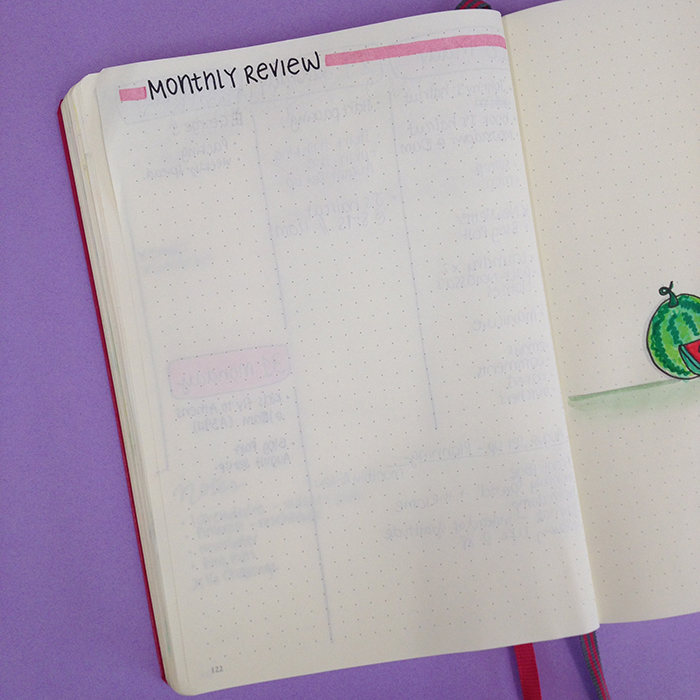
Since last month, I've started saving the last page of the month for a monthly review. This is where I'll go through my bullet journal and write about what happened during the month. What went well, what didn't and what I've learned from it. I also write any changes I want to make for the next month.

The next page is the first page of August, where the little penguin makes his appearance as usual. This time I decided to have him in his bathing suit eating some watermelon. I was inspired by the theme for the #doodlewithusinaugust2017 challenge, which for this month is 'Summer Fruits'. Go to this post for more information.

Next comes my monthly spread, which I made really simple and used the same layout I had for July. It really worked for me, and the two columns that separate my personal from my blog events is very very functional.
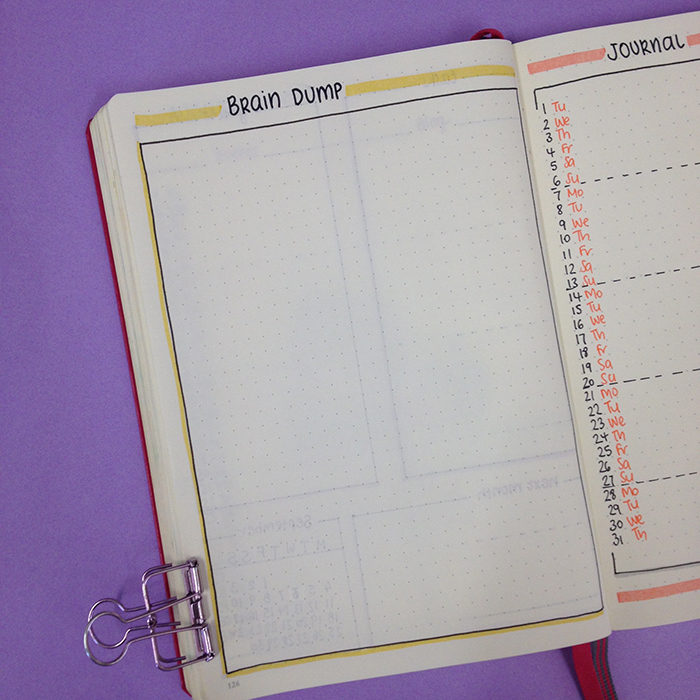
The Brain Dump page was one of the most useful pages last month. I decided to have one for each month instead of having one in my bullet journal in general. Now I don't have to go back and forth any pages and everything is more organised for each month.

One change I've made in this month's set up, is that instead of my gratitude log I now have a journal page, where I'll write one line per day. I wanted to change things up a bit and I really like the way it turned out. I'll see how it goes and next month I might add two lines per day, if I see that there's not enough space to write.
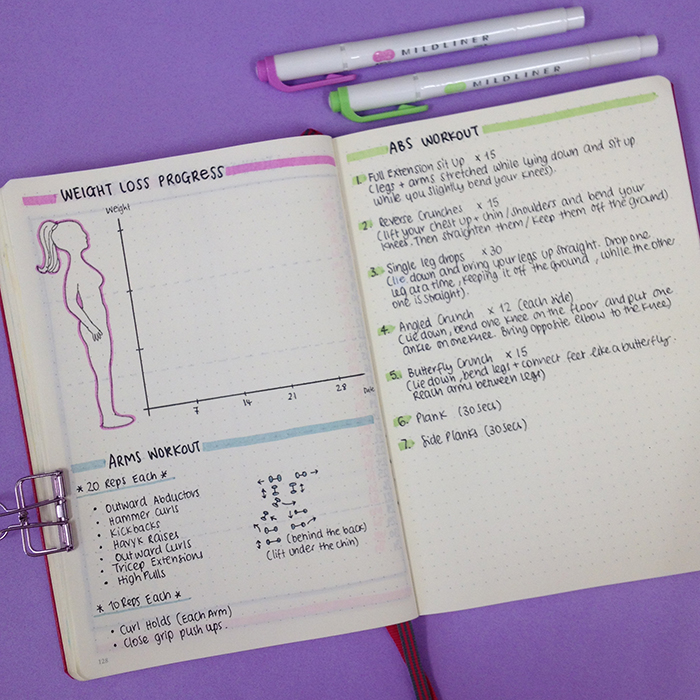
One of my goals for this month is to get more healthy. So, I made some spreads to help me focus on my diet, my exercise and my weight loss.

The diet page is the one that I've created before with all information and food ideas to get inspired and motivated.


The other two pages include my weight loss progress graph, and my workout plan that includes my arms and my abs workouts.

I also created a workout log page where I'll write analytically all the exercises I do during each day. I prefer to have this instead of a set plan where I pre-schedule everything. I tend to get bored easily and I might want to mix things up from time to time, so this works perfectly for me. The page opposite I've left it empty because I want to use it as my journal page for my workout.
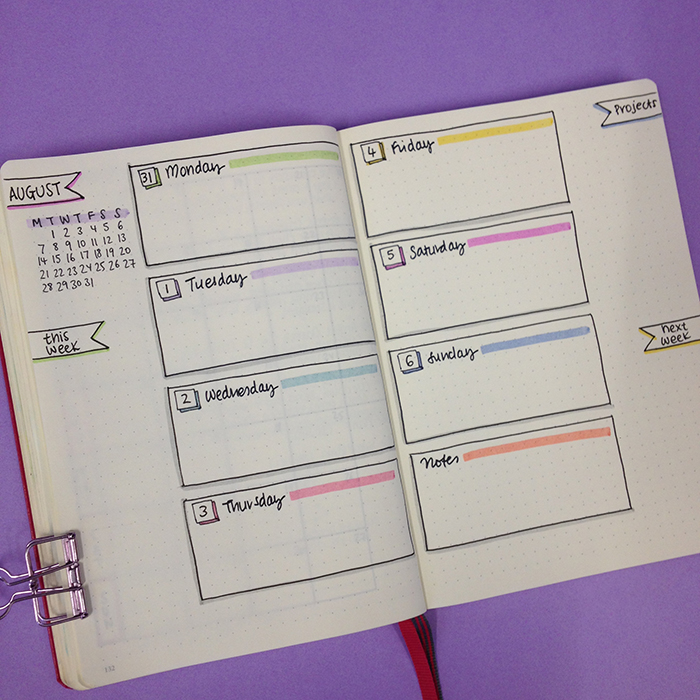
The next spread I'll share with you is my first weekly spread for the month. I decided to use one of my previous layouts that I really really like. It's very functional, practical and colourful.
The last spread I have included in my August set up is the one for the #doodlewithusinaugust2017 IG challenge, which is currently empty! 😊
So, there you have it. That's one more month set up in my bujo. What new spreads have you added in your bullet journal set up for this month? Leave a comment below and share with us :)


Instagram Challenge: #doodlewithusinaugust2017
Once again I'm excited to announce our Instagram Challenge for the month of August! It's the #doodlewithusinaugust2017 Instagram Challenge created by me and Alexandra (from @alexandra_plans).
It's going to be 31 days of doodles that will hopefully get you to be creative and have fun! The theme of August's prompts is 'Summer Fruits'. This theme is perfect for this time of the year and I seriously can't wait to start drawing!
As we did before, all the doodles are part of one big comprehensive picture. Imagine each day to be one piece of the puzzle. So, at the end of the month you will have one big doodle picture! :)
If you decide to follow this way, you'll have to create a table with 5x6 + 1 boxes and you shouldn't add the days on the top. You can also make the boxes and dates in pencil, if you don't want the lines to obscure the end result. It's totally up to you.
Of course, if you prefer to draw the doodles in the traditional way, that's absolutely fine as well. The important thing is to have fun!
You can also download a free printout with the daily prompts here.

If you want to join us then:
- Follow me (Christina) @christina77star and Alexandra @alexandra_plans over on Instagram.
- Download the prompts below.
- Draw something according to the day's prompt, take a photo of it, and share it with us on Instagram.
- Don't forget to add the hashtag #doodlewithusinaugust2017 and spread the word.
- Everyone is welcome!
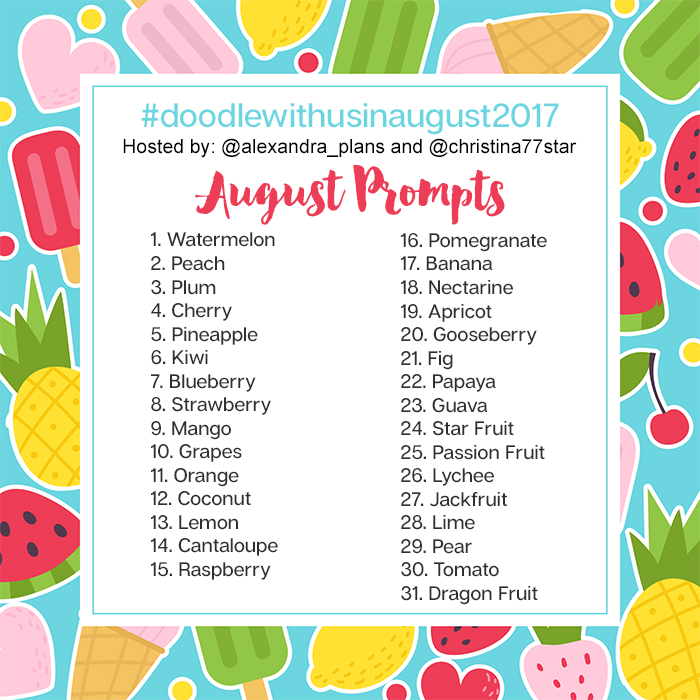
We're excited to see what you'll share!
Thank you for joining in!


The Craft Planner Review
If you’ve been following me for a while, you’ll know that I’m always searching for ways to be more productive and efficient with setting up my goals and see them come to life. Finding simple ways that will help me with my time management and staying on schedule with the various projects.
The problem that I always tend to have is that I start planning for a project and I’m very enthusiastic about it. Then I get confused with all the steps I need to take, when I need to take them and in the end I get flustered and frustrated because I feel completely lost and I’m out of schedule… Raise your hands if you’ve gone through the same scenario before…. Hopefully I’m not alone in this!
While I was on holiday, I was contacted to review the Craft Planner and after I quickly checked their website, I said yes straight away!
What is the Craft Planner?
““The Craft Planner is a unique way of accomplishing your goals easily. With the right kind of planning, you can build on small goals to lead to big accomplishments. With a simple and focused layout, the Craft Planner will help you to stay on-task so that you can keep your momentum going, follow your schedule closely, and remember what matters most to you. The Craft Planner is more than just a planner: it is a partner in your success.””
How it works?
According to the website you only need to take 2 simple steps with the Craft Planner for successful goal planning.


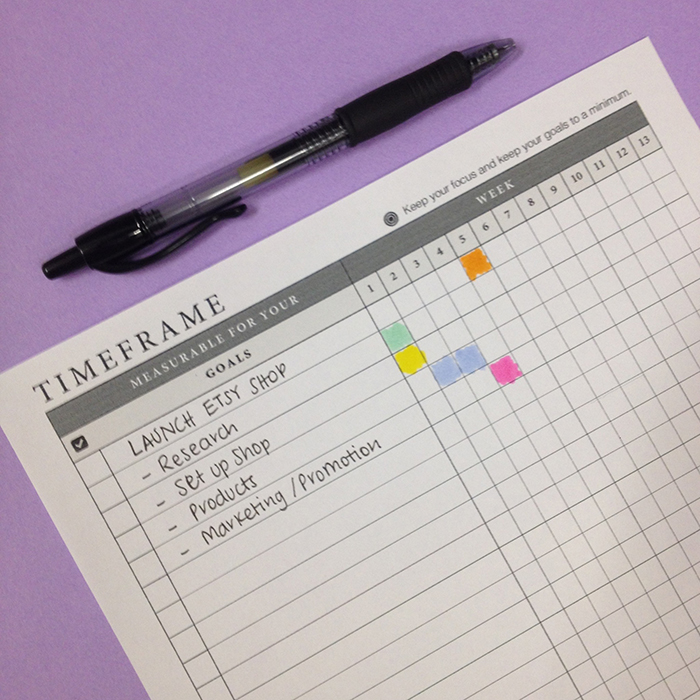
Since the planner is not available yet and I only had some pages to play with, I decided to see how I would use it for a project and try and see for myself how it works. Following the instructions, I started planning for my pretend project, which for the sake of this experiment was to 'Launch my Etsy Shop'.
I started with the goal timeframe page, where I wrote the steps I would normally take for such a project, and I marked with different colours the week I would plan to tackle each step separately.
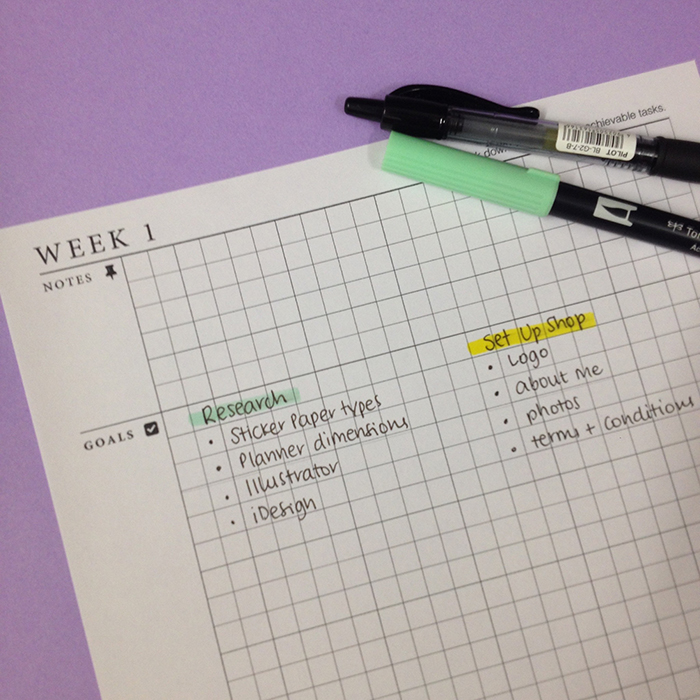
Then, I took the pages for the first two weeks and I started writing down what needed to be done for each step.

I have to say that while I was doing that, I felt really focused. I was able to plan ahead all the steps for each part of the project, give a timeframe within which each of them should be finished, and I could actually see the whole project unfold on paper. I also liked that everything has it's place, and I can easily find what I want. Also, there's lots of space for further steps or other things I might need to add later on.
Then I moved on the weekly page where I also planned a pretend day.

I was able to add my housework tracker and a to-do list for this week in the notes part. Then I drew a line to separate it from the day of the week. I chose to decorate it a bit using some of my stickers for the date, weather and water tracker. There was also space to create my daily plan bar on the left part, while on the right I made a list of the things I needed to do during that day.
All in all I really liked the format of the planner. I loved the simplicity of the system but also the flexibility of the pages. It allows you to use the page the way you want to. As you can see in the picture above, there is a line separating the space for each day, but if you need extra space like I did, you simply put an arrow facing downwards to indicate that you're using all the space for one day. That way there is no waste on the pages. Lastly, I really liked that I was able to customise the page the way I wanted and make it work for me. I chose stickers and coloured markers.
On the other hand, being a bullet journalist I missed my dots! Even though I like squares as well, I would love to have the option to chose a dotted format of the planner.

Features
- The planner comes in A5 size (5.8" x 8.4”), with a luxurious cover made form premium fabric.
- On the website it shows that the planner comes in 5 different colours, but I'm hoping that more options will be added once they start selling it.
- It comes with premium 70gsm paper that promises the same opacity & thickness as standard 100gsm paper. I’d love to test that, and see if it’s true.
- It comes with 2x Bookmarkers (0.35cm width)
- It lays flat and allows seamless writing on every page.
- There is also an expandable inner pocket and an elastic band.
What’s inside the Craft Planner?
- 1 page for Personal Details
- 4 pages of break-down Demo
- 24 pages for the 12-Month Calendar (undated)
- 4 pages of 52-Weeks Timeframe Goals Checklists
- 208 pages of 52-Weeks Planner (undated)
How to get yours
The Craft Planner is currently on Kickstarter where they're doing a fundraising on this campaign. They are very close to their goal, but if you like the planner you can help them reach their goal even sooner! You can back this project and select a reward. This means that you are actually pre-ordering one or more of their Craft Planners. By doing so, you'll receive a discount especially designed for backers, and you will get hold of your planner before it hits the store shelves.
For more FAQ, click here.
You can also get a free digital version of the Craft Planner 2.0 preview.
I really liked the format and the system of the Craft Planner. Future planning and project planning with the bullet journal can be a bit tricky. So, I'd definitely use this planner specifically for my various projects and goals during the year. I can't wait to get my hands on it this December!
Have you heard of the Craft Planner before? What do you think of it?


Vertical Dutch Door Ideas for your Bullet Journal
I’ve already talked about the dutch door system for your bullet journal in this blog post I wrote back in August last year. It’s one of my favourite ways to create weekly spreads, because it allows you to see multiple days/sections at a glance.
For those that don’t know of the term, the ‘dutch door’ system is a way of creating a weekly spread in your bullet journal, where part of the page remains stationary and the other part is normal, and you can turn the pages as usual. This system can be applied horizontally or vertically. In today’s post, I’ll focus on the vertical option.
I decided to use the dutch door system in my latest vacation trip. I wanted to document my days during our holidays, but I also wanted to have certain information and sections at hand. It worked perfectly for what I wanted to do, and I’m really happy with the result!

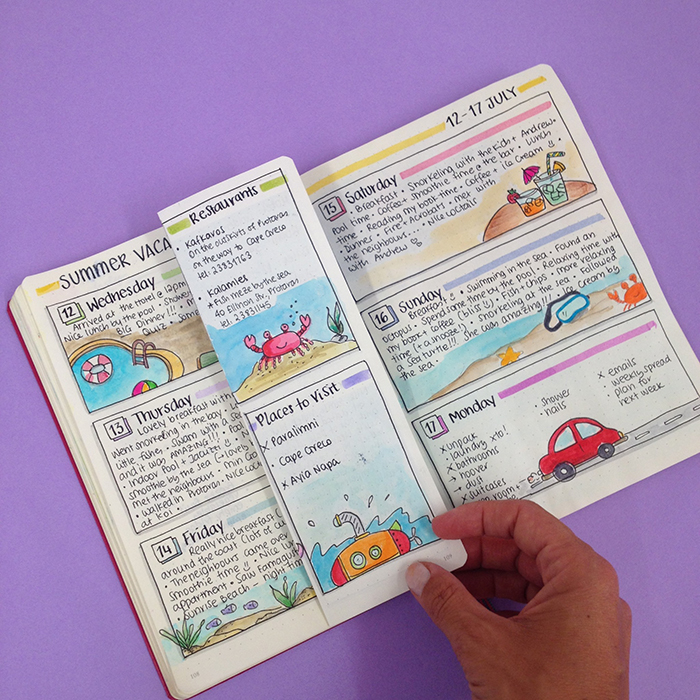


With this layout, I managed to have all the information I needed for my holidays as well as the plans I've made for those days, at the same place I was doing my journaling for each of those six days. I could flip the middle page to the section I wanted to look at, without having to go back and forth various pages.
The reason I like the vertical version of the dutch door system is also because you don't have to cut any pages of your precious journal. And I know that this prevents a lot of people from even trying to use that system. But with the vertical one, you only have to fold the middle page in the middle and add anything you want in the sections that are created. Also, after you finish using that spread, you can lay the middle page flat open, so that it doesn't disturb your writing in the other pages. Perfect!
In order for you to get more inspired, I'll share with you some examples of the vertical dutch door system by some amazing bullet journalists.
You can use the dutch door for your weeklies:


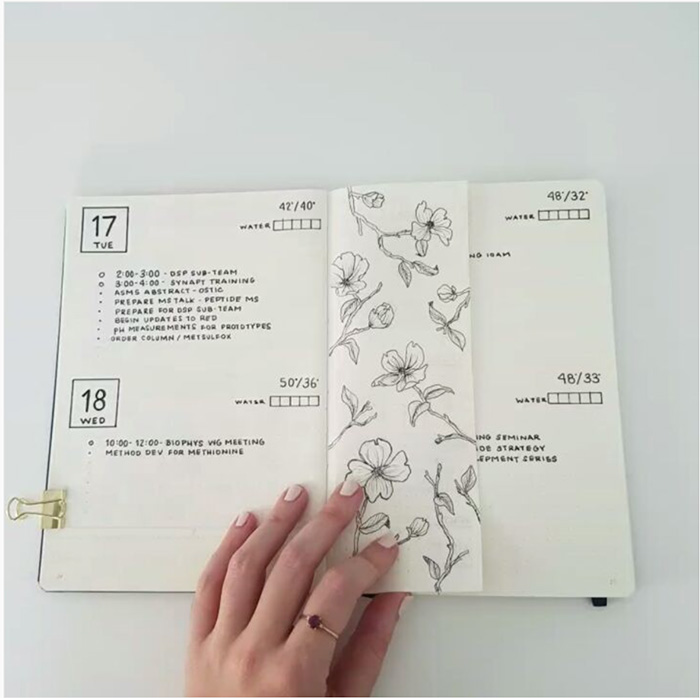

You can also use the vertical dutch door system to plan your monthly spreads:

saltykatie.com


I really love how functional this system is and I'll be using it more often from now on. Have you tried the vertical dutch door system? If you have make sure you share with us in the comments below ;)


How to deal with Mistakes in your Bullet Journal #2
Since I started bullet journaling almost 2 years ago, I’ve made LOADS of mistakes! Don’t think that from all the amazing pictures you see on social media, that everyone else has the perfect bullet journal. No. Not even close!
I have to say that in the beginning it was very hard for me to deal with my mistakes. Especially when you start something new, and you have a brand new journal that you want to make perfect, even the tiniest mistake and make you feel that you need to rip out the page completely. Which is always an option, but I prefer to find other ways to fix and cover up my mistakes.
I have another blog post on how to cover up your mistakes if you care to check it out here. And this is the #2 post I’ll dedicate on this subject. So, let’s dive in!
Since I started bullet journaling almost 2 years ago, I’ve made LOOOOOADS of mistakes! Don’t think that from all the amazing pictures you see on social media, that everyone else has the perfect bullet journal apart from you. No. Not even close!
I have to say that in the beginning it was very hard for me to deal with my mistakes. Especially when you start something new, and you have a brand new journal that you want to make perfect, even the tiniest mistake can make you feel that you need to rip out the page completely. Which is always an option, but I prefer to find other ways to fix and cover up my mistakes.
I have another blog post on how to cover up your mistakes if you care to check it out here. And this is the #2 post I’ll dedicate on this subject. So, let’s dive in!

For little mistakes, like small lines around the letters, or lines that you didn’t measure correctly and you drew a bit out of size, you can use a white gel pen. This will offer you a more precise correction around those small areas that need fixing.

Black it out. Cover the mistake with a black pen and write over it with a white gel pen. You can also use black washi tape instead if you want.
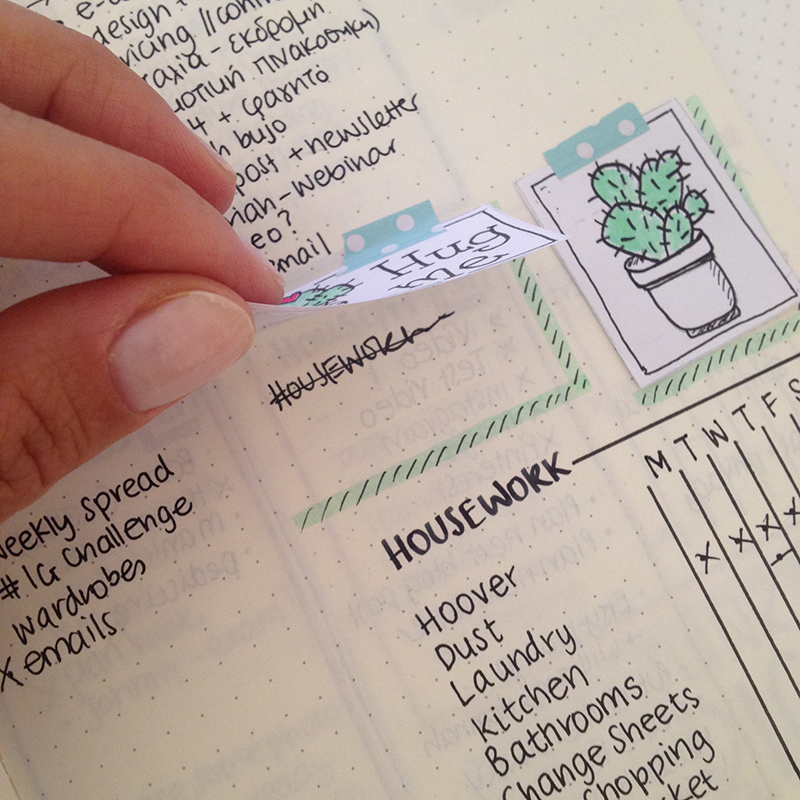
Create some mini drawings on a separate piece of paper, cut it out and stick it on top of your boo boo. That’s a fun way to cover up your mistakes.

For big mistakes, use some scrap paper to cover the whole page with it. You simply measure the size of the page, cut the paper and use some glue tape to stick it on the page.

You can also find cute quotes on line like the one I created in the picture above, print them on sticker paper, cut to size and stick directly on your page.
You can now download this quote for FREE and add it in your bullet journal. You simply print it on a sticker paper and stick it on the page that you've made a mistake on. You can also print it on normal paper and add it in you journal with some glue tape.
JOIN THE GANG!
Subscribe now to my Newsletter to download the FREE Printable.
Plus get access to the Resources Library!

Jolene Eborn
You can also use the page to create a collage with various images and scrapbooking supplies that will totally cover up your mistakes.
If nothing of the above works, simply glue the pages together and start fresh :)
How do you deal with your mistakes in your bullet journal? Please share in the comments below.


Tips for Better Handwriting
Nowadays, we don’t need to write things by hand as we did in the past. Everything now is digital, so instead we are using our computer or phone to write lists, texts or send emails. However, there are still times that we do need to write.

Nowadays, we don’t need to write things by hand as we did in the past. Everything now is digital, so instead we are using our computer or phone to write lists, texts or send emails. However, there are still times that we do need to write.
Our writing changes through the years and as we grow we develop our own style. A lot of people though, are not comfortable with the way their handwriting looks. Especially the younger generations, since they don’t write a lot, they don't get enough practice in order to perfect their style and have a good handwriting.
But what is ‘good handwriting’?
Good handwriting generally is when your letters are balanced and clearly formed on the page with an even spacing between the letters and the words.
If you are unhappy with the way your handwriting looks and you want to find ways to improve it, the following steps and techniques will surely help you to better your style.
Get ready
- Make sure when you write that you sit comfortably and use a surface with enough light and space to write on.
- Choose the right paper. When you choose notepads or journals, place your hand on the surface of the paper and see how it feels. The smoother the paper, the better the pens will write on it, and therefore your letters will look better.
- Choose lined, squared, dotted or plain styled paper. Personally, I find that I write better on dotted or squared paper. I don’t really like the lined one and I stay away from the plain paper because I can’t write straight, no matter how hard I try!
- Choose a pen or pencil that you like to write with. I have hundreds of pens (literally) but I always find myself picking 3-4 specific ones, because I like the way they write, and I find that when I use them, my letters look better. When you are choosing a pen, try to think of the type of the ink, the size and the shape of the pen as well as the point of the pen. Also make sure your pens dry fast, so that you prevent smudging.
- Choose a pen that’s comfortable to hold, and where the ink flows smoothly without your having to push too hard on the paper.
Practice
- Practice makes better. The more you practise the better your handwriting will get. Try to practise 10-15 minutes every day.
- Practise whenever you can and take every opportunity to write things down, whilst focusing on your handwriting. Write down your to-do lists, notes or start a journal.
- Start practising the letters you have the most trouble with.

- Look at some computerised fonts or other people's handwriting for ideas.
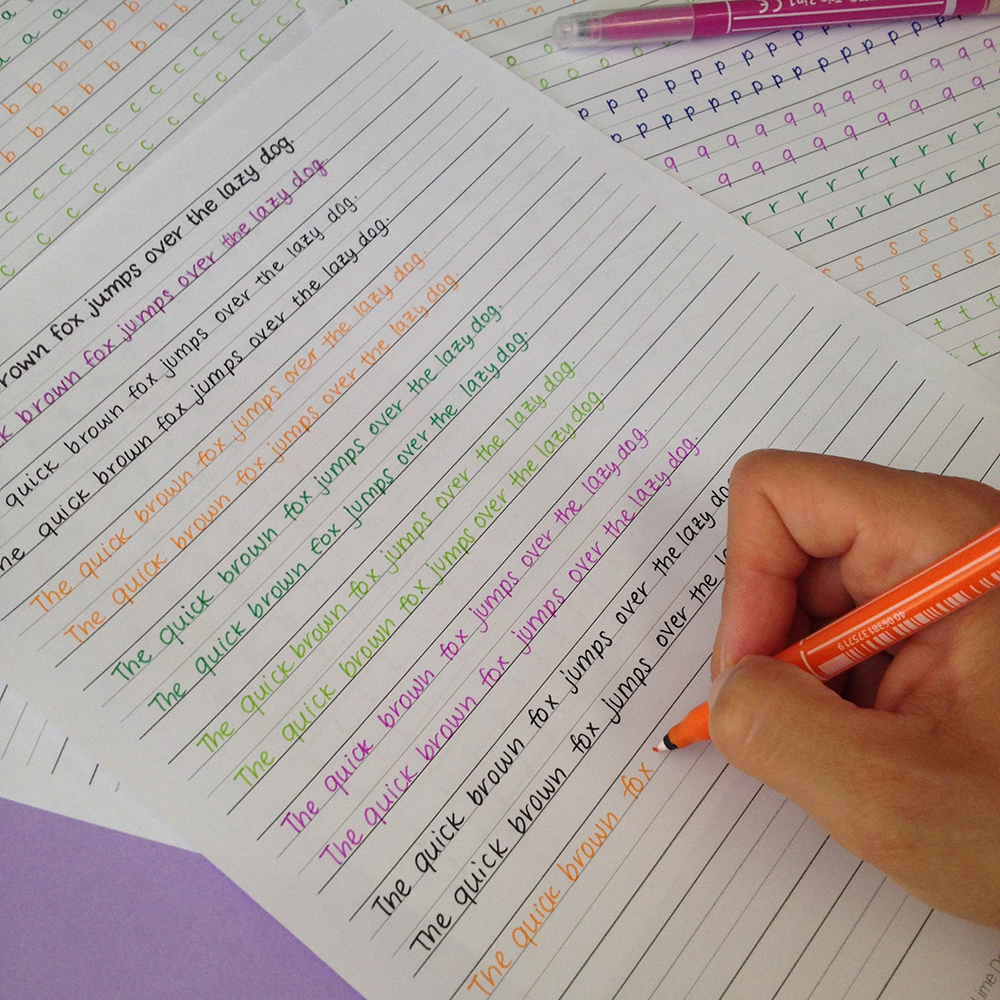
- Practise writing the same sentence over and over. One good idea is to choose a pangram, which is a sentence that has all the letters of the English language.
- Try to be consistent in terms of angle, length, and height of your letters. You can use special practice sheets that have horizontal lines to help you with that.
- Use different coloured pens and have fun with it!
Handwriting Practice Guide
I’ve created a handwriting practice guide with loads of practice sheets to help you improve your handwriting.

Handwriting Practice Guide
Practice sheets to help you improve your handwriting
Use the practice sheets and set a daily practice routine in order to see your handwriting improve and become better and better. The more you practise the better your handwriting will get. A beautiful handwriting style is always noticed - in your bullet journal, cards, notes letters and so on.
This downloadable digital guide is divided into PDF files, so that you can easily identify which pages you’d like to print. And you can print as many copies as you want, without worrying about messing up your practice sheets.

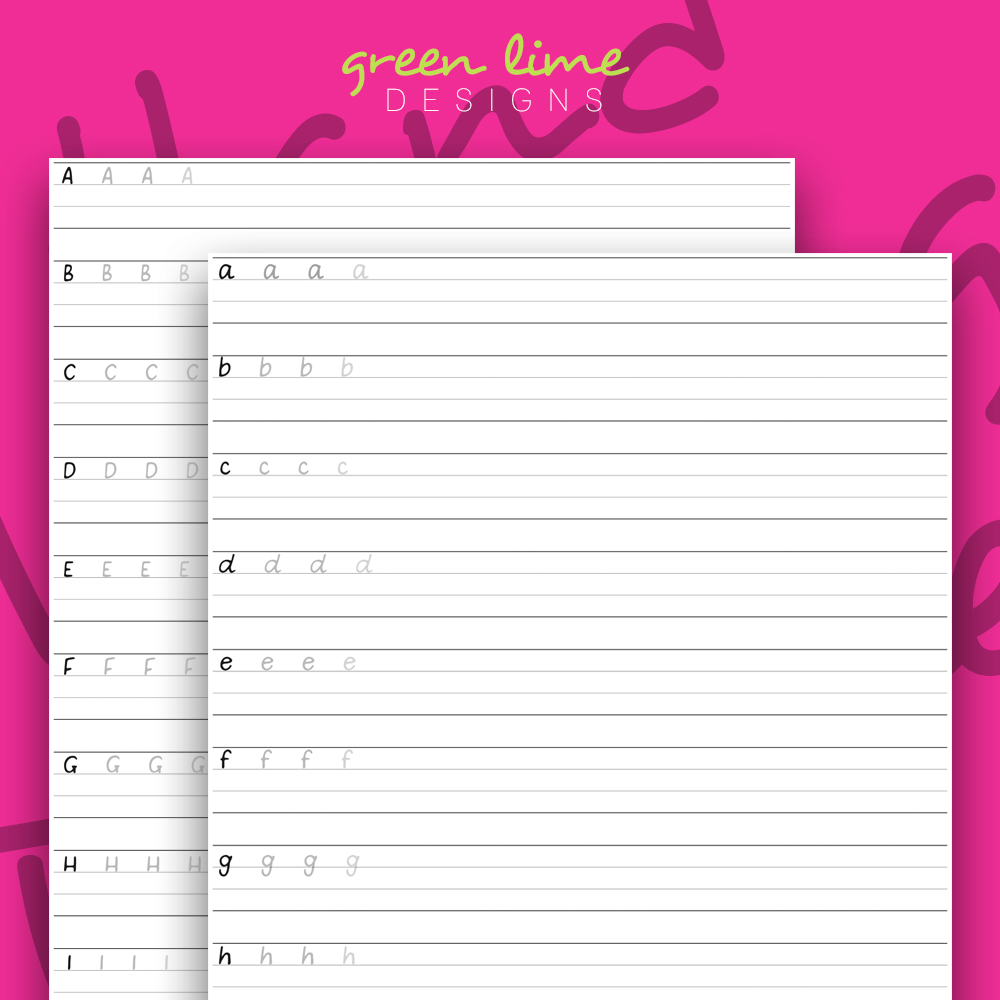

The Handwriting Practice Guide includes the following:
- Detailed instructions to help you use the practice sheets.
- 26 Practice Sheets - one for each letter in both upper and lowercase form.
- 3 Express Practice Sheets of the small letters.
- 3 Express Practice Sheets of the capital letters.
- Numbers and Symbols practice sheets.
- Pangram practice sheet.
- 5 different styles of empty practice sheets to practise your own words.
- Prompts and ideas to keep practising every day.
GET THE GUIDE NOW AND START FEELING MORE CONFIDENT ABOUT YOUR HANDWRITING.
Do you like your handwriting? Is there anything you would like to change about it? Feel free to share in the comments below ;)

