
How to Colour Code your To-Do List in your Bullet Journal
I'm all about colour coding your journal. If you've been following me for a while, then you'll know that I use a specific colour coding system throughout my bullet journal. It helps me to keep track of things and it's also one more way that helps me with being more productive.
I have written another blog post before, talking generally about how to colour code your bullet journal. But today, I'd like to show you 4 ways to use colour in your to-do lists. So, grab your highlighters and let's get started!

I'm all about colour coding your journal. If you've been following me for a while, then you'll know that I use a specific colour coding system throughout my bullet journal. It helps me to keep track of things and it's also one of the ways that helps me with being more productive.
I have written another blog post before, talking generally about how to colour code your bullet journal. But today, I'd like to show you 4 ways to use colour in your to-do lists. So, grab your highlighters and let's get started!
The very first thing is of course to create a colour coding system that works for you. As you can see in the image below, I use 6 different colours throughout my bullet journal for specific categories of my daily life. It today's post we'll focus mainly to 4 different colours:
pink - me
green - kids
orange - housework
purple - work/blogging

#1 // Colour Code Your Bullets

Looking at Tuesday's to-do list in the image above, you can see that I have created my list with random things that I want to do during the day. I have added the respective colour to the bullet of each item on that list, before I start ticking things off. This is a good way to see what you have to do for each category straight away.
I have to say, that this is my favourite way of all. You can still colour code your list without making it look messy all too cluttered.
#2 // Colour Code the whole item
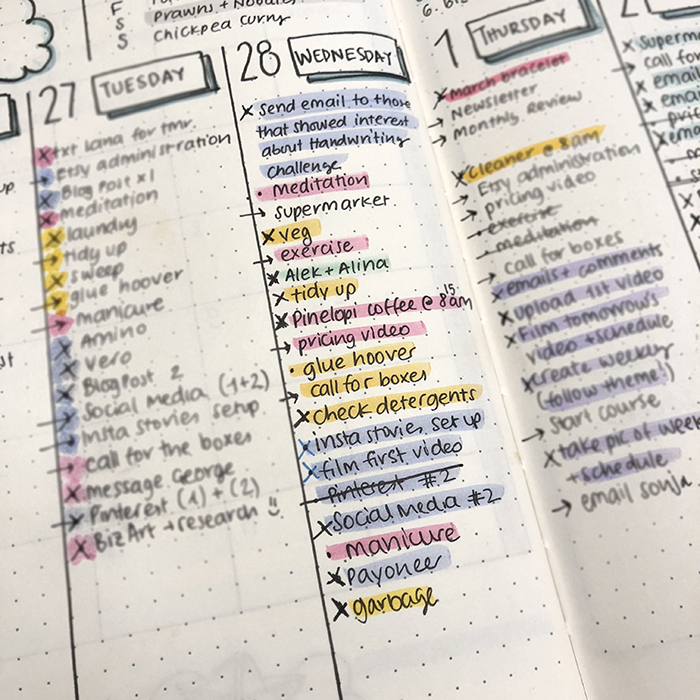
Moving on to Wednesday's list I did exactly the same thing, but instead of colouring the bullet I coloured all the words of each item on the list with the respective colour. Some people find this way more convenient, because they can see more clearly how many things they have in each category.
Personally, I found this the most confusing way of all. I had to double check each time I was looking at my list, since I was mistaking the highlighted items as being done...! So, that took me some time to get used to.
#3 // Colour the items as you go along with the respective colour

The third way is very similar with the 2nd one we saw previously, only that this time you highlight the items as you're ticking them off, using at the same time the respective colour for each category. This is a very useful way if you're interested to see how many items you have ticked off your list and from which category, straight away.
So, for example looking at my Thursday's list I can see that I finished more of my work related tasks. However, you don't have a clear picture of how many tasks you had to do during the day from each category in the first place. So, in that case it depends what you like to track more. The type of items you need to do, or the type of items you have ticked off your list. The choice is yours.
#4 // Colour the items as you go along with a single colour

The last method is exactly the same like no.3 but instead of using the respective colours of each category to highlight the items you are ticking off your list, you are using one highlighter colour for all of them. So, basically there isn't a colour code system, but just a way to highlight the items you've done during the day.
I've noticed a lot of people opting for this method as it's more convenient for them, instead of messing up with different colours and highlighters. I can see the functionality of it and I understand why people prefer this one the most.
So, how about you? Do you colour code your to-do lists? Which of the above methods are you using?

Moving Planner + Printable Kit
Research has shown that moving houses can be one of the most stressful experiences! Sometimes, more than a relationship breakdown, divorce or even a new job... And since I happen to have done this quite recently, I admit that the stress levels can be really high! 😬

Research has shown that moving houses can be one of the most stressful experiences! Sometimes, more than a relationship breakdown, divorce or even a new job... And since I happen to have done this quite recently, I admit that the stress levels can be really high! 😬

The way I decided to deal with this situation and go through this experience as smoothly as possible, was by planning as much as I could. I created a little moving planner which helped me to organise everything, and I successfully moved houses within one month.

In the last 10 years I've moved 5 times, 3 of which were to different countries!!! 😳 From my experience I know that you don't need elaborate lists. Just simple practical ones that will put your thoughts in order and that will help you go through the stages without forgetting anything.

So, I've decided to share with you my moving planner, in order to help anyone that might be moving houses and needs some organisation. 😉
This planner is the perfect way to get ready for your big move!

Whether you're moving across town or across the country. It will help you to keep track of everything from your address changes and cancelling/ transferring utilities, to a countdown until the big day. It includes 8 pages.
Using a planner like this takes the stress out of moving so you can make your new start with ease. And the best part... it's absolutely FREE!
JOIN THE GANG!
Subscribe now to my Newsletter to download the FREE Printable.
Plus get access to the Resources Library!
Have you moved house before? How was your experience? How did you deal with the stress that accompanies the move?

58th Ave Bullet Journal Review + Giveaway!
I was contacted by the lovely Sonja from 58th Ave to review their notebook, and of course I said yes! It's so nice that lately more and more new bullet journals make their appearance in the market. I remember when I started bullet journaling, there were less than 5 brands that made notebooks with bullets. So, I love it every time I get to review a new bullet journal ☺️

I was contacted by the lovely Sonja from 58th Ave to review their notebook, and of course I said yes! It's so nice that lately more and more new bullet journals make their appearance in the market. I remember when I started bullet journaling, there were less than 5 brands that made notebooks with bullets. So, I love it every time I get to review a new bullet journal ☺️

The bullet journal arrived beautifully packaged in a cardboard box.


Inside there were a lovely thank you note, the notebook, 4 stencils and 10 colourful washi tapes! My favourite kind of mail


The notebook comes in a black leather cover with embossed '58th Ave Just Because'. I loved the little details and the cover is of very good quality. Also I appreciated the protector that was placed underneath the elastic band. Sometimes, especially when the products are shipped, the elastic band can leave and indentation on the cover. So, that was a nice touch, and I have to say I haven't seen anyone else do that yet.
The size of the notebook is a bit smaller than an A5 one. More specifically, it is 13 x 21 cm.

As I mentioned, there is an elastic band to keep the cover closed, which is very sturdy and tight.

Another new thing that I haven't seen in any other bullet journal, is that the very first page is all black. I think that this is so cool, and you can definitely decorate it with pictures, stickers or a white pen. The black background will make everything pop.

The notebook starts on the bullet pages straight away, and there is no other page before that.

The pages are numbered which is always nice to have that. Especially if you like to have an index for your bullet journal.

At the back there is a black expandable inner pocket, which I always find very useful for stickers or little notes and stuff.

The notebook also comes with 3 page markers which I really like. It's nice to have more than one to mark the pages you use over and over through the month. I only wish they came in 3 different colours, so that I can differentiate straight away on what page is what. But still a nice add to the notebook.
The paper used in this notebook is 100gsm and the pages are thread bound, which means that the journal is more sturdy and it can lay flat for ease of use.
The quality of the pages is really good. When I first touched it, it reminded me of the Moteskine pages, which are so nice and smooth. And I have to say that after I tested them, the pens just glide on these pages!


As you can see there is no bleeding and not much ghosting.


The packet also came with 4 stencils and 10 colourful washi tapes. It was so fun playing around with those.

I must admit that I hadn't tried any stencils before, and I really like those. They are very useful. You can add nice touches to your pages, even if you can't sketch or draw.

Also the washi tapes are nice and thin to add on your pages for decoration or to create sections, borders and categories.

GIVEAWAY 🎉
I've teamed up with 58th Ave to offer 3 similar packs like the one I just reviewed for 3 lucky winners! So, if you liked the notebook and the accessories that come with it, then you can take part in this giveaway that is open internationally!
RULES:
- Like the giveaway photo on Instagram.
- Follow me @christina77star on Instagram.
- Tag as many friends as you want ( ONE FRIEND PER COMMENT).
- Extra Entry: For extra credits, leave a comment below, telling me what you love about bullet journaling.
PRIZES FOR 3 WINNERS:
- 1 58th Ave Notebook A5 size
- 4 Stencils
- 10 colourful washi tapes
DETAILS:
- The giveaway is open internationally and it will end at 11:59pm (GMT + 2) on the 15th of March.
- The winners will be picked randomly, and will be messaged within 48 hours after the giveaway is closed.
- If any of the winners doesn’t reply to my message within 24 hours, I will pick a new winner.
Good Luck everyone! 🍀

Improve Your Handwriting Challenge - March
I'm really excited to announce today a brand new monthly challenge that I'm starting on Instagram this March. It's the "Improve your Handwriting Challenge" and it starts on Thursday the 1st.
Since I've created the Handwriting Practice Guide, a lot of people showed interest in improving their handwriting, so I thought it would be fun to add a daily challenge that can help you set a daily practice routine in order for your handwriting to become better and better.
It's a fun way to practice daily, keep a photo archive of your handwriting and see how you've improved through time. You can also interact online with other people doing the same challenge, and also you can get inspired by others' handwriting too.
So, for March it's going to be 31 days of handwriting prompts that will hopefully get you to start practicing your handwriting every day. The words for this month's challenge come from the Dolch list, which is a list that includes the most frequently used words in the English language.

Here's how to participate:
- Follow me (Christina) @christina77star over on Instagram.
- If you want, you can download and print the monthly prompts here.
- Each day there is a corresponding prompt, that you simply have to write on a piece of paper. You can also choose to have a dedicated notebook for your daily handwriting practice. Try and focus on the word and the letters as you write them. You can repeat the word as many times as you want. Look at the way that you wrote the word the first time and the way you wrote it the last time. Is there a difference? Do you think you need to work on a specific letter?
- Take a photo of your practice and tag it with #improveyourhandwritingchallenge, so that it gets added to the feed.
- At the end of each month look back at your practice pages and see how you've improved.
- Make sure to encourage each other and have fun!
- Please share this post to spread the word and invite others to join in the fun and improve their handwriting as well!
Thank you for joining in!
Christina x

Handwriting Practice Guide
Practice sheets to help you improve your handwriting

Plan With Me: My March Set Up in my Bullet Journal + Video
In today's post I’m going to show you how I've set up my bullet journal for March. March will be the first month that I'll be fully settled in the new house and that means that I can finally focus on my projects and planning. For that reason you'll see as well that I'm introducing some new spreads that will help me to focus more this month and be more productive.

In today's post I’m going to show you how I've set up my bullet journal for March. March will be the first month that I'll be fully settled in the new house and that means that I can finally focus on my projects and planning. For that reason you'll see as well that I'm introducing some new spreads that will help me to focus more this month and be more productive.
Make sure you scroll down to the bottom of the post, because there's also a video, where I'm showing you exactly how I've created each spread.

Before I start with the monthly set up, I'd like to take a minute to express how much I love this notebook! It's the Scribbles That Matter notebook and the quality of the pages is amazing! I highly recommend it! You can find a thorough review here.
This month I decided to create all my pages following the same theme. I watch all these amazing videos on YouTube on bullet journaling and every month the designs look really nice. So I decided to give it a go and do the same. I contemplated for a while on the theme I wanted to go for. I wanted something easy and relevant but I didn't want to do another flower theme that is the most popular one for this season. So, after some thought I decided to go with clouds and little paper boats, and I'm really excited with the way it turned out.

So, the first page of the month I decided to keep it quite simple with a few clouds and a paper boat on one of them. It was hard to not use my cute penguin calendar, but I think it still turned out cute and nice. I also added the March calendar underneath to add balance to the picture.
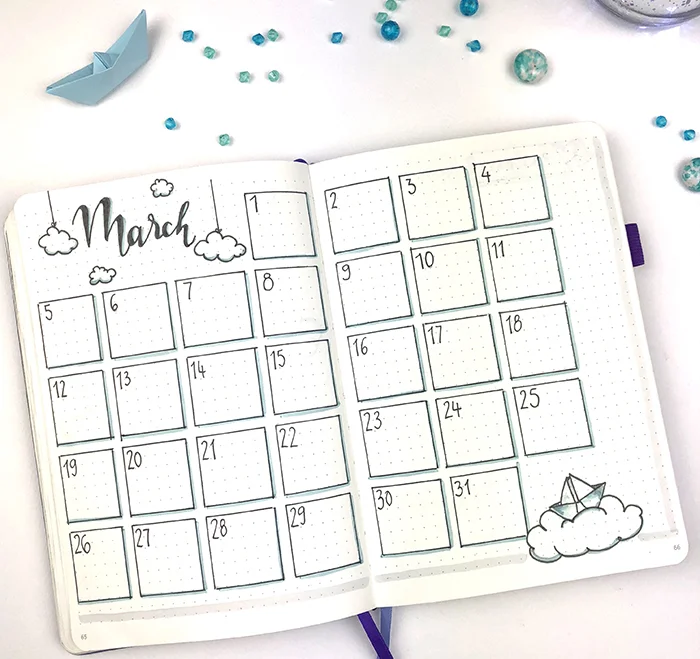
For my monthly spread I chose again the grid layout, but I decided to keep the boxes separate. I found that when you create the grid with the boxes connected to each other, unavoidably there will be a column of boxes in-between the pages that made it very difficult to write in them. So, by keeping a space between the boxes you can get a much better layout. Each box is 6x6 except from the first column that is 5x6. And of course the theme continues here as well.

The next page is all about my goals for the month. I kept it very simple with only two categories - Personal and Business. I try to keep things simple and more focused this month, and with these two categories I can focus on all the things that I want.

The next page is my monthly focus. I found this in 'Your Best Year 2018' by Lisa Jacobs and I really really like that idea, so I decided to added it in my bullet journal as well. These are my monthly objectives summarised in 5 categories that include Financial, Spiritual, Mental, Physical and Relational.
These are the five pillars of a harmonic life, as taught in 'Harmonic Wealth: The Secret of attracting the life you want' by James Arthur Ray. And on this page you basically write what you want to improve during this month in each of those categories. It's just another way to help you focus more on specific areas of your life in order to move forward and make changes.

This next spread is again inspired by 'Your Best Year 2018'. I like how Lisa helps you to organise your thoughts and what you have to do during the month. On the left hand page is the areas of focus, where I will write everything I want to do during March. Then I'll take it a step further and I will be more analytical by writing all the steps I need to take in order for everything to be done. After that, I will take those steps and I will group them as the tasks that need to be completed in the 4 weeks of the month. That way, I know exactly what I need to do each week in order to have a successful month, so that I will finish all my projects and tick off all the things from my to-do list.

Next comes my finances page for March. I usually keep this spread in another notebook I have, but I find it tiresome to go back and forth to different notebooks all the time, so I decided to add it in my monthly set up, instead. This is a very basic spread for my income and my expenses. It's good to track your finances, and keep up with your money and how you spend it.

As always, I add a notes page in my monthly set up. The notes page is one of my most used and visited pages during the month. I like to write everything that comes to my head that I want to remember, ideas, and notes that don't have a place anywhere else in my bullet journal. Sometimes I even add post-it notes or I stick pieces of paper and photos. And by the end of the month it definitely doesn't look as nice and clean as this! But I don't mind 😉⠀

For the next spread I was inspired by Sarah Churchill on YouTube. This is my 'one line per day' spread which I basically try to write something every day. It is like a journal - it could be a thought, it could be something that happened during that day, a quote I liked or anything else I want to remember about that particular day. And even though it says that it's a line per day, I added two lines for each day of the month, because I like to have more space to write things down.

The next spread is again something that I saw in Sarah's video and I really wanted to give it a try for March. It's a self love log, where I write one thing I like about myself each day. After looking online, I saw more people mentioning this page as well, and I believe it started from Caitlin's Corner, so I thought I should mention her here as well.
I think a lot of people (including myself) find it difficult to come up with things to love yourself about. It's easier to be hard on ourselves and when it comes to showing some love, people mistake it for arrogance sometimes. So this spread will help me to be nice to myself and find 31 things that I love about me. Let's see what I'll come up with!

Moving on we come to my exercise log. Basically I like to note down when I exercise and what type of exercise I do, how long etc.
I did terribly last month and I have to get back to the way I used to exercise before. I can't seem to make it a habit to exercise at least 3-4 times a week, and this spread is my attempt to persuade myself to exercise more often. I admit that I don't feel very good when I look back at the February's exercise log page, so hopefully this month I'll try harder and make myself proud! If you have any advise on how you push yourself to exercise during the week, please let me know in the comments below.
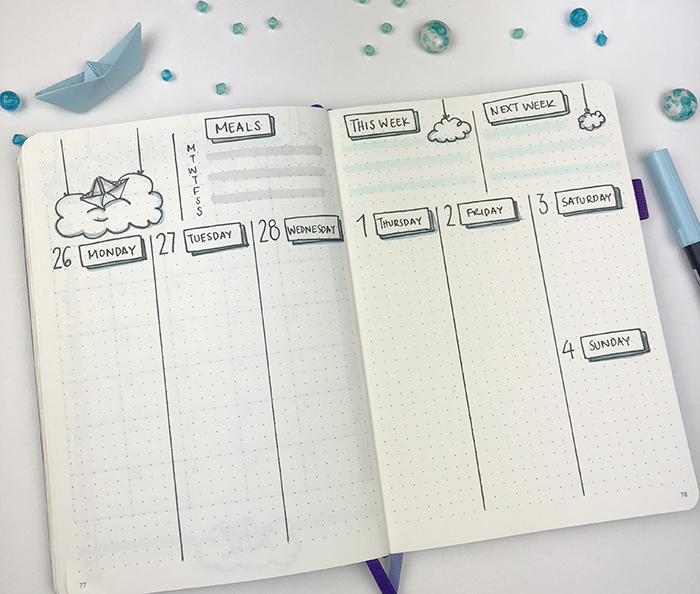
And the last spread is the first weekly spread of the month. This is the third time I'm using this weekly spread layout and I really like it. This time though I incorporated the theme of the month with the paper boat and the clouds. Do you have any go to weekly spreads that you seem to use over and over? Comment below and let me know. (Spread inspired by @penpapersoul)
You can watch also the video here, to see exactly how I created each spread:
SUPPLIES I USED:
- Scribbles That Matter notebook
- Staedtler Pigment Liner 0.2 and 0.6
- Tombow Dual Brush Markers (451, 491 and N75)
- Stabilo Trio 2 in 1 in black
- Zebra Mildliners (Smoke Blue and Grey) You can purchase them from kawaiipenshop with free international shipping. Use the code christina77star to get a 10% discount.
And that is one more month planned in my bullet journal. Have you finished your setup for March? What theme did you choose for this month? Let me know in the comments below. Also, if you use the same theme like me, please send me a picture of it at christina77star@gmail.com


Instagram Challenge: #doodlewithusinmarch2018
I'm excited to announce our Instagram Challenge for the month of March! 👏🏻
It's the #doodlewithusinmarch2018 Instagram Challenge created by me and Alexandra (from @alexandra_plans).
It's going to be 31 days of doodles that will hopefully get you to be creative and have fun! The theme of March's prompts is 'Flowers'. I seriously can't wait to start drawing!
As we did before, all the doodles are part of one big comprehensive picture. Imagine each day to be one piece of the puzzle. So, at the end of the month you will have one big doodle picture! :)
If you decide to follow this way, you'll have to create a table with 5x6 + 1 boxes and you shouldn't add the days on the top. You can also make the boxes and dates in pencil, if you don't want the lines to obscure the end result. It's totally up to you.
Of course, if you prefer to draw the doodles in the traditional way, that's absolutely fine as well. The important thing is to have fun!
You can also download a free printout with the daily prompts here.

If you want to join us then:
- Follow me (Christina) @christina77star and Alexandra @alexandra_plans over on Instagram.
- Download the prompts below.
- Draw something according to the day's prompt, take a photo of it, and share it with us on Instagram.
- Don't forget to add the hashtag #doodlewithusinmarch2018 and spread the word.
- Everyone is welcome!

We're excited to see what you'll share!
Thank you for joining in!


How do you transition from one month to the next in your weekly spreads
Starting a bullet journal can be a bit intimidating to some of you. Up until now you have been used to having a planner all set up for you already, but now you have to put the work, and you can create your own layout. So, you might find yourself at times staring at the empty pages of your journal wondering what to do next.
One of these times might be when you transition from one month to the next and you don't know how to set up your weekly spreads.
How do you do your weekly spread when the month changes mid-week? On which monthly layout do you add that particular week? Do you repeat it for the next month?
These are some of the questions I get asked, so today I thought I'll show you a few ways you can deal with this dilemma and choose the one that works for you.

Starting a bullet journal can be a bit intimidating to some of you. Up until now you have been used to having a planner all set up for you already, but now you have to do all the work, and you can create your own layout. So, you might find yourself at times staring at the empty pages of your journal wondering what to do next.
One of these times might be when you transition from one month to the next and you don't know how to set up your weekly spreads.
How do you do your weekly spread when the month changes mid-week? On which monthly layout do you add that particular week? Do you repeat it for the next month?
These are some of the questions I get asked, so today I thought I'll show you a few ways you can deal with this dilemma and choose the one that works for you.
1. The month with more days for the week wins
As the title suggests, when you are about to create the layout for the last week of the month, you can check and see how many days of that week belong to that month and how many days belong to the next month.
The month with the most days wins, and you can then add that weekly spread in the winning month's layout.

So for example, the above weekly spread was for the last week of July and the beginning of August. As you can see August is clearly the winner so this spread should go to the August layout.
2. Go with the flow
This way suggests to go with the flow. That means that no matter how many days there are in each month or when the new month begins, since the week has days of the current month in it, then it should go in that month's layout.

So in this case, even though there are only 2 days of August in this weekly spread, it will still be added in the August layout. That way, you don't have to count and make things more complicated. Regardless of the month you continue your weekly spreads as normal.
3. Create shorter 'weeklies'
If you want to be more strict with your weekly layout and the days that belong to each month, there's also the option to add only the days of that particular month on your weekly spread. What that means is that you create shorter 'weeklies' with only the days of the current month in them.
So for example, if May ends on a Wednesday, then you can create a mini weekly spread with the last three days of May (Monday-Wednesday) on one page, and then the rest of the week you can add it in the June layout. So, you are essentially creating two partial weekly spreads.
Of course you also have the option to skip the weekly spreads altogether for the last days of the month and do only daily spreads.
The bullet journal system gives you the opportunity to choose which way suits you best. You can also try one method one month and if you see that it doesn't work, you can change it around the next month. The important thing is to not stress about it, and just plan however feels the most useful to you.
Me personally, I prefer the go with the flow option. But there have been months where I have also followed option no. 1.
How do you transition from month to month with your weeklies? Are you using any of the above choices? Do you do things differently? If so, let us know in the comments below.


The Craft Planner Review
Hey there everyone! It's been a while...! But I'm happy to report that I'm finally all settled in the new house, and I can't wait to start creating again ☺️
In today's blog post, I'd like to review the Craft Planner for you. Back in July, I was asked to review the Craft Planner and I really liked the way this planner helps you to manage your projects. At the time the planner was not available yet, and I only had some printable pages to play with. But now I have the finished product in my hands, and I'd like to review it properly for you.

I chose the Craft Planner A5 Limited Edition in Coral Blue. It is actually a very light blue-grey colour and the cover feels like fabric. I really like the way it looks - very sophisticated.

Inside the planner you also get some coloured dot stickers that you can use to colour code in your planner, and a pager marker with some nice suggestions to plan your day and manage your time.

The planner comes with a light grey elastic band that is very sturdy.

I like the attention to detail with all the shiny letters at the front and the back of the notebook.

I also like the shiny finish of the pages on the side, that makes it look so cool when it's closed.

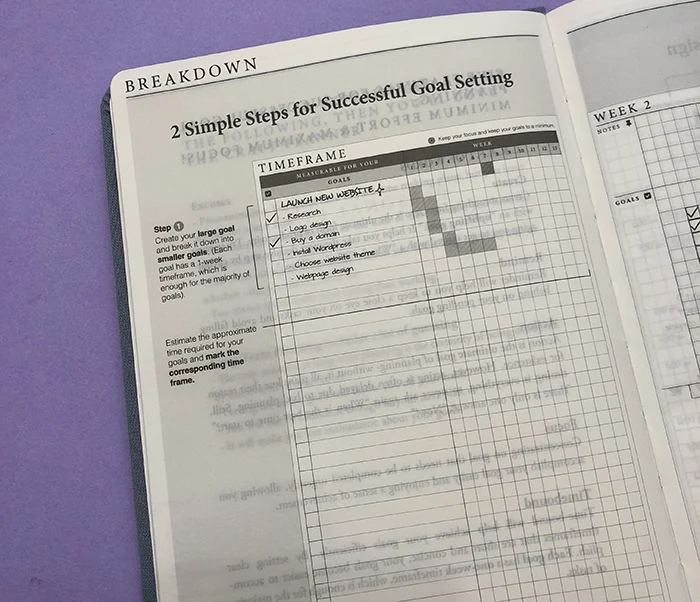
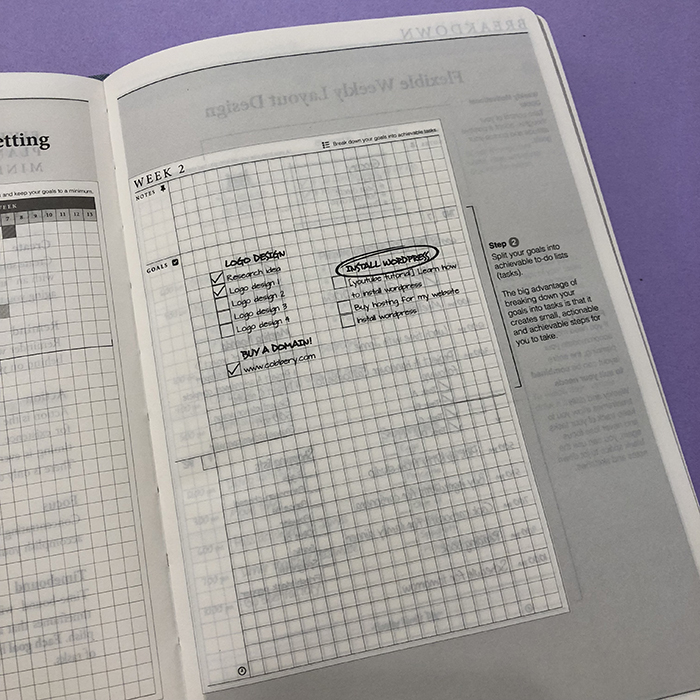
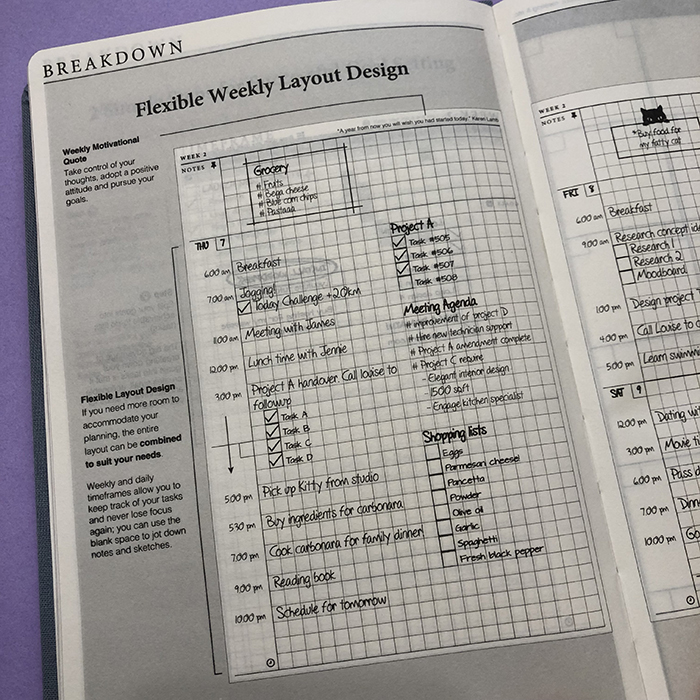
There are 4 pages of break-down demo in the beginning of the notebook, where it shows you exactly how to use this planner. You can scroll through the pictures above to see them properly.
The first section of the notebook consists of 24 pages with the 12-Month Calendar, which is undated. I always like to have a month at a glance section, where I can plan the whole month at once and have a clear view of what I have to do each day. Also, note that the weeks start from a Sunday for this layout.

Then you get 4 pages of 52-Weeks Timeframe Goals Checklists. I really like this idea, where you can break down your goals / projects into smaller steps and allocate each one on specific weeks. That way you can totally manage your projects and stay on top of them.

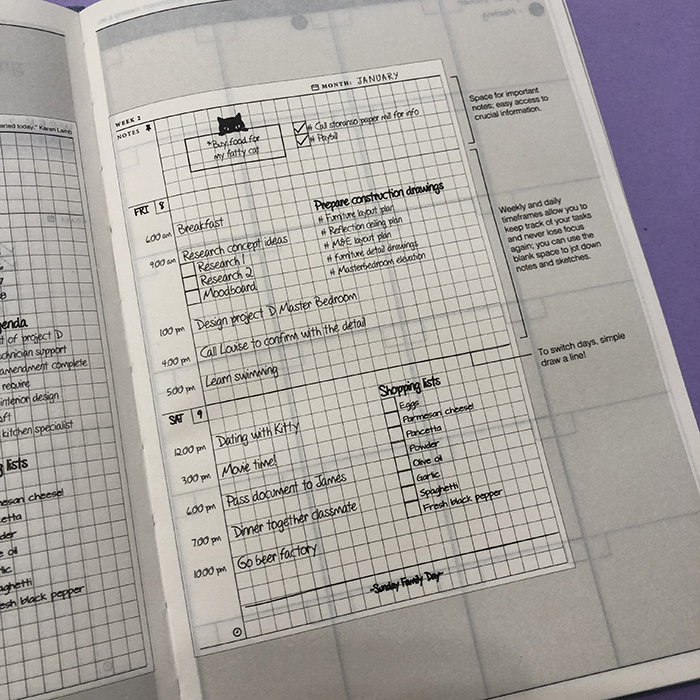
The last part of the notebook is 208 pages of 52-Weeks Planner, which is again undated. There are sections for your notes and goals, and then you can start planning your days.

At the back of the planner you get an expandable inner pocket, which I always find very useful for stickers or little notes and stuff.

You also get 2 bookmakers in different shades of grey, that you can use to mark the pages you want in your notebook.
Features
- The planner comes in A5 size (5.8" x 8.4”), with a luxurious cover made form premium fabric.
- It comes with cream lightweight paper, 70 gsm
- 2x Bookmarkers (0.35cm width)
- It lays flat and allows seamless writing on every page.
- Apart from the Coral Blue colour, it also comes in Obsidian Black and Forest Pine.

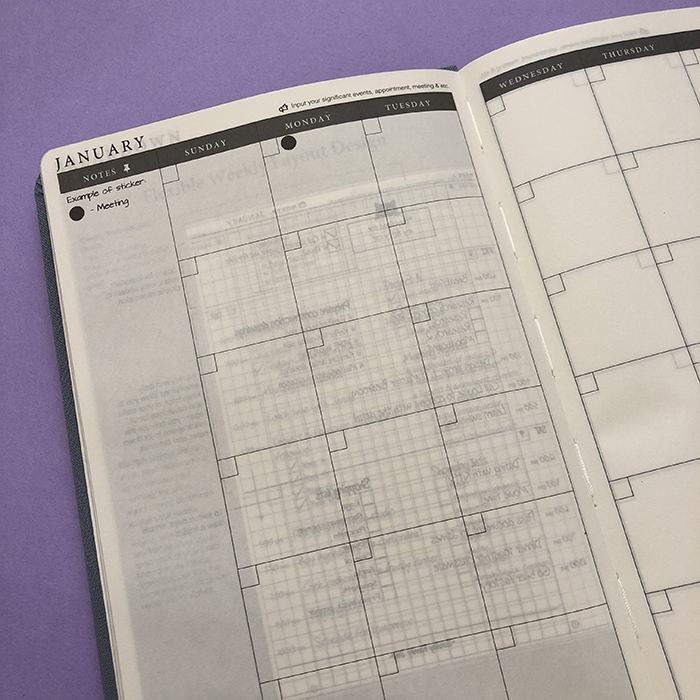
I gave the planner a test drive, where I planned and colour coded one of my days. I used my most used pens on this page, because I wanted to test the quality of the pages and see if there is any ghosting or bleeding. I even used a fountain pen (see the 'stay focused' phrase at the bottom).

As you can see there is quite a bit of ghosting, but no bleeding through.
I really liked the format and the system of the Craft Planner. Future planning and project planning with the bullet journal can be a bit tricky. And all in all I'm really happy with this notebook.
The things that I would like it to have to make it even better would be:
- Index Page in the beginning of the notebook. Since using my bullet journal, I like to know where everything is and I tend to archive all my notes and planners.
- Numbered Pages. Again, it's nice to be able to refer to a page without adding any markers.
- Better quality paper. I find this paper to be very thin and see through, so I believe that a thicker and better quality paper will take this notebook to the next level.
- Extra pages at the end of the notebook. I always like to keep lists of ideas and notes for my projects, so any extra pages is always nice to have.
You can get a free digital version of the Craft Planner here, to try out this system for yourself before you buy. If you want to get your own planner you can visit their website. Right now they are having a sale and they also offer free international shipping!
Have you heard of the Craft Planner before? What do you think of it?


