Bullet Journal Ideas: 3 Weekly Spread Layouts for June 2018
Continuing from last month, I decided to create a similar post for June as well. In this post I'll show you the 3 layouts I’m using for my weekly spreads in my bullet journal for June, and how I decorated them.
I tend to have 3-4 layouts for my weekly spreads which I rotate during the month. And of course I try to make them more interesting by decorating them according to that month’s theme. For June the theme is Photos and Summer memories.
This is the first weekly spread for June, and you can find exactly how I created it in my monthly plan with me video.
This is the second weekly spread for June. It is a layout that is inspired by @penpapersoul⠀on Instagram. I continue the theme with the pictures, the ice-creams and all that.
I deliberately chose pastel colours that are completely different from what you'd usually use to colour all these doodles.
You can find all the supplies I used at the end of this post.
For the third weekly spread I chose again a vertical layout with all these hanging signs and pictures. And as you should know by now, I love to add some accent coloured lines in my spreads. I like the effect they give with minimum effort.
As you can see my doodles are quite raw and far from perfect. And that is the look I wanted to go with. I wanted to show you that you can do something cute and fun without it being a masterpiece. You should create things in your journal that you enjoy and feel fun.
The last spread of the month was inspired again by the lovely @momruncraft on Instagram. I have to say that this is one of my most favourite layouts. I like that it separates your to-do list in categories. And of course you can add any category you want. I added: work, personal and meals.
I particularly enjoy writing in the section of the happy daily thought. It's nice to start with something positive each day
SUPPLIES USED:
- Scribbles That Matter notebook
- Faber-Castell PITT Artist Pen in S, F, B
- Tombow Dual Brush Markers (491, 451, 452, 443, 553, 673, N75 and N95)
So, these are the last 3 weekly layouts for June. I hope you liked this post and that you found some inspiration for your own weekly layouts. If you liked the theme and you'd like to recreate it, please send me some pictures. I'd love to see your pages!! You can always contact me at christina77star@gmail.com
Plan With Me: My June Set Up in my Bullet Journal + Video
I can't believe that May is almost over! Time flies by for sure! As always I had to get my bullet journal ready for June (Yay! 👏🏻)
I knew I wanted the theme to be related to summer, but I wanted something a bit different from the normal summer themes. So, in the end I decided to go with a 'Polaroid photos and Summer Time' theme. I also didn't want to use all the conventional colours that you'd normally use for this type of theme. I wanted to go more with a pastel palette. (You can check all the supplies I used for this theme at the end of this post 😉)
Make sure you scroll down to the bottom of the post, because there's also a video, where I'm showing you exactly how I've created each spread.
We start with the cover page of the month. As you can see it's full of photos of ice-creams, summer fruit and a cute little boat. 🍦 All things you associate with summer. Here you can also see the type of colours I chose for this theme. They are mostly blues with pinks and light purples.
The theme continues into my Monthly Spread. Again I used the separate boxes for this layout, and I've added lots of photo doodles with lots of summer elements to match with the theme.
As you can see my doodles are quite raw and far from perfect. And that is the look I wanted to go with. I wanted to show you that you can do something cute and fun without it being a masterpiece. You should create things in your journal that you enjoy and most importantly have fun.
Again I'm separating my monthly goals into two sections: personal and business. Sitting down and writing all the things I want to focus on during the month in these two categories has proven very productive. It helps me clear my head and narrow down the things that I want to achieve each month.
The next page is my monthly focus. I've started using this spread in March and it has become a staple in my monthly set up since then.
I found it in 'Your Best Year 2018' by Lisa Jacobs and decided to added it in my bullet journal. These are my monthly objectives summarised in 5 categories that include Financial, Spiritual, Mental, Physical and Relational.
These are the five pillars of a harmonic life, as taught in 'Harmonic Wealth: The Secret of attracting the life you want' by James Arthur Ray. And on this page you basically write what you want to improve during this month in each of those categories. It's just another way to help you focus more on specific areas of your life in order to move forward and make changes. So, together with my monthly goals page they set up my intentions for each month.
Moving forward, this is my areas of focus / tasks to complete spread. It is the next step of my monthly focus and planning. One more spread inspired by 'Your Best Year 2018'. It helps you to organise your thoughts and what you have to do during the month and turn your plans into actionable steps.
On the left hand page is the areas of focus, where I write everything I want to do during June. To create this list, I look at the previous two spreads. Then I take it a step further and I write all the steps I need to take for each goal, in order for everything to be done. After that, I take those steps and I spread them as the tasks that need to be completed in the 4 weeks of the month. That way, I know exactly what I need to do each week in order to have a successful month, so that I will finish all my projects and tick off all the things from my to-do list.
Next comes my monthly finances spread as always. It's a basic spread for my blog/work income and my expenses.
As always I keep a notes page in my monthly layout. I think every one should have a page like that in their monthly setup. It's such a useful page, that keeps all my random thoughts and notes in one place. And I think it turned out so cute this time with those polaroid photos!
This is my 'two lines per day'spread. It is a spread that I use like a journal. I like to come here every night and write something I want to remember about that day - it could be a thought, it could be something that happened during that day, a quote I liked or anything else I want .
I enjoy so much filling in this spread each day! And I love coming back at the end of the month to read all the things I've written.
And lastly, but not least, this is my first weekly spread for June. Again I used a very simple layout for the first week. I love the simplicity and functionality of it. And it's my go to layout when I want to create my weekly in a hurry. You simple create 2 lines on each page and then you add the days on each rectangle formed.
SUPPLIES USED:
- Scribbles That Matter notebook
- Faber-Castell PITT Artist Pen in S, F, B
- Tombow Dual Brush Markers (491, 451, 452, 443, 553, 673, N75 and N95)
And that is one more month planned in my bullet journal. Have you decided on June's theme yet? Do you prepare ahead of time, or you like to start planning on the 1st of each month? Let me know in the comments below. Also, if you use the same theme like me, please send me a picture of it at christina77star@gmail.com
Bullet Journal Ideas: 3 Weekly Spread Layouts for May 2018
Since a lot of you ask me about my weekly spreads, I thought to create a blog post and a video where I show you the 3 layouts I’m using for my weekly spreads in my bullet journal for May, and how I decorated them.
Today I'm showing you only the last 3 weekly spreads for the month. The first weekly spread you can find it in my monthly plan with me video.
I tend to have 3-4 layouts for my weekly spreads which I rotate during the month. And of course I try to make them more interesting by decorating them according to that month’s theme.
Make sure you scroll down to the bottom of the post, because there's also a video, where I'm showing you exactly how I've created each spread.
This is the second weekly spread for May. It is a layout that is inspired by @penpapersoul⠀on Instagram. I continue the theme with the light bulbs here too and I’m also using the same colours as before.
SUPPLIES USED:
For the third weekly layout I decided to do something a bit different. A few days ago I bought the Uni Posca White Pen which i’m obsessed with and keep on using it all the time! So, I decided to use it for this spread and I made all the signs black with white lettering. I love the effect that it gives. It looks like little blackboards.
As you can see I tend to prefer the vertical layouts for my weekly spreads instead of the horizontal.
I find that I can utilise the space more, and I think that my brain works better when my to-do list is vertical. Does this happen to you too? Let me know in the comments below.
The last spread of the month was inspired by the lovely @momruncraft on instagram. I like that it separates your to-do list in categories. You can add any category you want. I added: work, personal and meals.
I also liked the section of the happy daily thought that she had in her speed, and I decided to keep it in mine too.
On the left there’s a section that you can add any other part you want in your weekly, like the weather, or your weekly habit tracker and so on. I decided to have it as a notes section, where I usually add things I need to do during the week that don’t have a specific place to go, or they are not meant to be done on a specific day, or things I need to remember to do for next week.
So, these are the last 3 weekly layouts for May. I hope you liked this post and that you found some inspiration for your own weekly layouts. If you liked the theme and you'd like to recreate it, please send me some pictures. I'd love to see your pages!! You can always contact me at christina77star@gmail.com
Plan With Me: My May Set Up in my Bullet Journal + Video
Almost another month is coming up to an end, and you know what that means? That I have to set up my bullet journal for May! Thankfully this month I was ahead of the game and I have already done all my spreads and layouts, which I'm going to share with you in this post. (Yay! 👏🏻)
I found it hard to decide on the theme for May. I had a lot of good ideas and I just couldn't choose which one I liked the best. In the end I went ahead with a light, love and lots of light bulbs theme! I just got inspired by a quote I saw on Pinterest, which I've actually used in one of my layouts as you'll see later on. It says 'Let Your Light Shine', and it really affected me when I read it. So, I wanted to incorporate it in my May's theme.
Make sure you scroll down to the bottom of the post, because there's also a video, where I'm showing you exactly how I've created each spread.
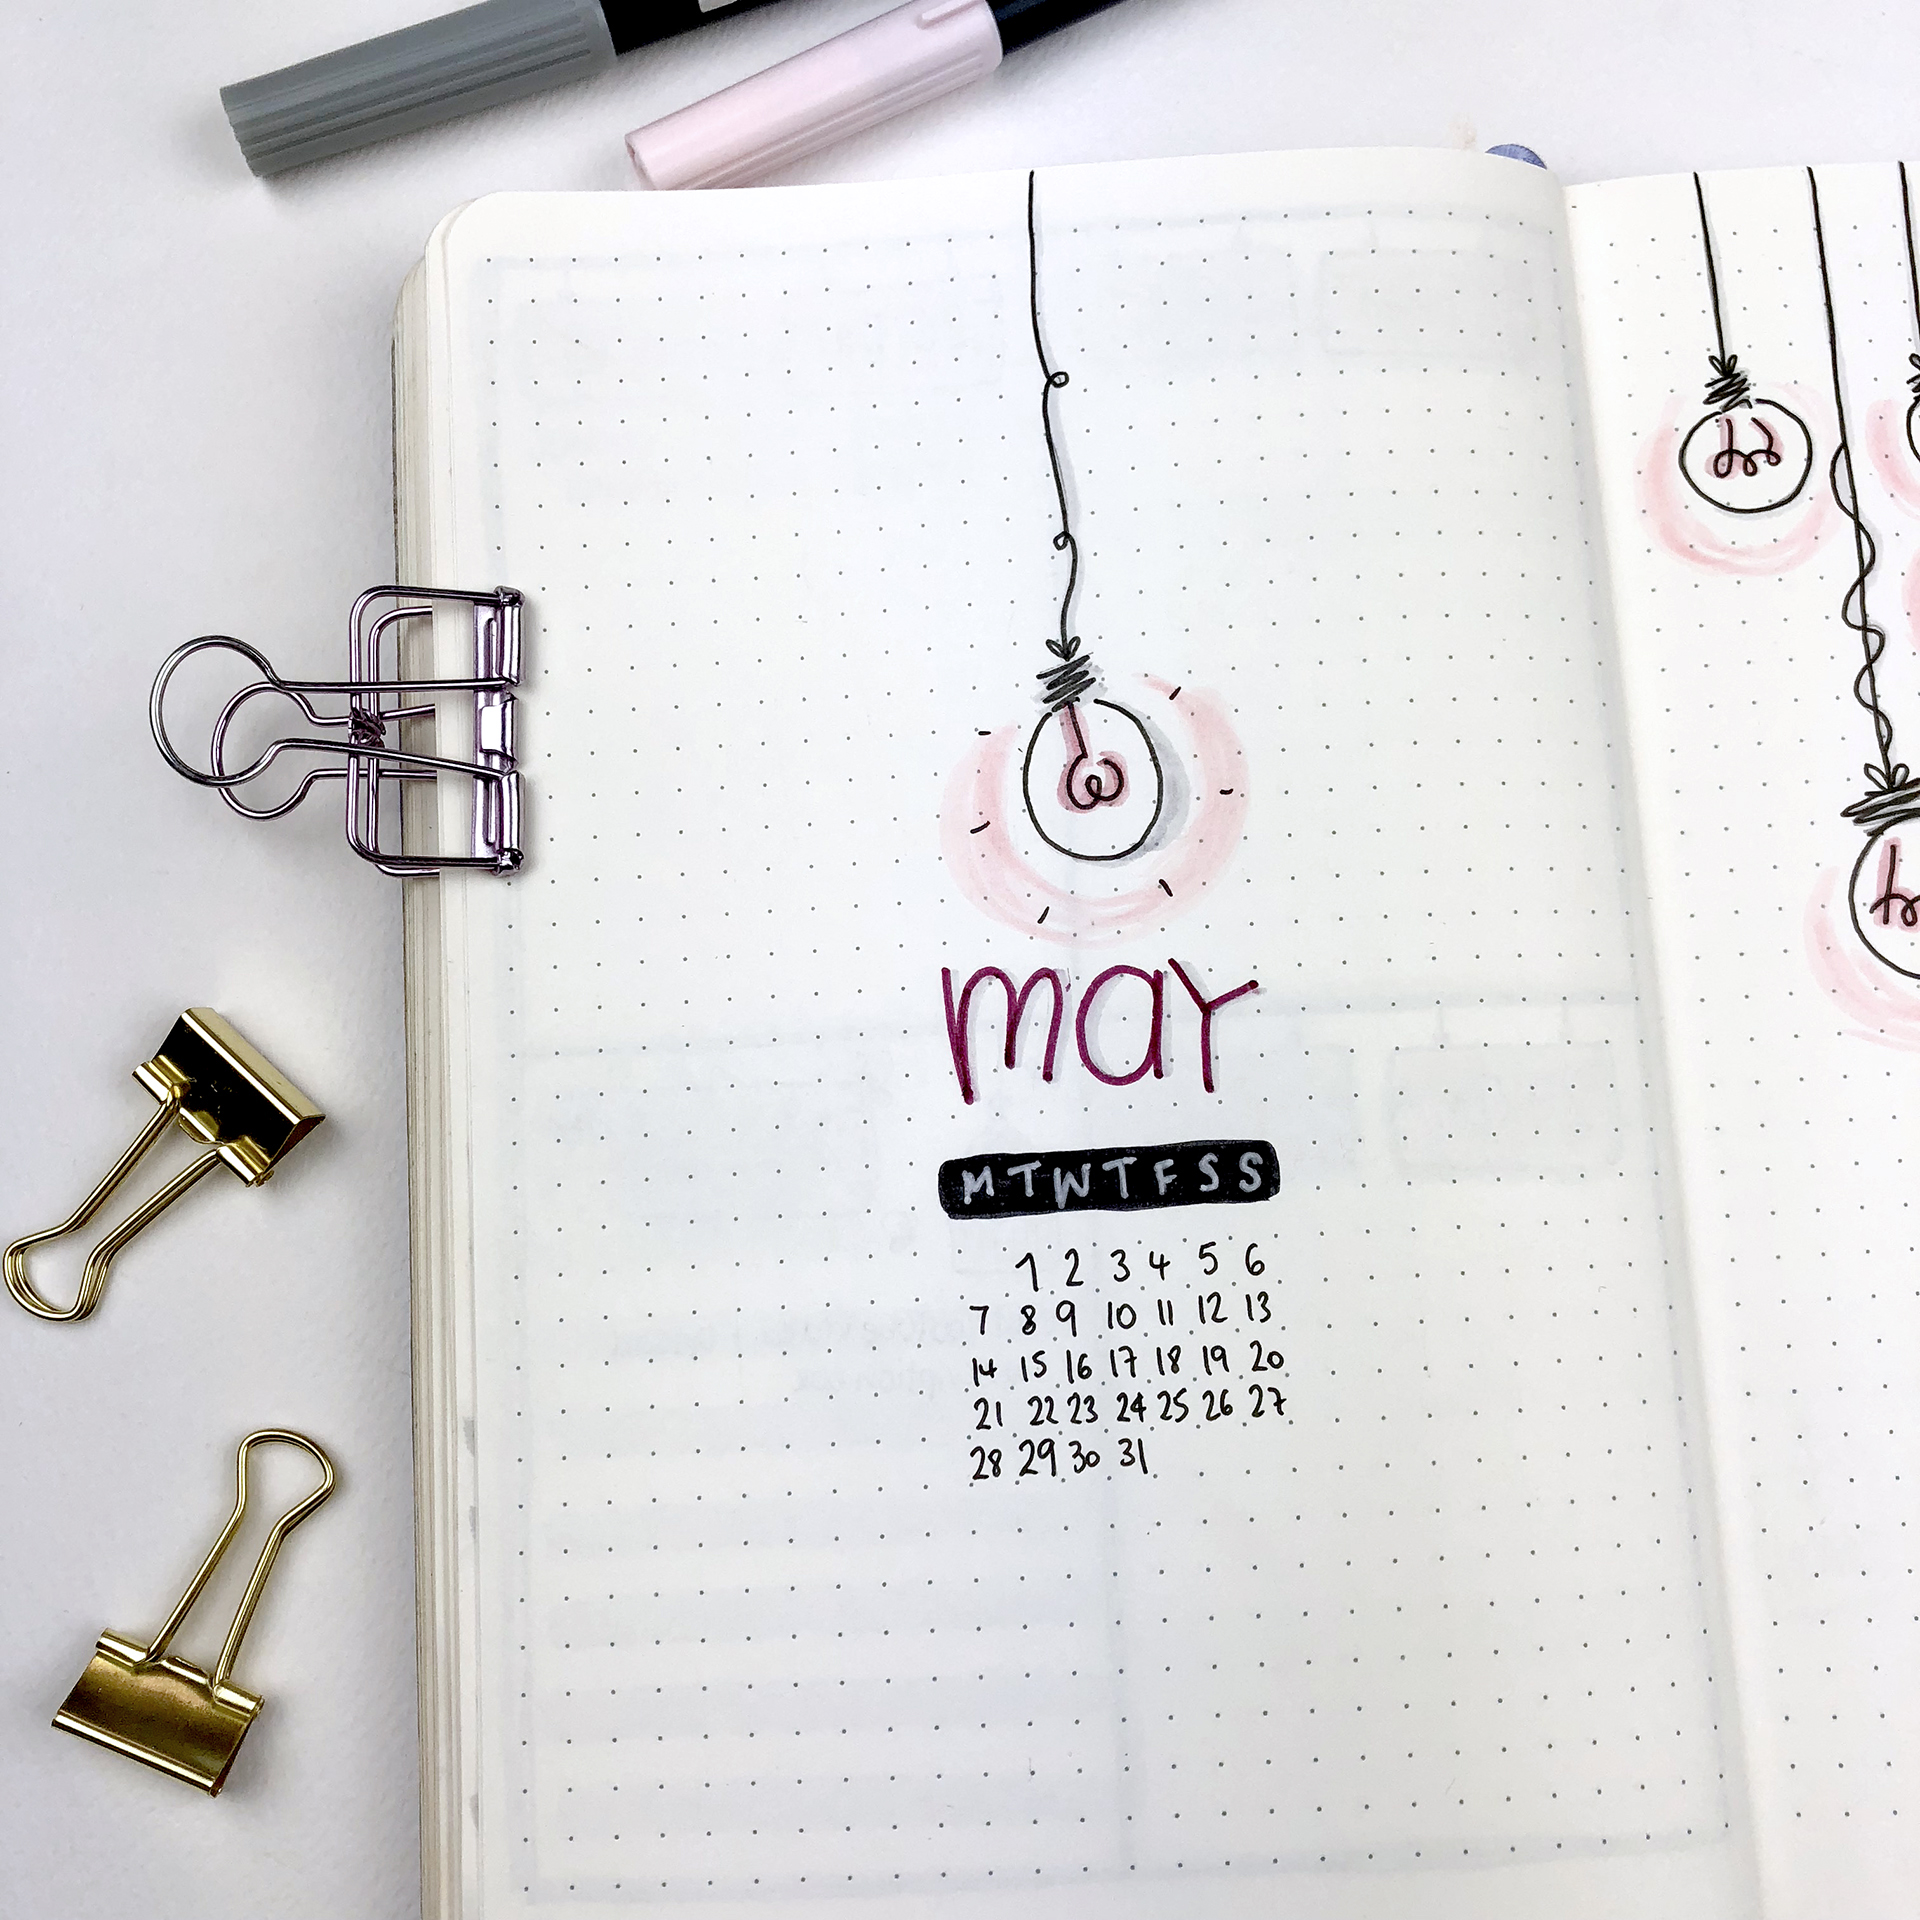
For my cover page I decided to have a two page spread this month. On the first page I have the month with a little calendar and a single light bulb. As you can see, the colour palette I chose for this month has pinks, greys and black and white shades. I decided to not go for the traditional yellow shades that you normally associate with light. And I have to say that I love the way it turned out.
At the end of the post I always add all the supplies I used to create my layouts, so make sure to check it out.
The next part of my cover page has the quote that I mentioned earlier. I really wanted to include it in the layout and I thought that the very first page is the best place to add it. As you can see, I've added lots of light bulbs and I played around with different filaments, that make each light bulb unique and cute 💡
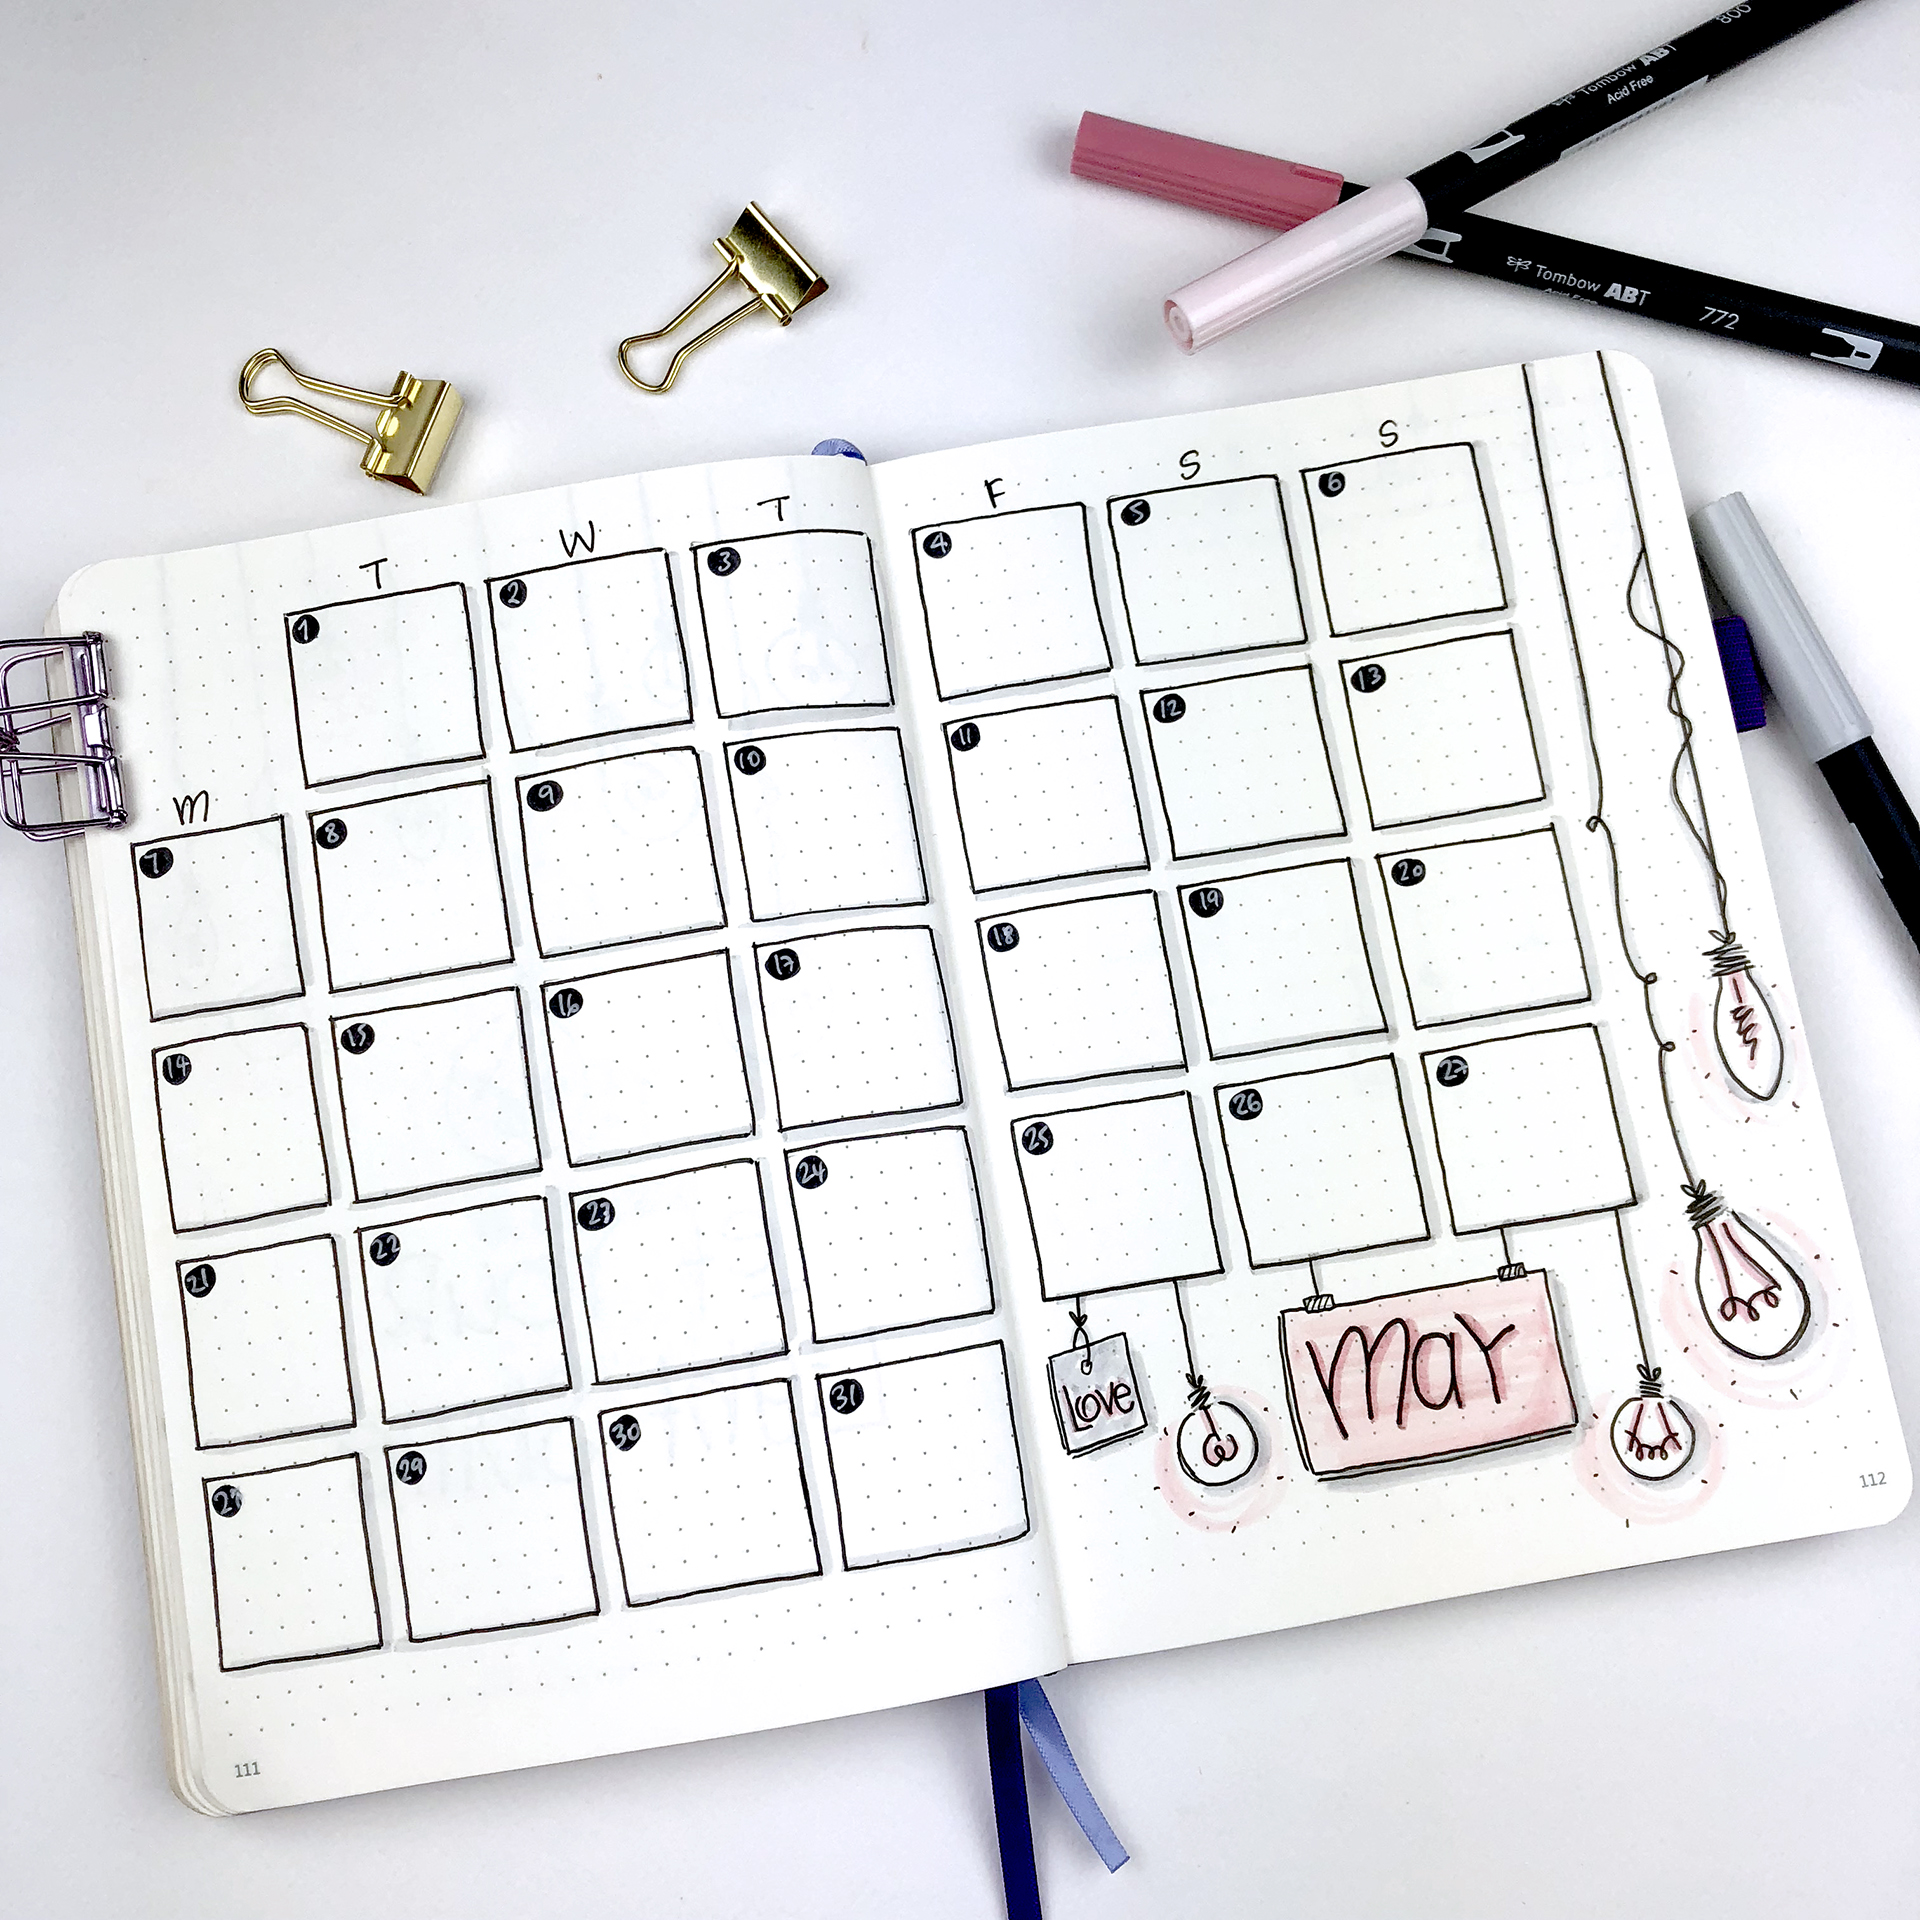
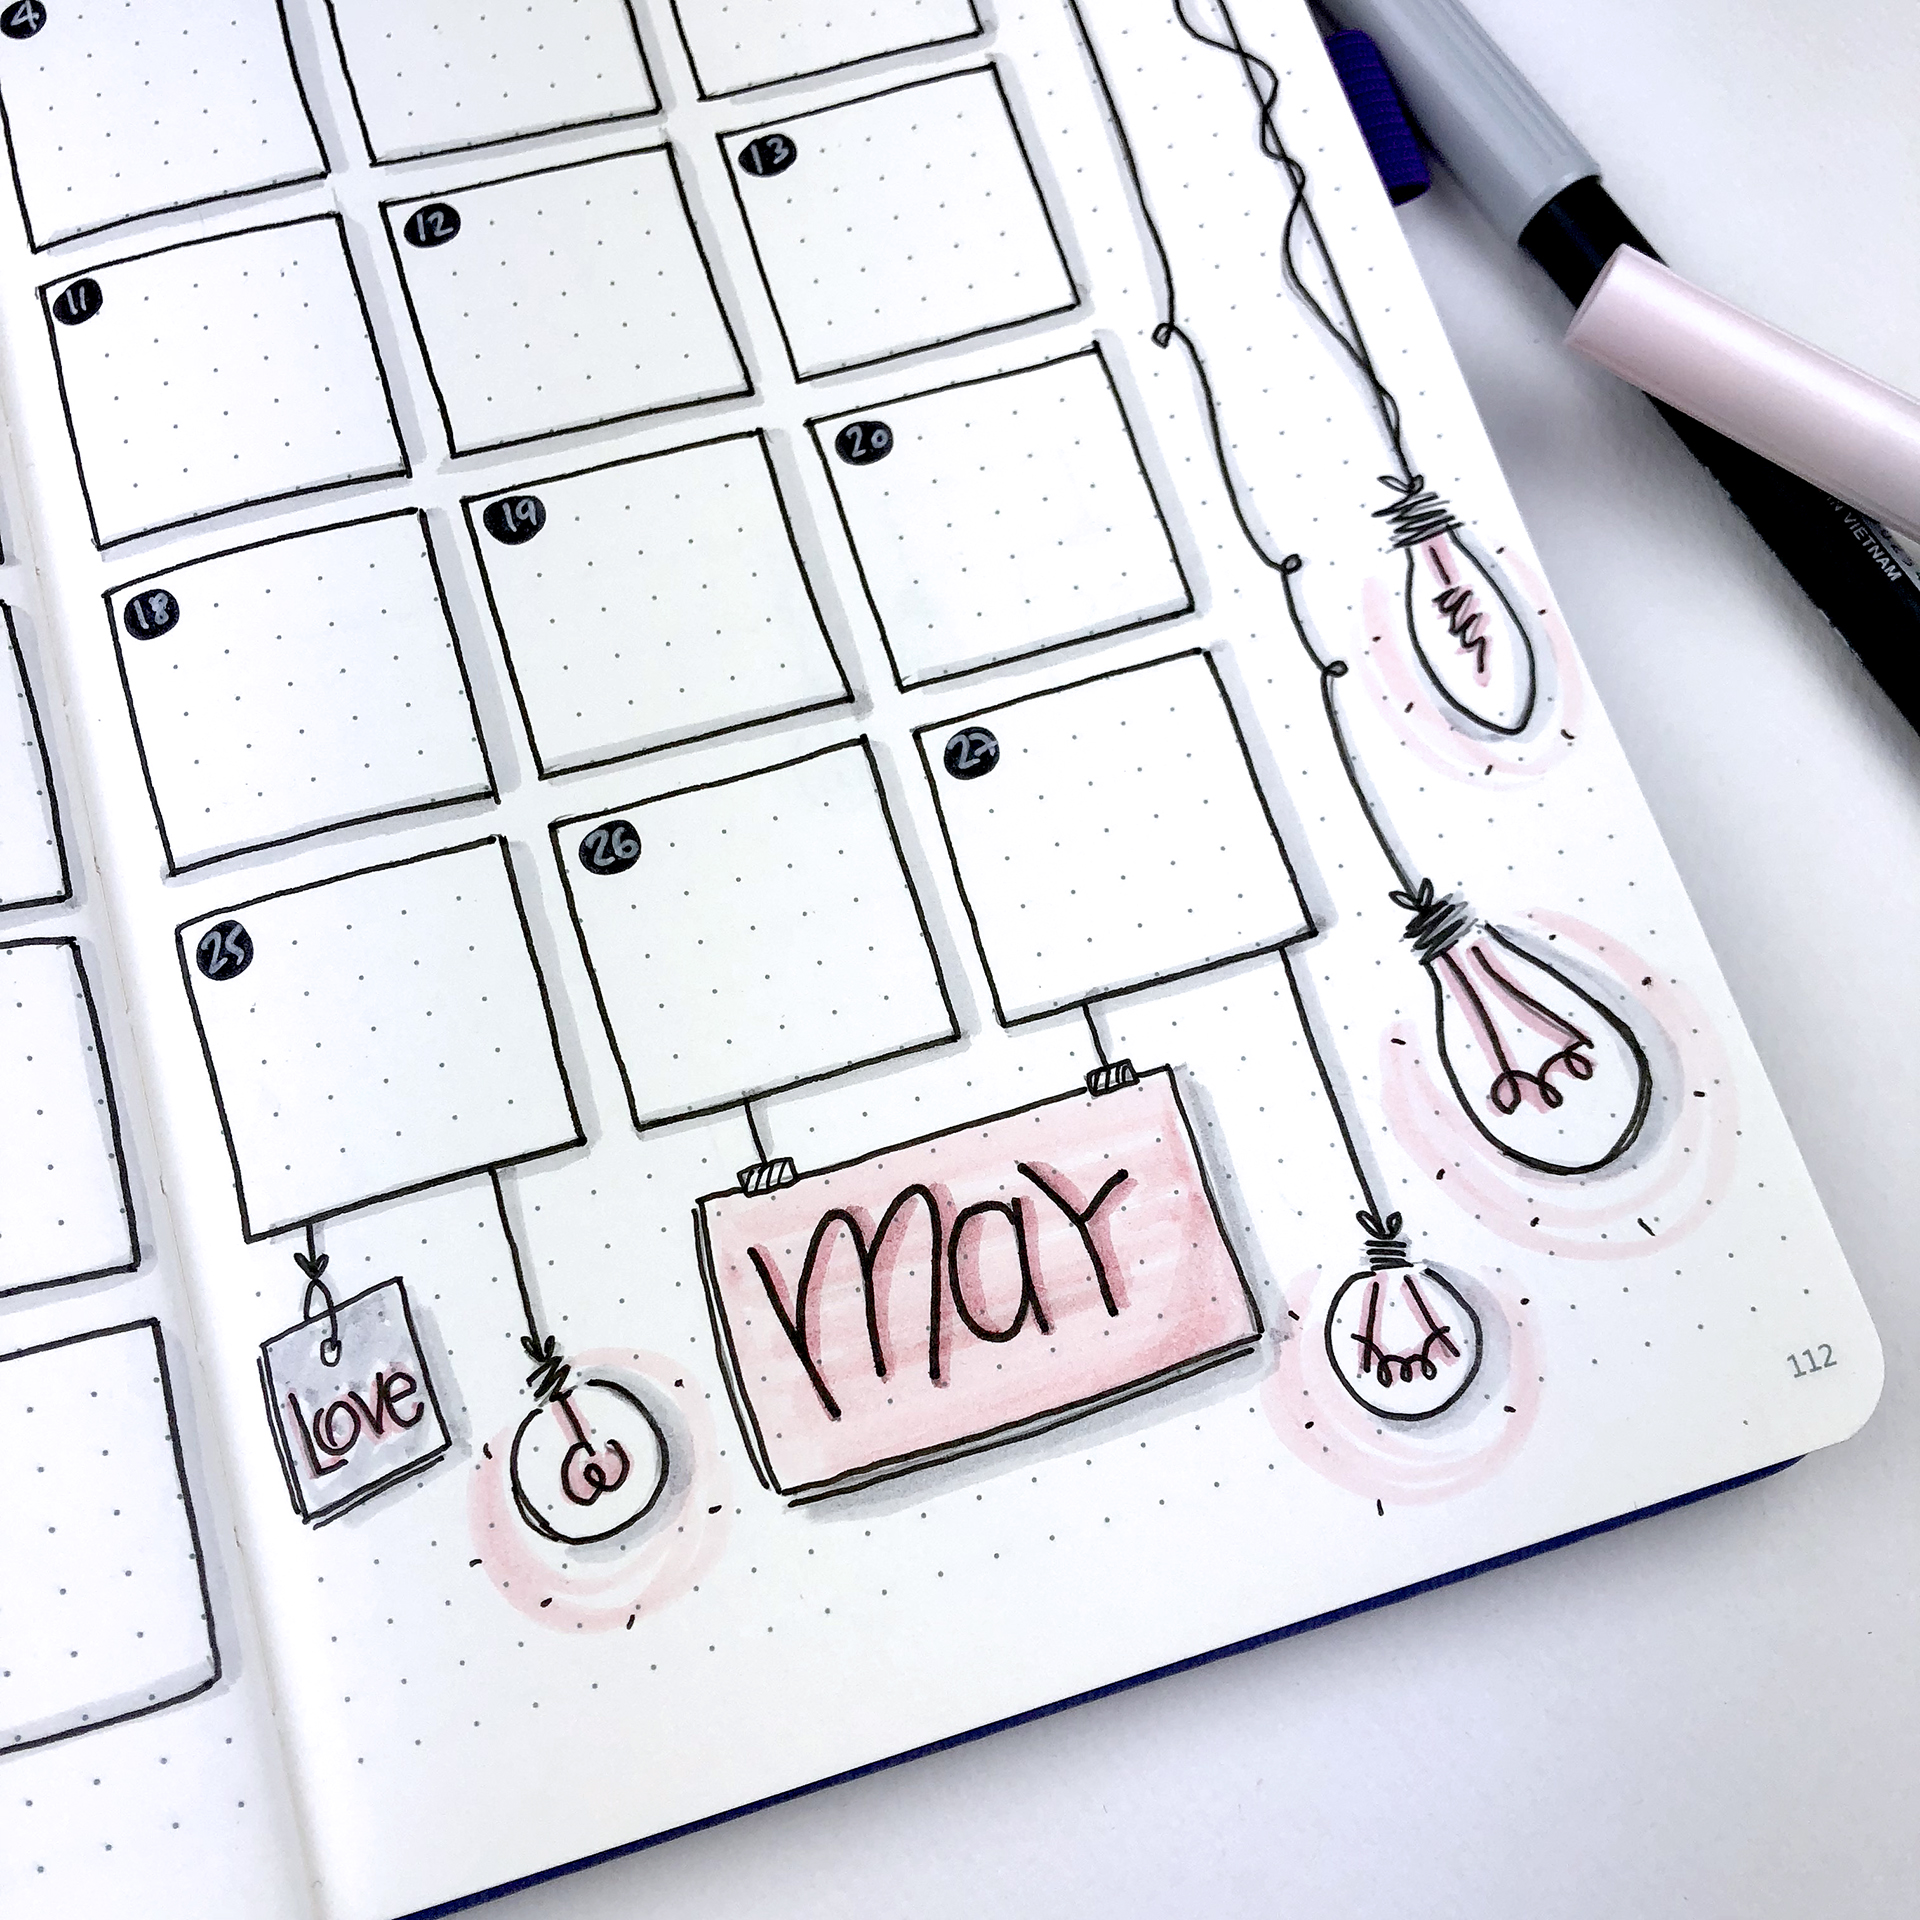
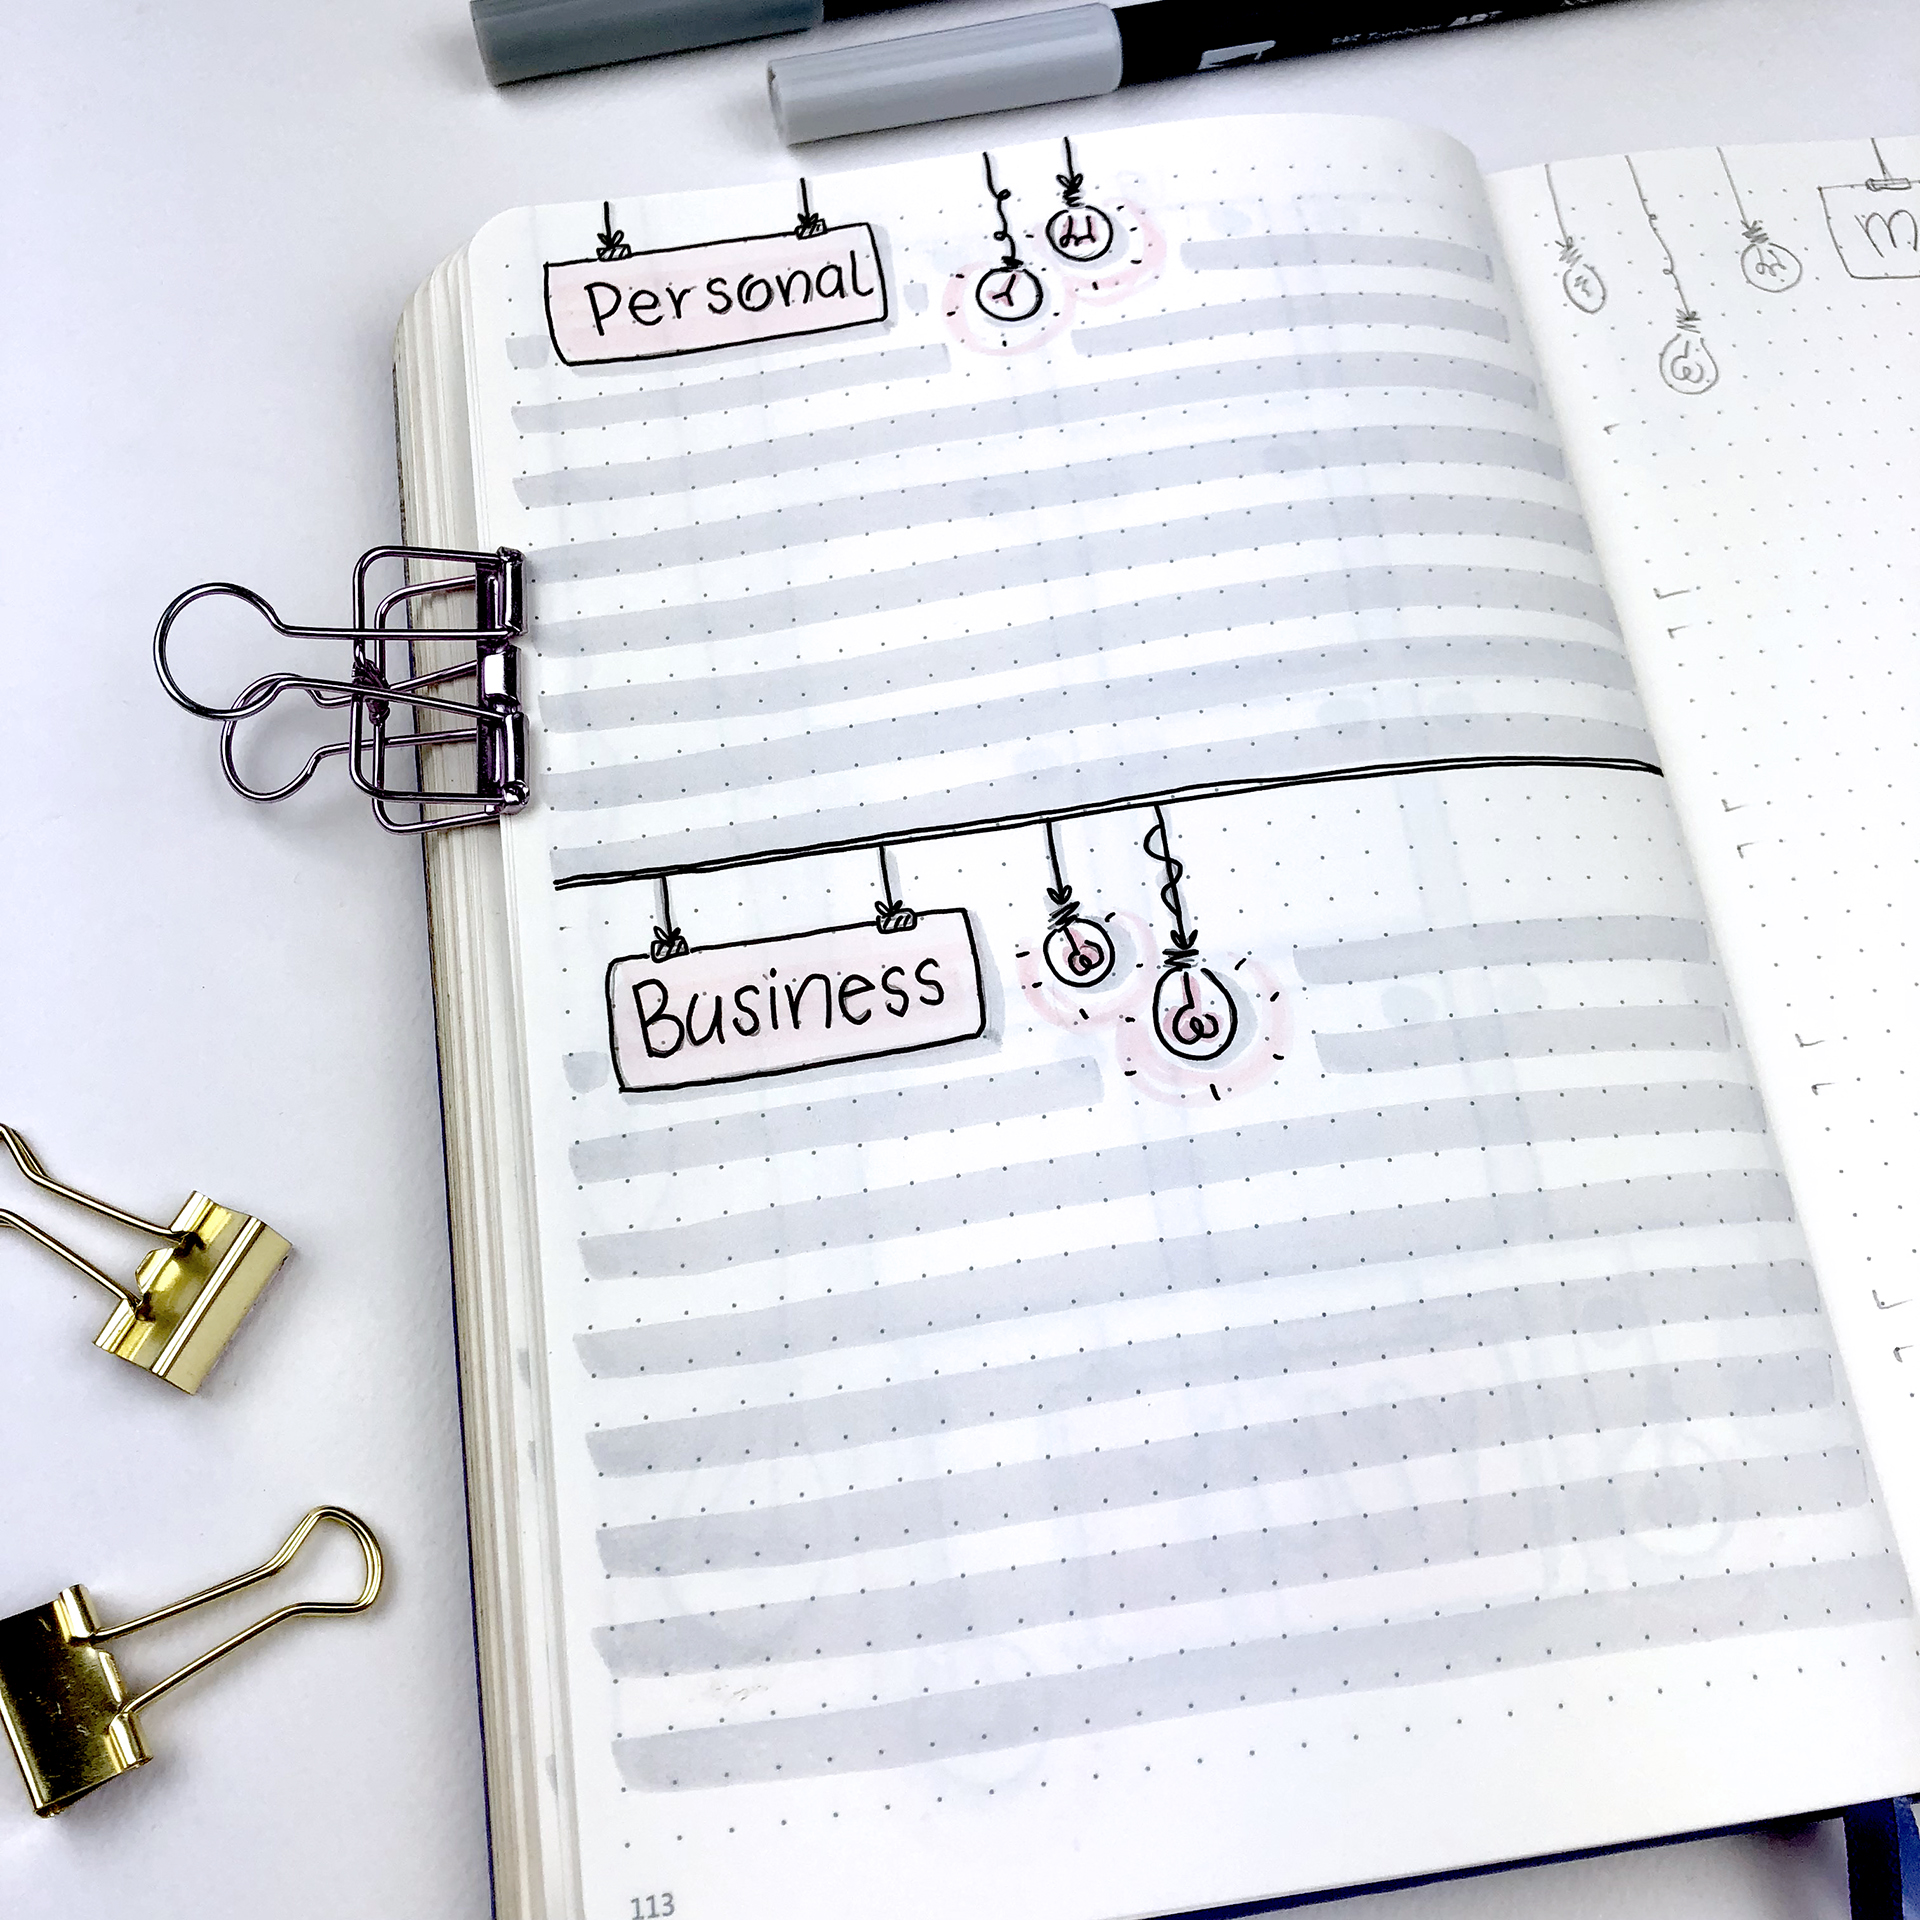
The theme continues into my Monthly Spread. Again I used the separate boxes for this layout, and I've added lots of light bulbs with notes and signs to match with the theme.
I LOVE the black numbers in the boxes, and I think this is one of my favourite pages for this month!!!
Again I'm separating my monthly goals into two sections: personal and business. Sitting down and writing all the things I want to focus on during the month in these two categories has proven very productive. It helps me clear my head and narrow down the things that I want to achieve each month.
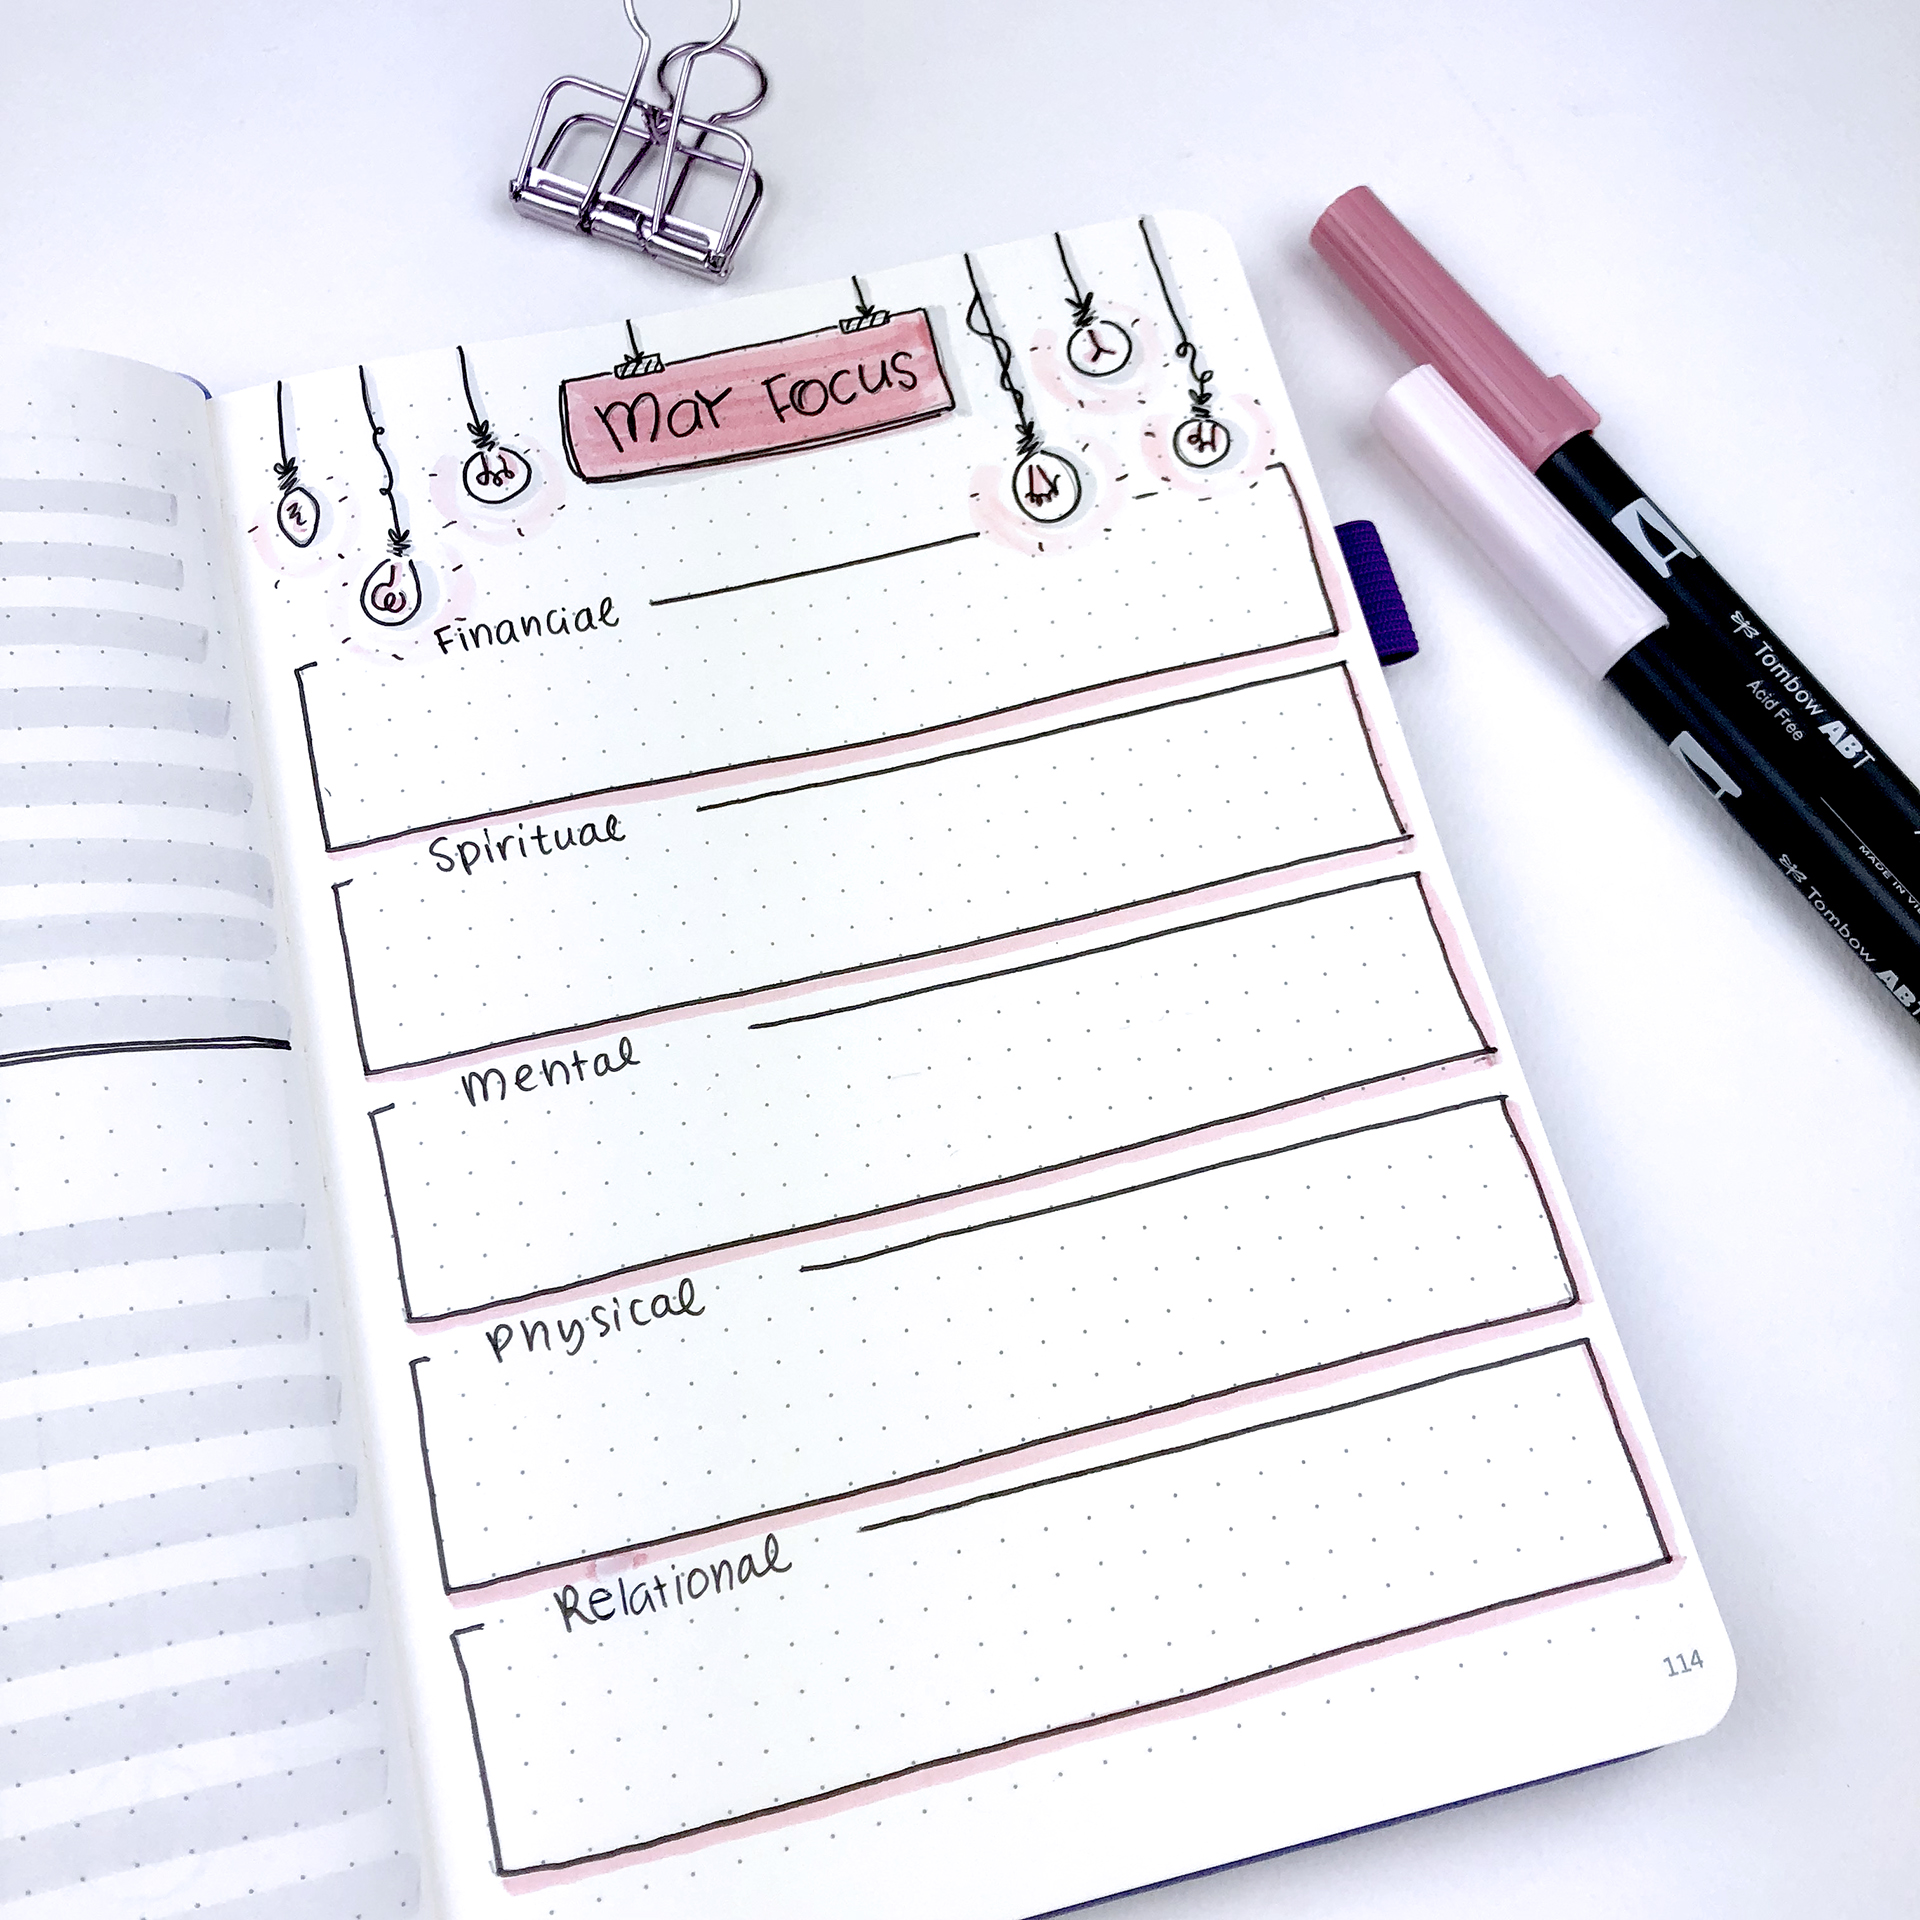
The next page is my monthly focus. I've started using this spread in March and it has become a staple in my monthly set up since then.
I found it in 'Your Best Year 2018' by Lisa Jacobs and decided to added it in my bullet journal. These are my monthly objectives summarised in 5 categories that include Financial, Spiritual, Mental, Physical and Relational.
These are the five pillars of a harmonic life, as taught in 'Harmonic Wealth: The Secret of attracting the life you want' by James Arthur Ray. And on this page you basically write what you want to improve during this month in each of those categories. It's just another way to help you focus more on specific areas of your life in order to move forward and make changes. So, together with my monthly goals page they set up my intentions for each month.
Moving forward, this is my areas of focus / tasks to complete spread. It is the next step of my monthly focus and planning. One more spread inspired by 'Your Best Year 2018'. It helps you to organise your thoughts and what you have to do during the month and turn your plans into actionable steps.
On the left hand page is the areas of focus, where I write everything I want to do during May. To create this list, I look at the previous two spreads. Then I take it a step further and I write all the steps I need to take for each goal, in order for everything to be done. After that, I take those steps and I spread them as the tasks that need to be completed in the 4 weeks of the month. That way, I know exactly what I need to do each week in order to have a successful month, so that I will finish all my projects and tick off all the things from my to-do list.
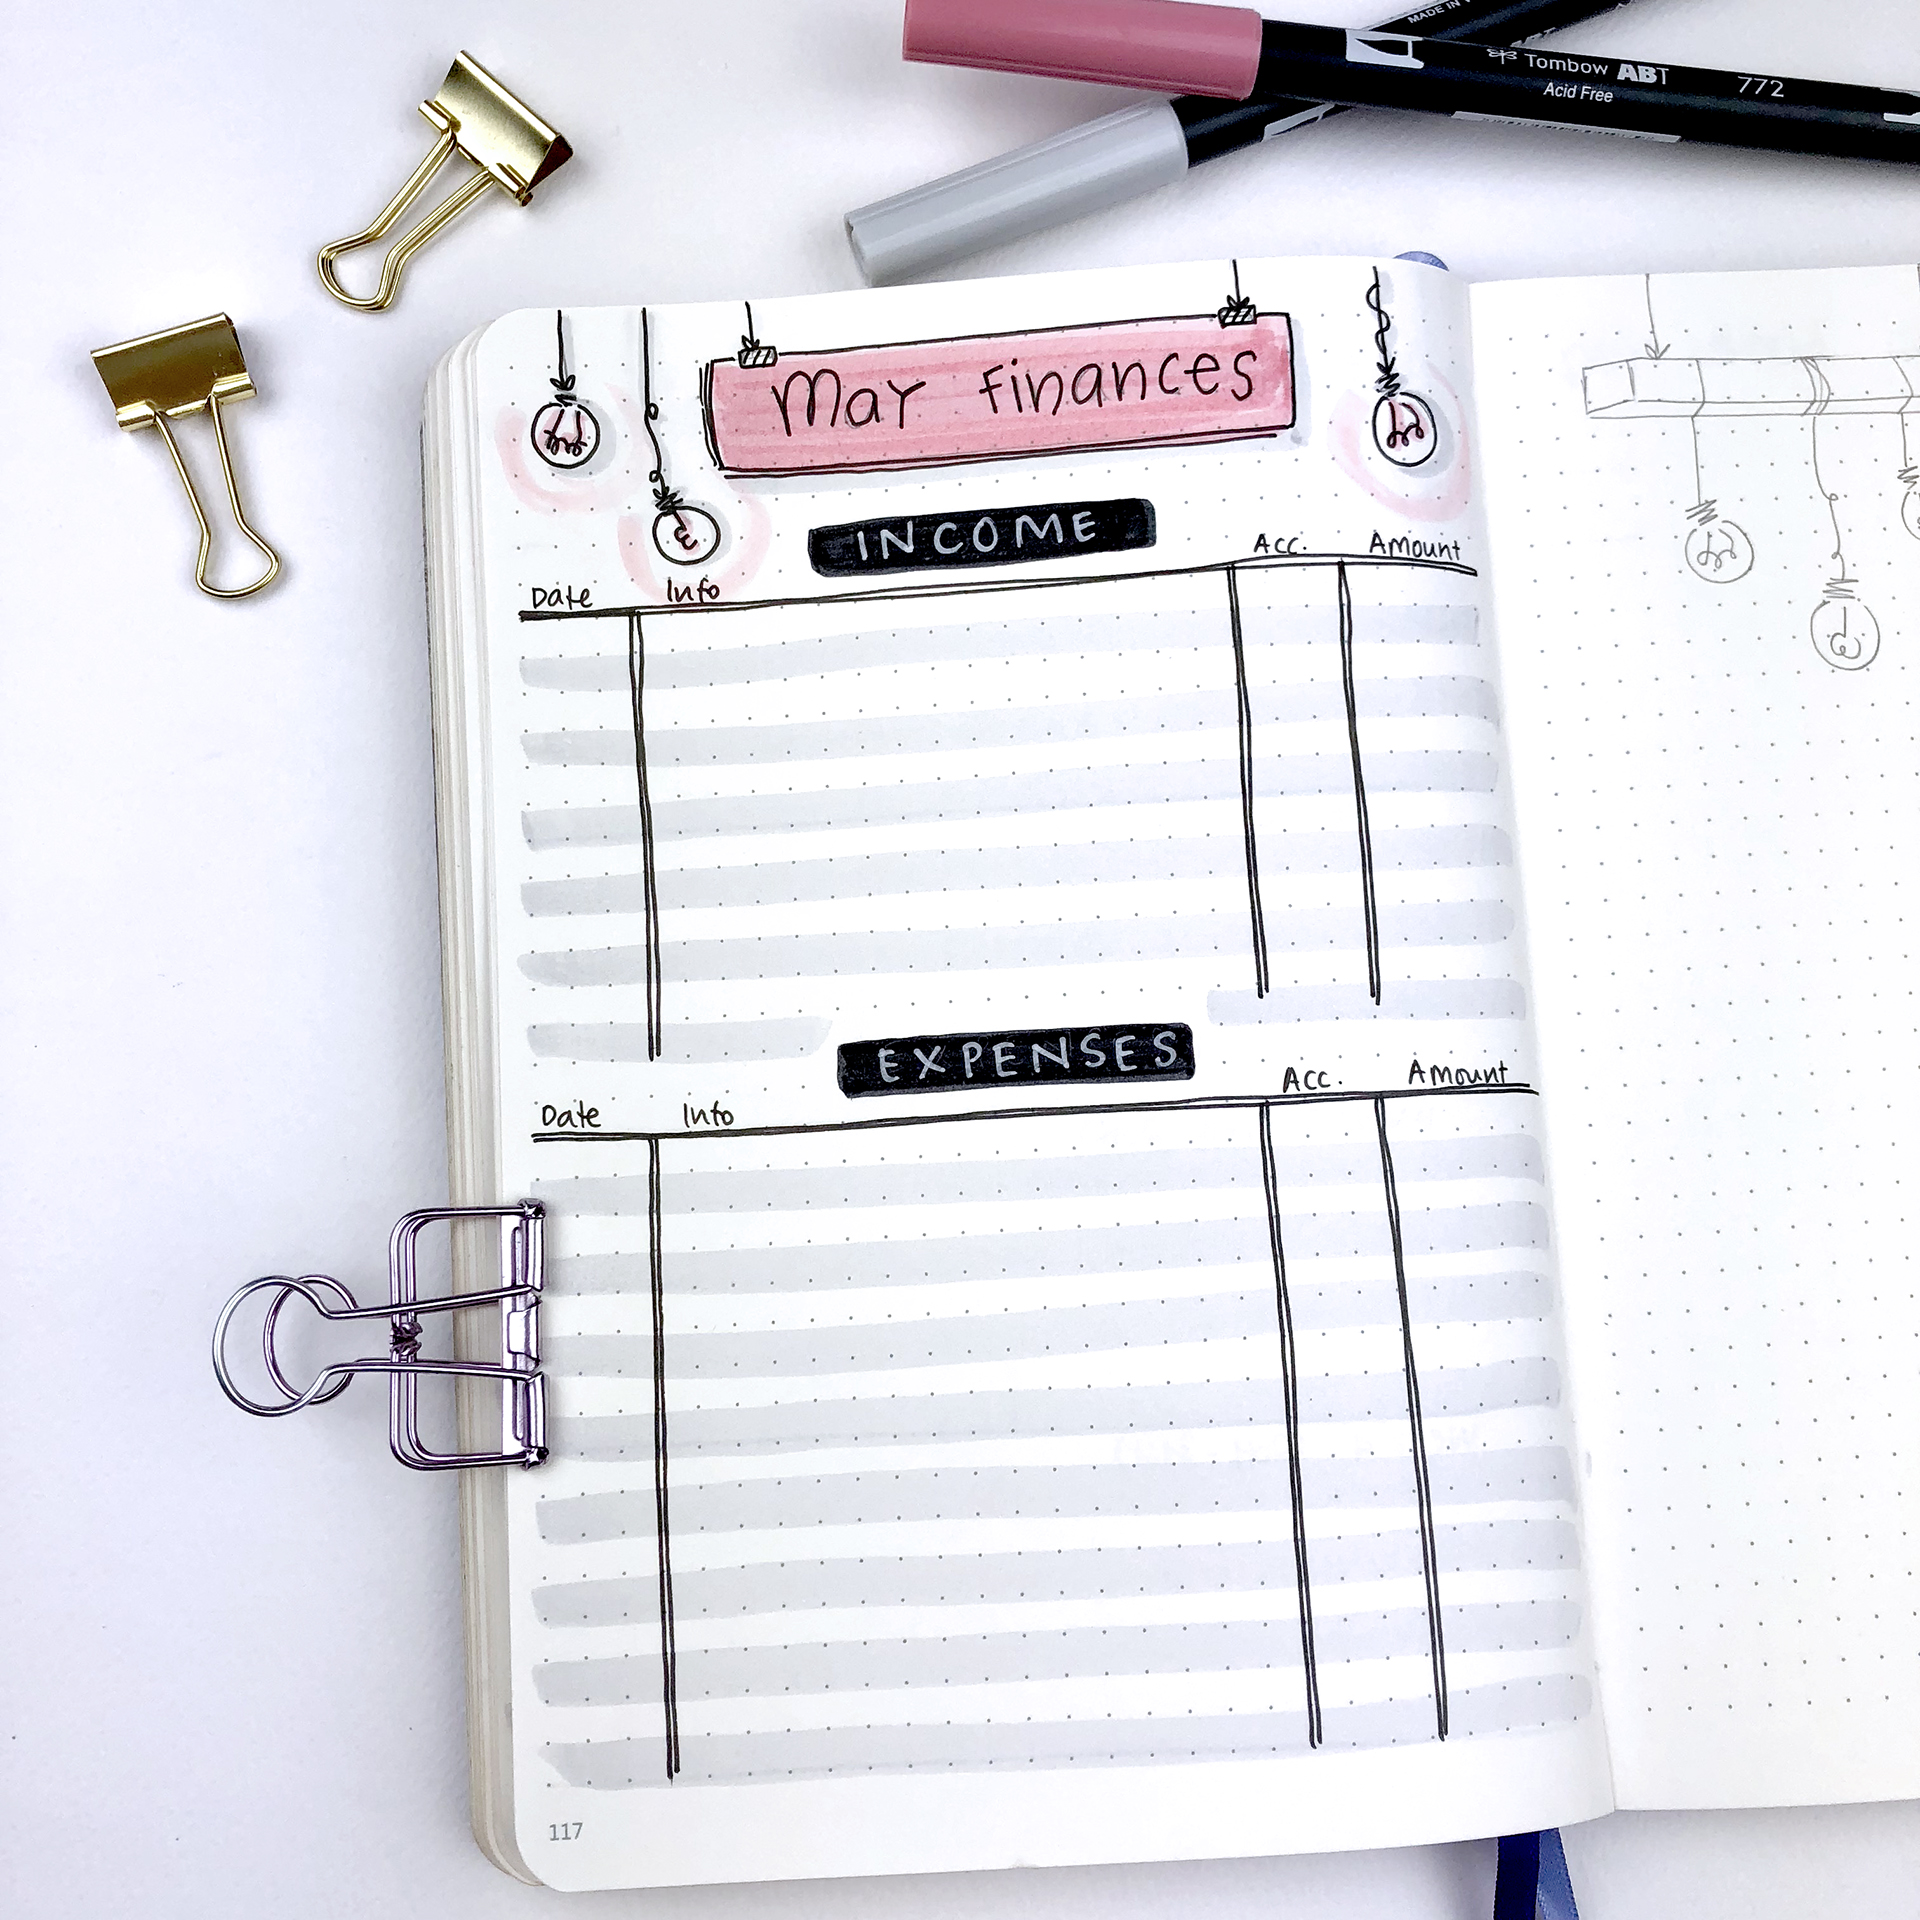
Next comes my monthly finances spread. It's a basic spread for my blog/work income and my expenses. It's become a habit to track my finances, so this spread is a constant for each month.
As always I keep a notes page in my monthly layout. I think every one should have a page like that in their monthly setup. It's such a useful page, that keeps all my random thoughts and notes in one place.
As someone corrected me in last month's plan with me post, this is my 'two lines per day' spread (and not 'one line per day'). It is a spread that I use like a journal - it could be a thought, it could be something that happened during that day, a quote I liked or anything else I want to remember about that particular day. So, instead of having different spreads for gratitude, journaling and so on, I only have this.
I enjoy so much filling in this spread each day! And I love coming back at the end of the month to read all the things I've written.
And lastly, but not least, this is my first weekly spread for May. I used a very simple layout and I've added lots of light bulbs to decorate it. I find that I prefer vertical layouts for my weekly spreads instead of horizontal. So, I've found a few that work for me and I rotate them for the 4 weeks of each month.
And that is one more month planned in my bullet journal. When do you start thinking of next month's theme? And when do you actually start planning your month? Let me know in the comments below. Also, if you use the same theme like me, please send me a picture of it at christina77star@gmail.com
Plan With Me: My April Set Up in my Bullet Journal + Video
Time flies by... literally! I can't believe that March is almost over and April is fast approaching...! This time I tried to be prepared and setup my bullet journal quite early. I contemplated a bit on the theme for this month. I wanted it to be relevant to spring, but I didn't want any flowers and such. I wanted something different. So, I came up with a theme that's full of butterflies, bird houses, wooden signs and one air balloon!
Time flies by... literally! I can't believe that March is almost over and April is fast approaching...! This time I tried to be prepared and setup my bullet journal quite early. I contemplated a bit on the theme for this month. I wanted it to be relevant to spring, but I didn't want any flowers and such. I wanted something different. So, I came up with a theme that's full of butterflies, bird houses, wooden signs and one air balloon!
I'm really happy with the way the theme turned out. Though I'm not so happy with myself, because I made a few mistakes while I was planning. But, you just have to accept them, fix them as much as you can and move on... I've also kept most of the spreads the same with March, because they worked so well. Actually, March has been one of the most productive and focused months so far, and I really believe that my bullet journal helped a lot.
Make sure you scroll down to the bottom of the post, because there's also a video, where I'm showing you exactly how I've created each spread.
This is the first page of the month, and the hot air balloon I mentioned earlier. I think it turned out very cute and I also love the colours. I tried to use the same colours throughout the set up, focusing mainly on pastel green, beige and light grey. I have all the details of the products I've used for this setup at the end of this post.
As you can see the mistakes started from the very first page! Oh, well...
I kept the monthly spread layout the same. The separate boxes seem to work well. And for this month I started the layout from a Sunday, so that the whole month fits in the page.
Separating my monthly goals into two sections: personal and business, has proven very productive. It's such a simple layout but it does really work. And it helps me to focus on the things that matter.
The next page is my monthly focus. I talked about this spread in my March Set Up.
I found it in 'Your Best Year 2018' by Lisa Jacobs and I really really liked that idea, so I decided to added it in my bullet journal as well. These are my monthly objectives summarised in 5 categories that include Financial, Spiritual, Mental, Physical and Relational.
These are the five pillars of a harmonic life, as taught in 'Harmonic Wealth: The Secret of attracting the life you want' by James Arthur Ray. And on this page you basically write what you want to improve during this month in each of those categories. It's just another way to help you focus more on specific areas of your life in order to move forward and make changes.
Moving forward, this is my areas of focus / tasks to complete spread. This worked so well in March, that I decided to keep it for April's layout as well.
It is inspired by 'Your Best Year 2018'. I like how Lisa helps you to organise your thoughts and what you have to do during the month. On the left hand page is the areas of focus, where I will write everything I want to do during April. Then I'll take it a step further and I will be more analytical by writing all the steps I need to take in order for everything to be done. After that, I will take those steps and I will group them as the tasks that need to be completed in the 4 weeks of the month. That way, I know exactly what I need to do each week in order to have a successful month, so that I will finish all my projects and tick off all the things from my to-do list.
Next comes my monthly finances spread, where I clearly made a mistake with the month!!! 🙄
I was so upset with myself, that I didn't even want to fix it. So, I left it as it is.... This is a very basic spread for my blog/work income and my expenses. I find that it's good to track your finances, and keep up with your money and how you spend it.
As always I keep a notes page in my monthly layout. Such a useful page, that keeps all my random thoughts and notes.
I really really enjoyed filling in this spread last month, so of course I had to include it in April as well. This is my 'one line per day' spread where I basically try to write something every day. It is like a journal - it could be a thought, it could be something that happened during that day, a quote I liked or anything else I want to remember about that particular day.
And lastly my first weekly of the month (even though there is only one day of April in there!). This is where I mixed up the dates and I realised my mistake way too late... 😢 I tried to save it as much as I can, but it still shows. I'll admit that I was really tempted to stick the two pages together and make a new one, but I decided against that idea. You don't have to be perfect, and you have to accept that mistakes do happen. So, I kept the page and even though it's a bit messed up I've come to like it.
You can watch also the video here, to see exactly how I created each spread:
And that is one more month planned in my bullet journal. Have you finished your setup for April? What theme did you choose for this month? Let me know in the comments below. Also, if you use the same theme like me, please send me a picture of it at christina77star@gmail.com
How to Colour Code your To-Do List in your Bullet Journal
I'm all about colour coding your journal. If you've been following me for a while, then you'll know that I use a specific colour coding system throughout my bullet journal. It helps me to keep track of things and it's also one more way that helps me with being more productive.
I have written another blog post before, talking generally about how to colour code your bullet journal. But today, I'd like to show you 4 ways to use colour in your to-do lists. So, grab your highlighters and let's get started!
I'm all about colour coding your journal. If you've been following me for a while, then you'll know that I use a specific colour coding system throughout my bullet journal. It helps me to keep track of things and it's also one of the ways that helps me with being more productive.
I have written another blog post before, talking generally about how to colour code your bullet journal. But today, I'd like to show you 4 ways to use colour in your to-do lists. So, grab your highlighters and let's get started!
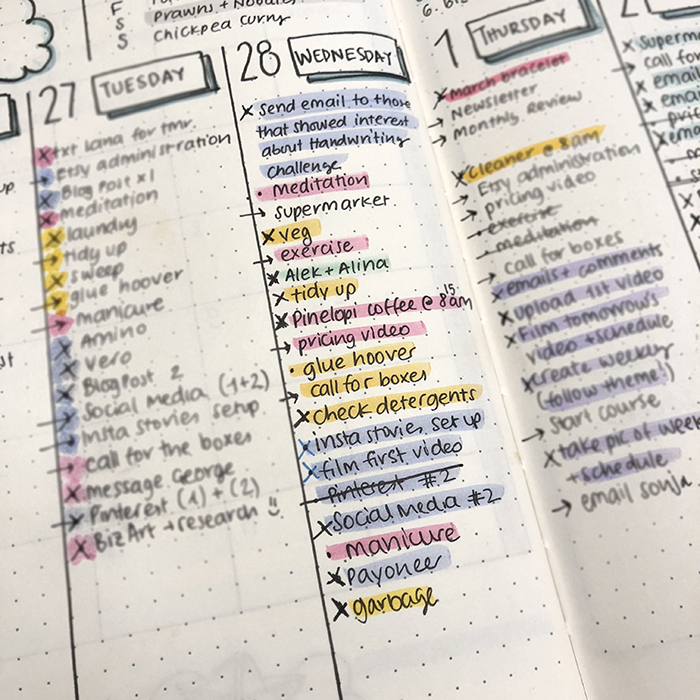
The very first thing is of course to create a colour coding system that works for you. As you can see in the image below, I use 6 different colours throughout my bullet journal for specific categories of my daily life. It today's post we'll focus mainly to 4 different colours:
pink - me
green - kids
orange - housework
purple - work/blogging
#1 // Colour Code Your Bullets
Looking at Tuesday's to-do list in the image above, you can see that I have created my list with random things that I want to do during the day. I have added the respective colour to the bullet of each item on that list, before I start ticking things off. This is a good way to see what you have to do for each category straight away.
I have to say, that this is my favourite way of all. You can still colour code your list without making it look messy all too cluttered.
#2 // Colour Code the whole item
Moving on to Wednesday's list I did exactly the same thing, but instead of colouring the bullet I coloured all the words of each item on the list with the respective colour. Some people find this way more convenient, because they can see more clearly how many things they have in each category.
Personally, I found this the most confusing way of all. I had to double check each time I was looking at my list, since I was mistaking the highlighted items as being done...! So, that took me some time to get used to.
#3 // Colour the items as you go along with the respective colour
The third way is very similar with the 2nd one we saw previously, only that this time you highlight the items as you're ticking them off, using at the same time the respective colour for each category. This is a very useful way if you're interested to see how many items you have ticked off your list and from which category, straight away.
So, for example looking at my Thursday's list I can see that I finished more of my work related tasks. However, you don't have a clear picture of how many tasks you had to do during the day from each category in the first place. So, in that case it depends what you like to track more. The type of items you need to do, or the type of items you have ticked off your list. The choice is yours.
#4 // Colour the items as you go along with a single colour
The last method is exactly the same like no.3 but instead of using the respective colours of each category to highlight the items you are ticking off your list, you are using one highlighter colour for all of them. So, basically there isn't a colour code system, but just a way to highlight the items you've done during the day.
I've noticed a lot of people opting for this method as it's more convenient for them, instead of messing up with different colours and highlighters. I can see the functionality of it and I understand why people prefer this one the most.
So, how about you? Do you colour code your to-do lists? Which of the above methods are you using?
How do you transition from one month to the next in your weekly spreads
Starting a bullet journal can be a bit intimidating to some of you. Up until now you have been used to having a planner all set up for you already, but now you have to put the work, and you can create your own layout. So, you might find yourself at times staring at the empty pages of your journal wondering what to do next.
One of these times might be when you transition from one month to the next and you don't know how to set up your weekly spreads.
How do you do your weekly spread when the month changes mid-week? On which monthly layout do you add that particular week? Do you repeat it for the next month?
These are some of the questions I get asked, so today I thought I'll show you a few ways you can deal with this dilemma and choose the one that works for you.
Starting a bullet journal can be a bit intimidating to some of you. Up until now you have been used to having a planner all set up for you already, but now you have to do all the work, and you can create your own layout. So, you might find yourself at times staring at the empty pages of your journal wondering what to do next.
One of these times might be when you transition from one month to the next and you don't know how to set up your weekly spreads.
How do you do your weekly spread when the month changes mid-week? On which monthly layout do you add that particular week? Do you repeat it for the next month?
These are some of the questions I get asked, so today I thought I'll show you a few ways you can deal with this dilemma and choose the one that works for you.
1. The month with more days for the week wins
As the title suggests, when you are about to create the layout for the last week of the month, you can check and see how many days of that week belong to that month and how many days belong to the next month.
The month with the most days wins, and you can then add that weekly spread in the winning month's layout.
So for example, the above weekly spread was for the last week of July and the beginning of August. As you can see August is clearly the winner so this spread should go to the August layout.
2. Go with the flow
This way suggests to go with the flow. That means that no matter how many days there are in each month or when the new month begins, since the week has days of the current month in it, then it should go in that month's layout.
So in this case, even though there are only 2 days of August in this weekly spread, it will still be added in the August layout. That way, you don't have to count and make things more complicated. Regardless of the month you continue your weekly spreads as normal.
3. Create shorter 'weeklies'
If you want to be more strict with your weekly layout and the days that belong to each month, there's also the option to add only the days of that particular month on your weekly spread. What that means is that you create shorter 'weeklies' with only the days of the current month in them.
So for example, if May ends on a Wednesday, then you can create a mini weekly spread with the last three days of May (Monday-Wednesday) on one page, and then the rest of the week you can add it in the June layout. So, you are essentially creating two partial weekly spreads.
Of course you also have the option to skip the weekly spreads altogether for the last days of the month and do only daily spreads.
The bullet journal system gives you the opportunity to choose which way suits you best. You can also try one method one month and if you see that it doesn't work, you can change it around the next month. The important thing is to not stress about it, and just plan however feels the most useful to you.
Me personally, I prefer the go with the flow option. But there have been months where I have also followed option no. 1.
How do you transition from month to month with your weeklies? Are you using any of the above choices? Do you do things differently? If so, let us know in the comments below.
Plan With Me: My February Set Up in my Bullet Journal
February is almost here and I'm all set up in my Bullet Journal already! Yay!
We're almost done with the move as well, so I can't wait for the next month to come, in order to finally start working on my projects. And since I don't have as much time as before, I decided to keep the layout more simple but still have a theme for the month.
Also, there won't be any videos this month I'm afraid because all my equipment that I use for filming are already packed up 😬
So, here's how I've set up my bullet journal for the month of February:
The first page as always is the front page of the month with my little penguin calendar.
You can find the 2018 Penguin Calendar in my Etsy shop.
You can print and use it as normal calendar, but what I like to do is to print it on a sticker paper, cut it to size and add it straight on the page. I like to use a ruler to make sure the sticker goes on straight and that there's no bubbles..
Moving on to the next spread which is my month at a glance. As I mentioned before, I prefer the grid layout so that's what I did again.
As you can see the theme I chose for this month is inspired from Valentine's Day and it's full of hearts and different shades of pink 💕
On the right of the calendar I have a section for all the things/events I want to remember to do this month as well as for next month.
Moving on to the next page and the goals and general to-dos for the month.
I created boxes for the 4 categories - personal, family, home, and work. I usually make a list of all the goals I want to achieve during the month for each one of those categories, and I visit this page every time I do my weekly spread, to see if I can add some of those goals in that week's list of to-dos.
The next page is a spread for notes that I create every month, where I can add anything I want. One of the most functional pages of each month, for sure!
The next two pages have to do with my exercise and diet. Last year I neglected my body a lot, and I wasn't paying attention to what I was eating most of the time. Also, I skipped exercising by finding various excuses all the time... So, this year I decided to take control of my body, lose the extra kilos that piled up in 2017, and be healthier and stronger. So, after the move, there are no more excuses! 😬
On the left hand page there is an exercise log, where I'll write exactly what I do each day. This helps me to see how many days I've exercised each month and what type of exercise I did the most.
The next page has to do with my diet and it has a list with lots of meal ideas for breakfast, lunch, dinner and snacks. I find it easier to keep up with a certain diet, if there is a list of simple and healthy options for me to choose. Pre-planning my meals for the week is a must, if I want to stay on track and lose that weight.
The last page I created is the first weekly spread of the month. I decided to use a very basic layout with no trackers or anything like that. Simply the to-dos for each day and a section for notes.
And that is one more month planned in my bullet journal. Have you finished your setup for February? What theme did you choose for this month? Let. me know in the comments below.

