
Bullet Journal Ideas: 3 Weekly Spread Layouts for May 2018
Since a lot of you ask me about my weekly spreads, I thought to create a blog post and a video where I show you the 3 layouts I’m using for my weekly spreads in my bullet journal for May, and how I decorated them.
Today I'm showing you only the last 3 weekly spreads for the month. The first weekly spread you can find it in my monthly plan with me video.
I tend to have 3-4 layouts for my weekly spreads which I rotate during the month. And of course I try to make them more interesting by decorating them according to that month’s theme.
Make sure you scroll down to the bottom of the post, because there's also a video, where I'm showing you exactly how I've created each spread.

This is the second weekly spread for May. It is a layout that is inspired by @penpapersoul⠀on Instagram. I continue the theme with the light bulbs here too and I’m also using the same colours as before.

SUPPLIES USED:

For the third weekly layout I decided to do something a bit different. A few days ago I bought the Uni Posca White Pen which i’m obsessed with and keep on using it all the time! So, I decided to use it for this spread and I made all the signs black with white lettering. I love the effect that it gives. It looks like little blackboards.

As you can see I tend to prefer the vertical layouts for my weekly spreads instead of the horizontal.
I find that I can utilise the space more, and I think that my brain works better when my to-do list is vertical. Does this happen to you too? Let me know in the comments below.

The last spread of the month was inspired by the lovely @momruncraft on instagram. I like that it separates your to-do list in categories. You can add any category you want. I added: work, personal and meals.
I also liked the section of the happy daily thought that she had in her speed, and I decided to keep it in mine too.

On the left there’s a section that you can add any other part you want in your weekly, like the weather, or your weekly habit tracker and so on. I decided to have it as a notes section, where I usually add things I need to do during the week that don’t have a specific place to go, or they are not meant to be done on a specific day, or things I need to remember to do for next week.
So, these are the last 3 weekly layouts for May. I hope you liked this post and that you found some inspiration for your own weekly layouts. If you liked the theme and you'd like to recreate it, please send me some pictures. I'd love to see your pages!! You can always contact me at christina77star@gmail.com


Improve Your Handwriting Challenge - May
I'm back with one more "Improve your Handwriting Challenge"!
It's a fun way to practice daily, keep a photo archive of your handwriting and see how you've improved through time. You can also interact online with other people doing the same challenge, and also you can get inspired by others' handwriting too.
So, for May it's going to be 31 days of handwriting prompts that will hopefully get you to start practicing your handwriting every day. The theme for this month's words is 'Words with more than 10 Letters'.

Here's how to participate:
- Follow me (Christina) @christina77star over on Instagram.
- If you want, you can download and print the monthly prompts here.
- Each day there is a corresponding prompt, that you simply have to write on a piece of paper. You can also choose to have a dedicated notebook for your daily handwriting practice. Try and focus on the word and the letters as you write them. You can repeat the word as many times as you want. Look at the way that you wrote the word the first time and the way you wrote it the last time. Is there a difference? Do you think you need to work on a specific letter?
- Take a photo of your practice and tag it with #improveyourhandwritingchallenge, so that it gets added to the feed.
- At the end of each month look back at your practice pages and see how you've improved.
- Make sure to encourage each other and have fun!
- Please share this post to spread the word and invite others to join in the fun and improve their handwriting as well!
Thank you for joining in!
Christina x
Improve Your Handwriting Course
Basic, step by step video lessons that help you practise and become more confident with your handwriting.

Instagram Challenge: #doodlewithusinmay2018
I'm excited to announce our Instagram Challenge for the month of May! 👏🏻
It's the #doodlewithusinmay2018 Instagram Challenge created by me and Alexandra (from @alexandra_plans).
It's going to be 31 days of doodles that will hopefully get you to be creative and have fun! We're going with a 'Baby Theme' for this month. I seriously can't wait to start drawing!
As we did before, all the doodles are part of one big comprehensive picture. Imagine each day to be one piece of the puzzle. So, at the end of the month you will have one big doodle picture! :)
If you decide to follow this way, you'll have to create a table with 5x6 + 1 boxes and you shouldn't add the days on the top. You can also make the boxes and dates in pencil, if you don't want the lines to obscure the end result. It's totally up to you.
Of course, if you prefer to draw the doodles in the traditional way, that's absolutely fine as well. The important thing is to have fun!
You can also download a free printable with the daily prompts here.

If you want to join us then:
- Follow me (Christina) @christina77star and Alexandra @alexandra_plans over on Instagram.
- Download the prompts below.
- Draw something according to the day's prompt, take a photo of it, and share it with us on Instagram.
- Don't forget to add the hashtag #doodlewithusinmay2018 and spread the word.
- Everyone is welcome!

We're excited to see what you'll share!
Thank you for joining in!


Plan With Me: My May Set Up in my Bullet Journal + Video
Almost another month is coming up to an end, and you know what that means? That I have to set up my bullet journal for May! Thankfully this month I was ahead of the game and I have already done all my spreads and layouts, which I'm going to share with you in this post. (Yay! 👏🏻)
I found it hard to decide on the theme for May. I had a lot of good ideas and I just couldn't choose which one I liked the best. In the end I went ahead with a light, love and lots of light bulbs theme! I just got inspired by a quote I saw on Pinterest, which I've actually used in one of my layouts as you'll see later on. It says 'Let Your Light Shine', and it really affected me when I read it. So, I wanted to incorporate it in my May's theme.
Make sure you scroll down to the bottom of the post, because there's also a video, where I'm showing you exactly how I've created each spread.
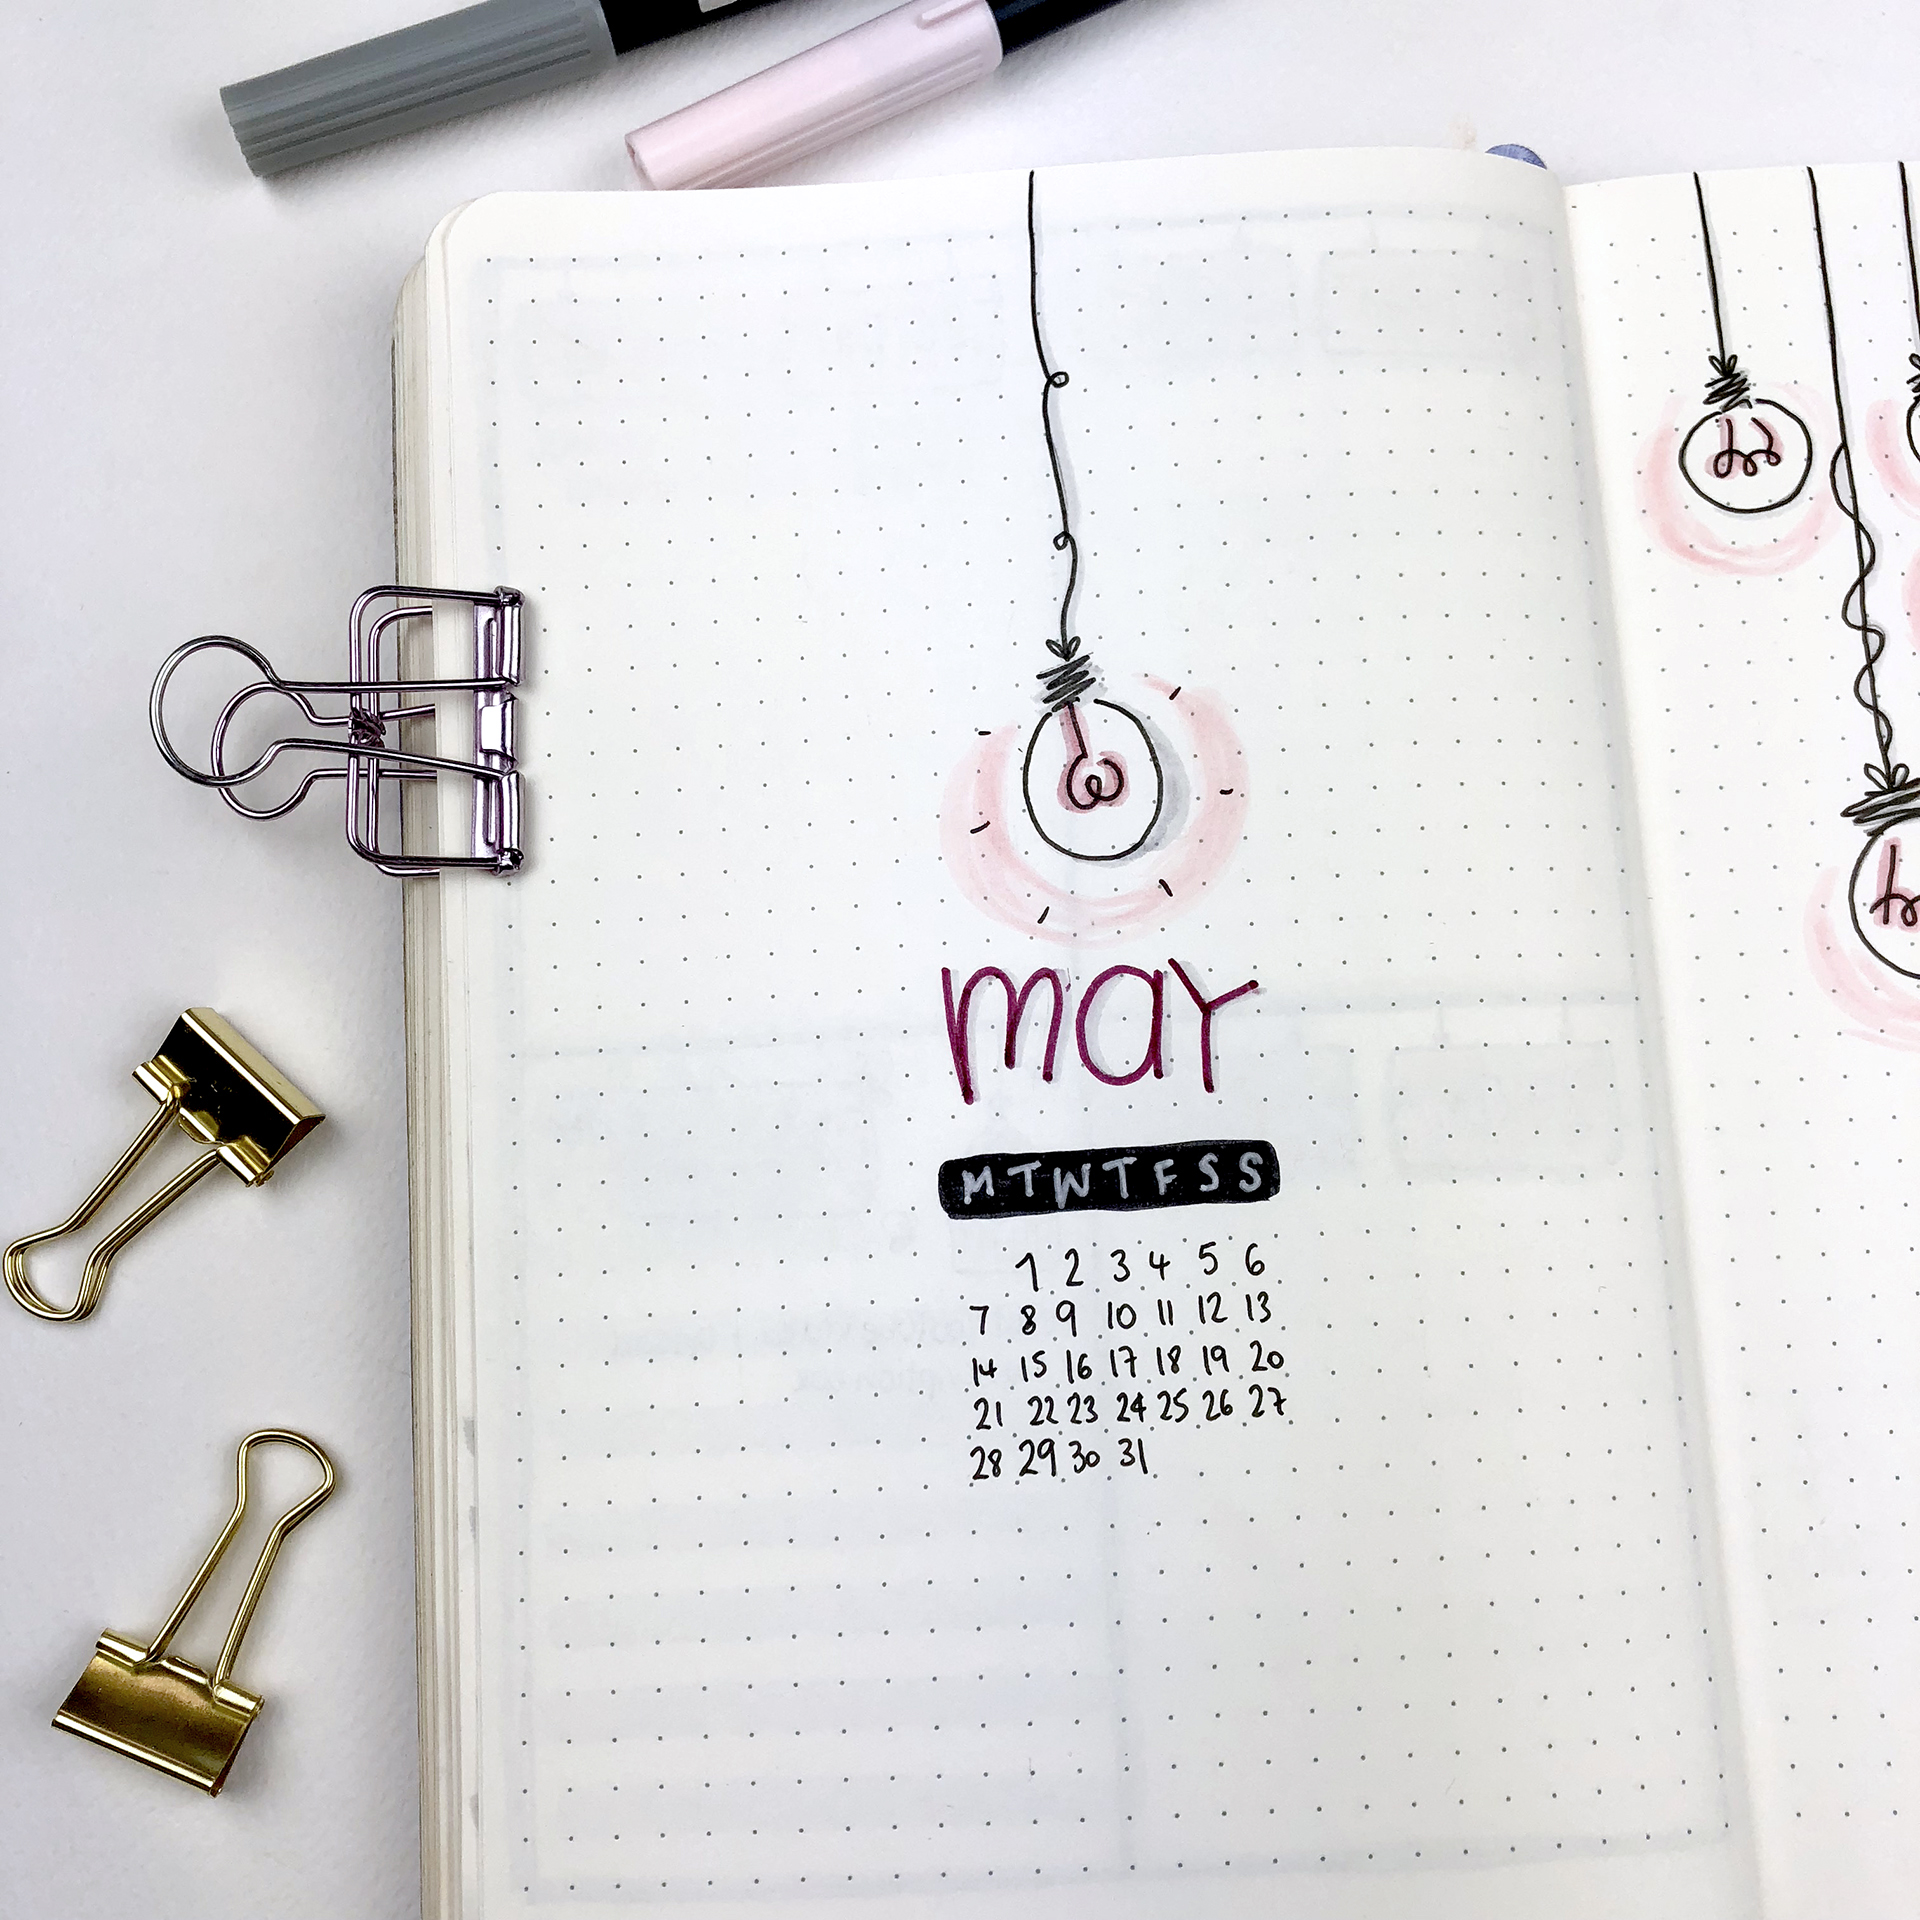
For my cover page I decided to have a two page spread this month. On the first page I have the month with a little calendar and a single light bulb. As you can see, the colour palette I chose for this month has pinks, greys and black and white shades. I decided to not go for the traditional yellow shades that you normally associate with light. And I have to say that I love the way it turned out.
At the end of the post I always add all the supplies I used to create my layouts, so make sure to check it out.

The next part of my cover page has the quote that I mentioned earlier. I really wanted to include it in the layout and I thought that the very first page is the best place to add it. As you can see, I've added lots of light bulbs and I played around with different filaments, that make each light bulb unique and cute 💡
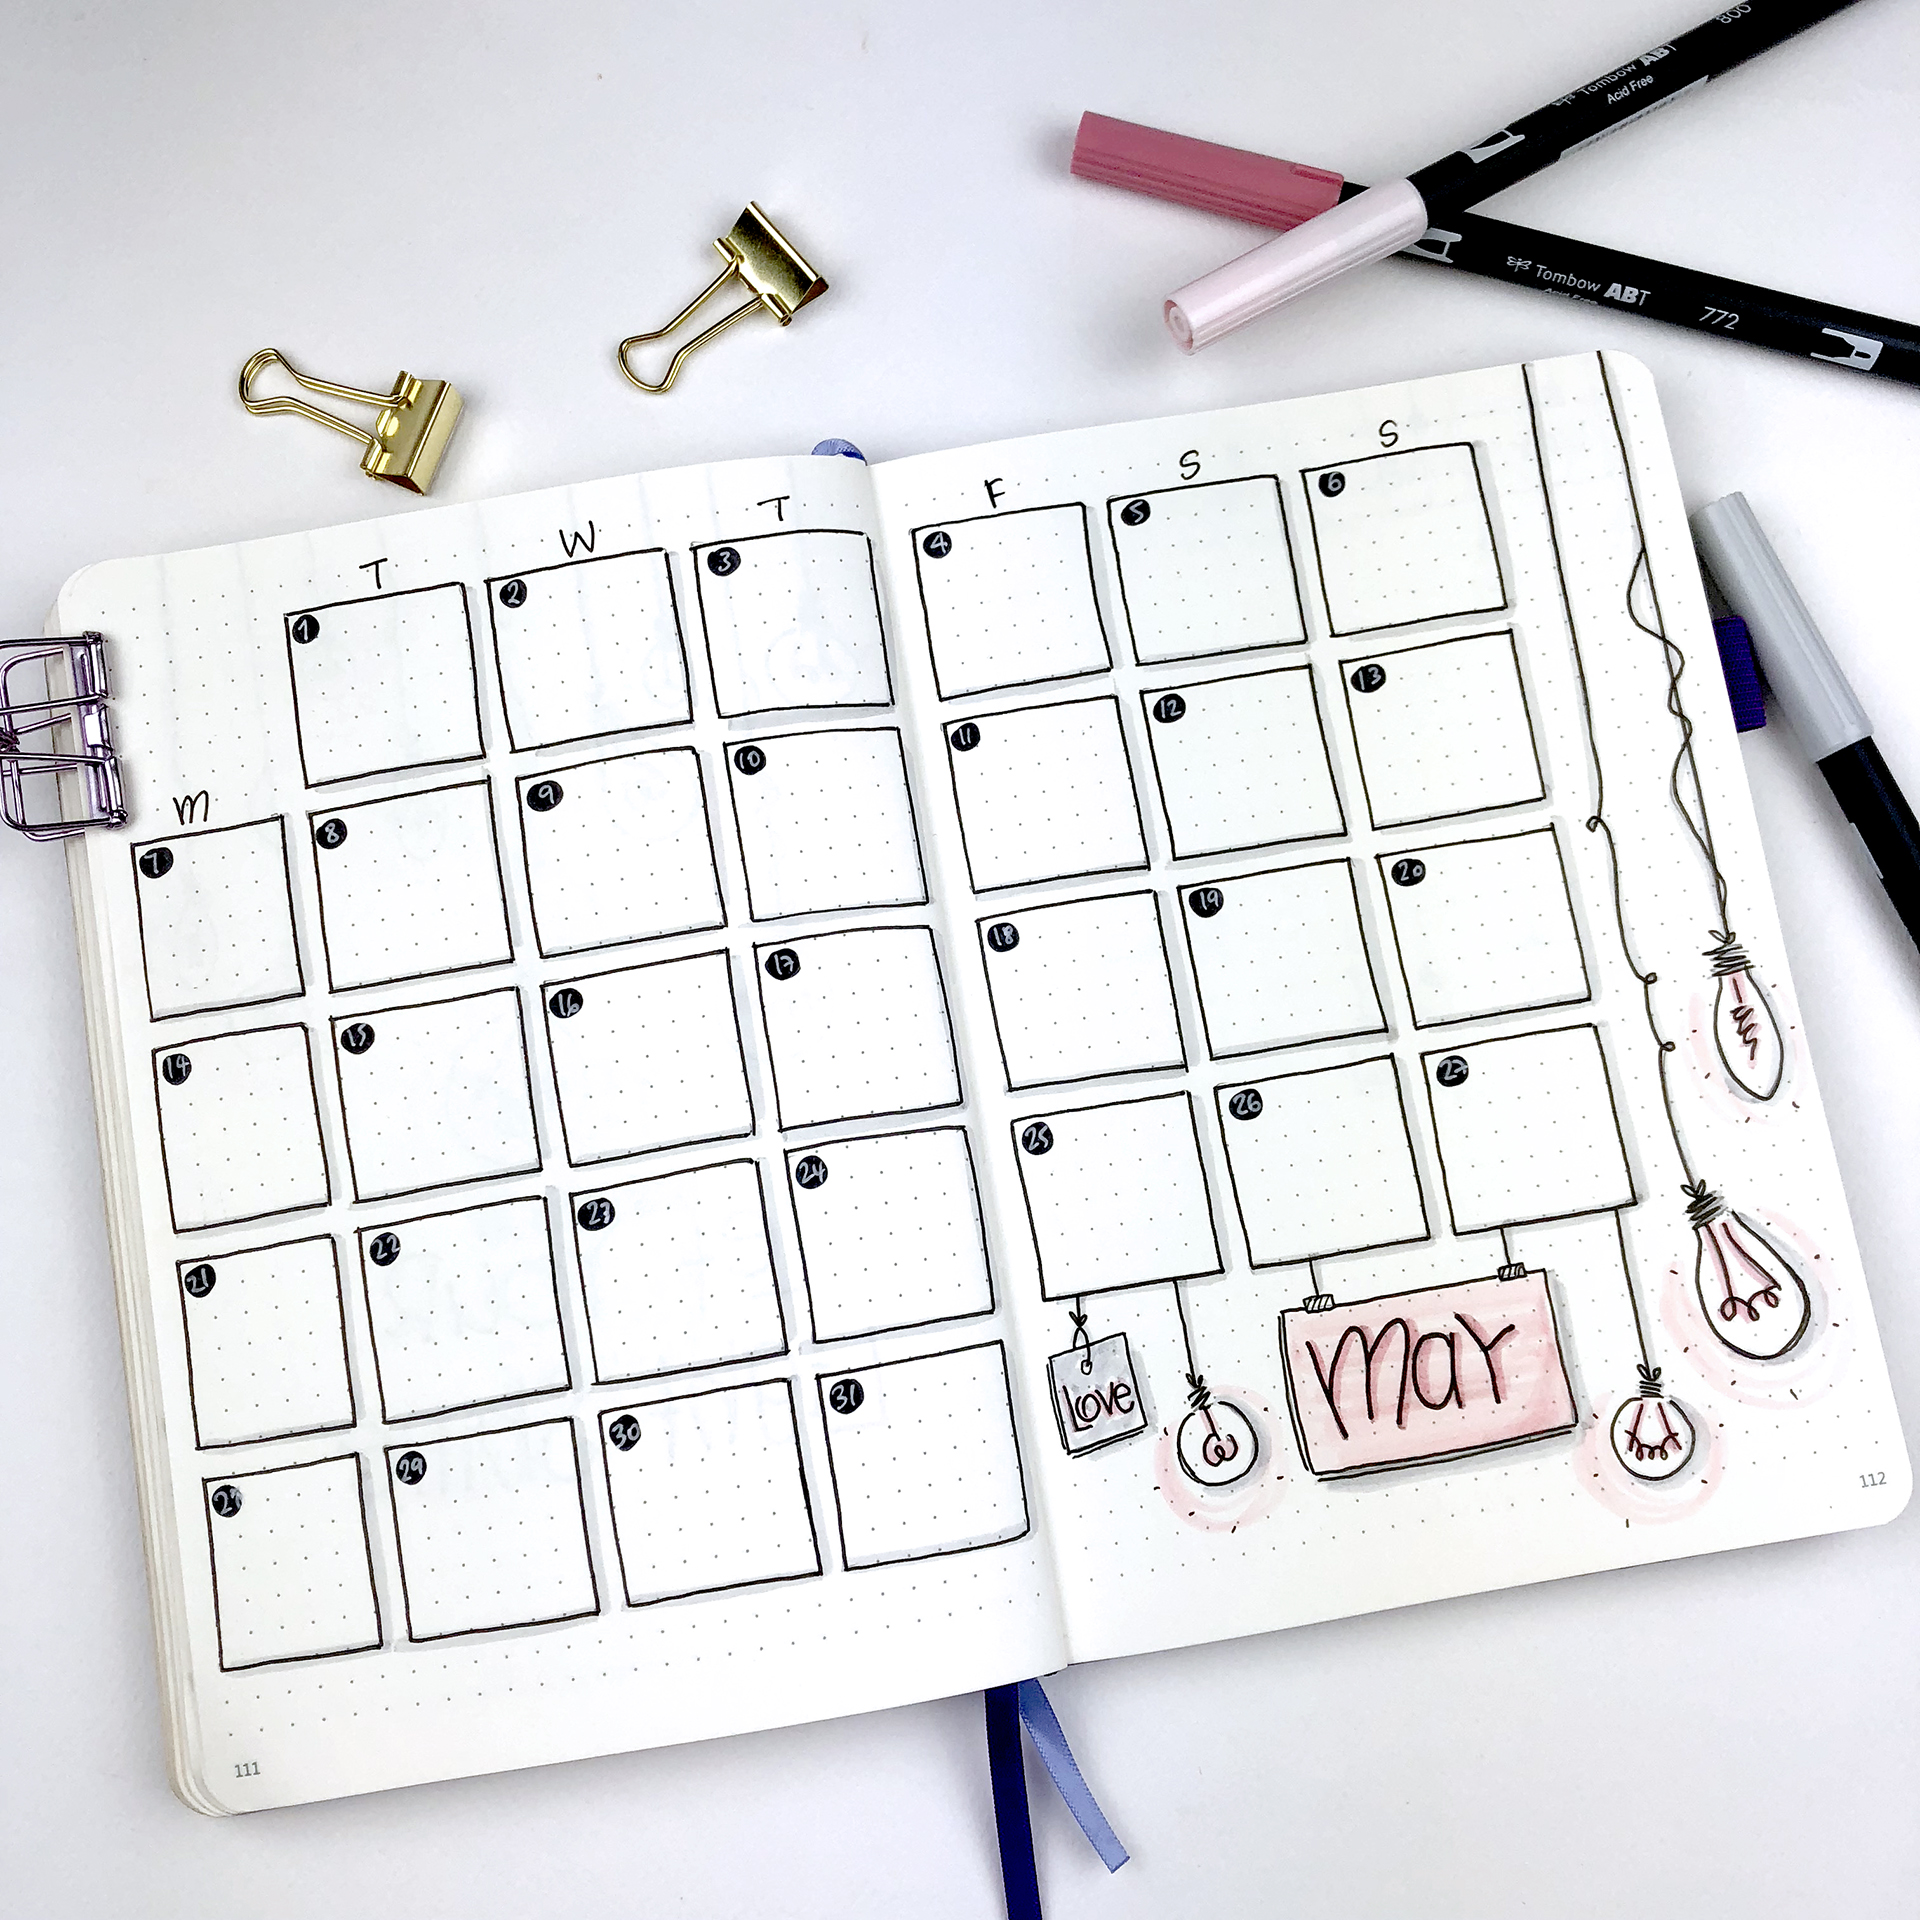
The theme continues into my Monthly Spread. Again I used the separate boxes for this layout, and I've added lots of light bulbs with notes and signs to match with the theme.
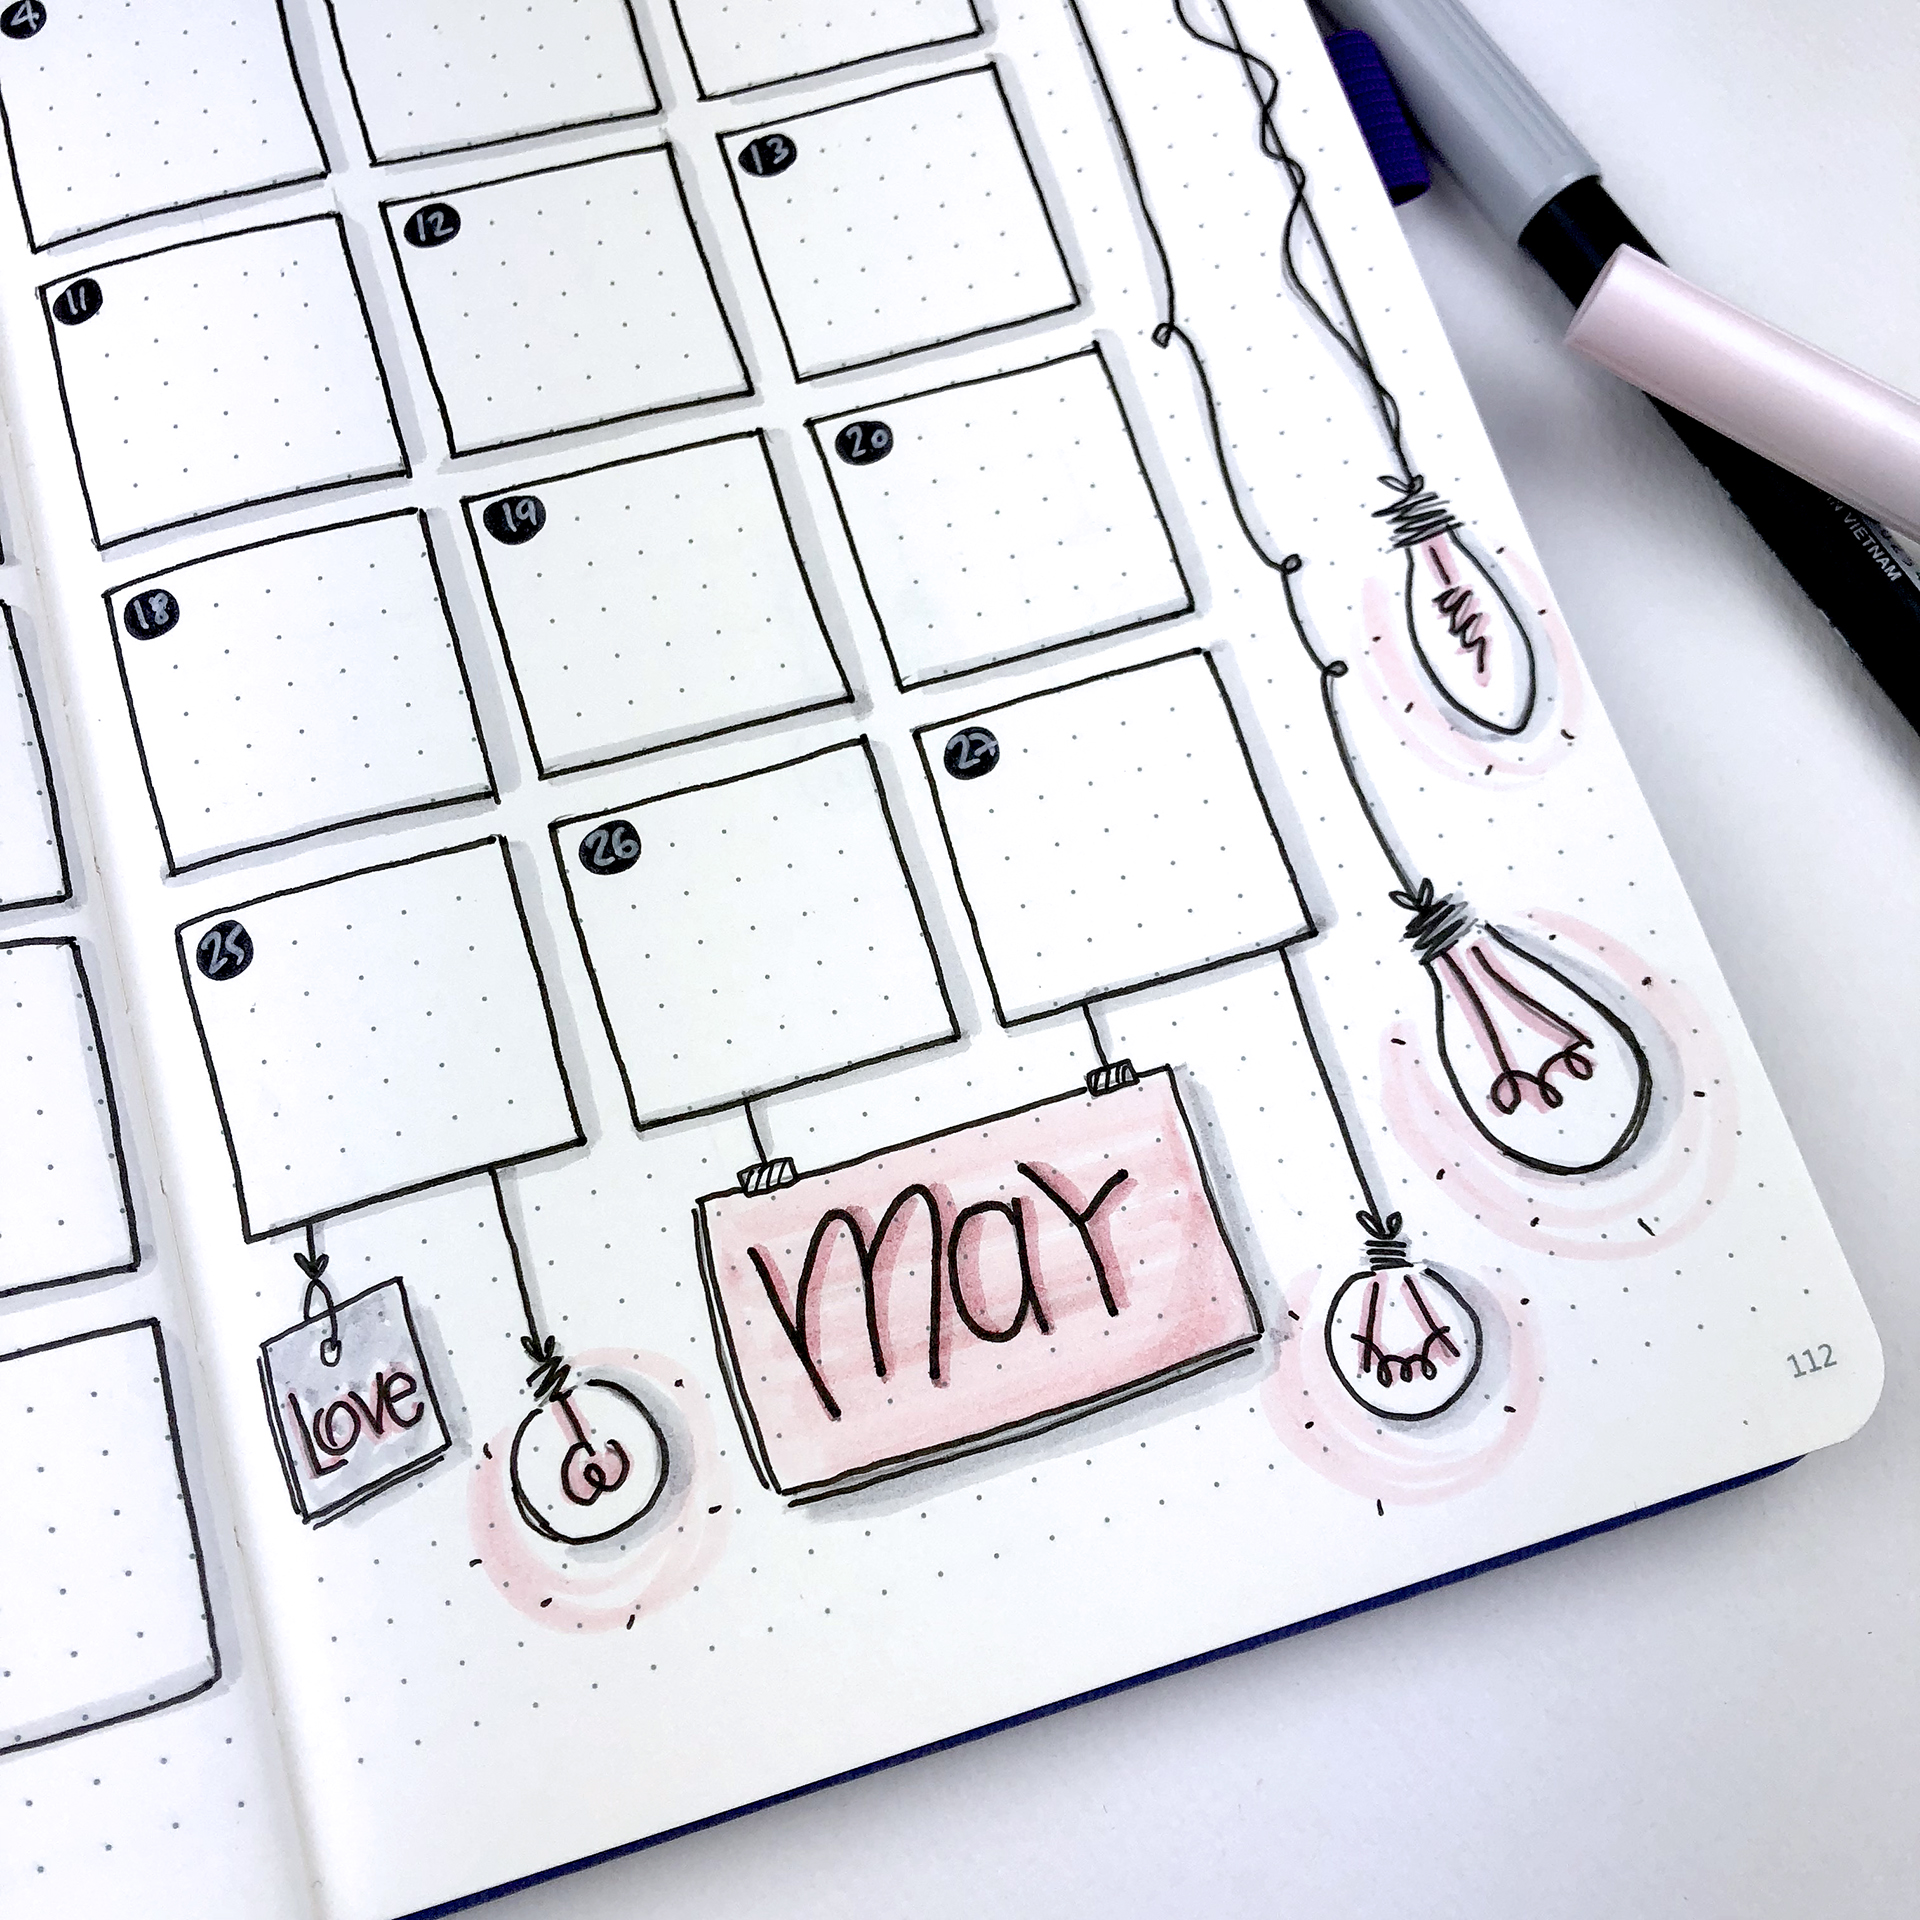
I LOVE the black numbers in the boxes, and I think this is one of my favourite pages for this month!!!

Again I'm separating my monthly goals into two sections: personal and business. Sitting down and writing all the things I want to focus on during the month in these two categories has proven very productive. It helps me clear my head and narrow down the things that I want to achieve each month.
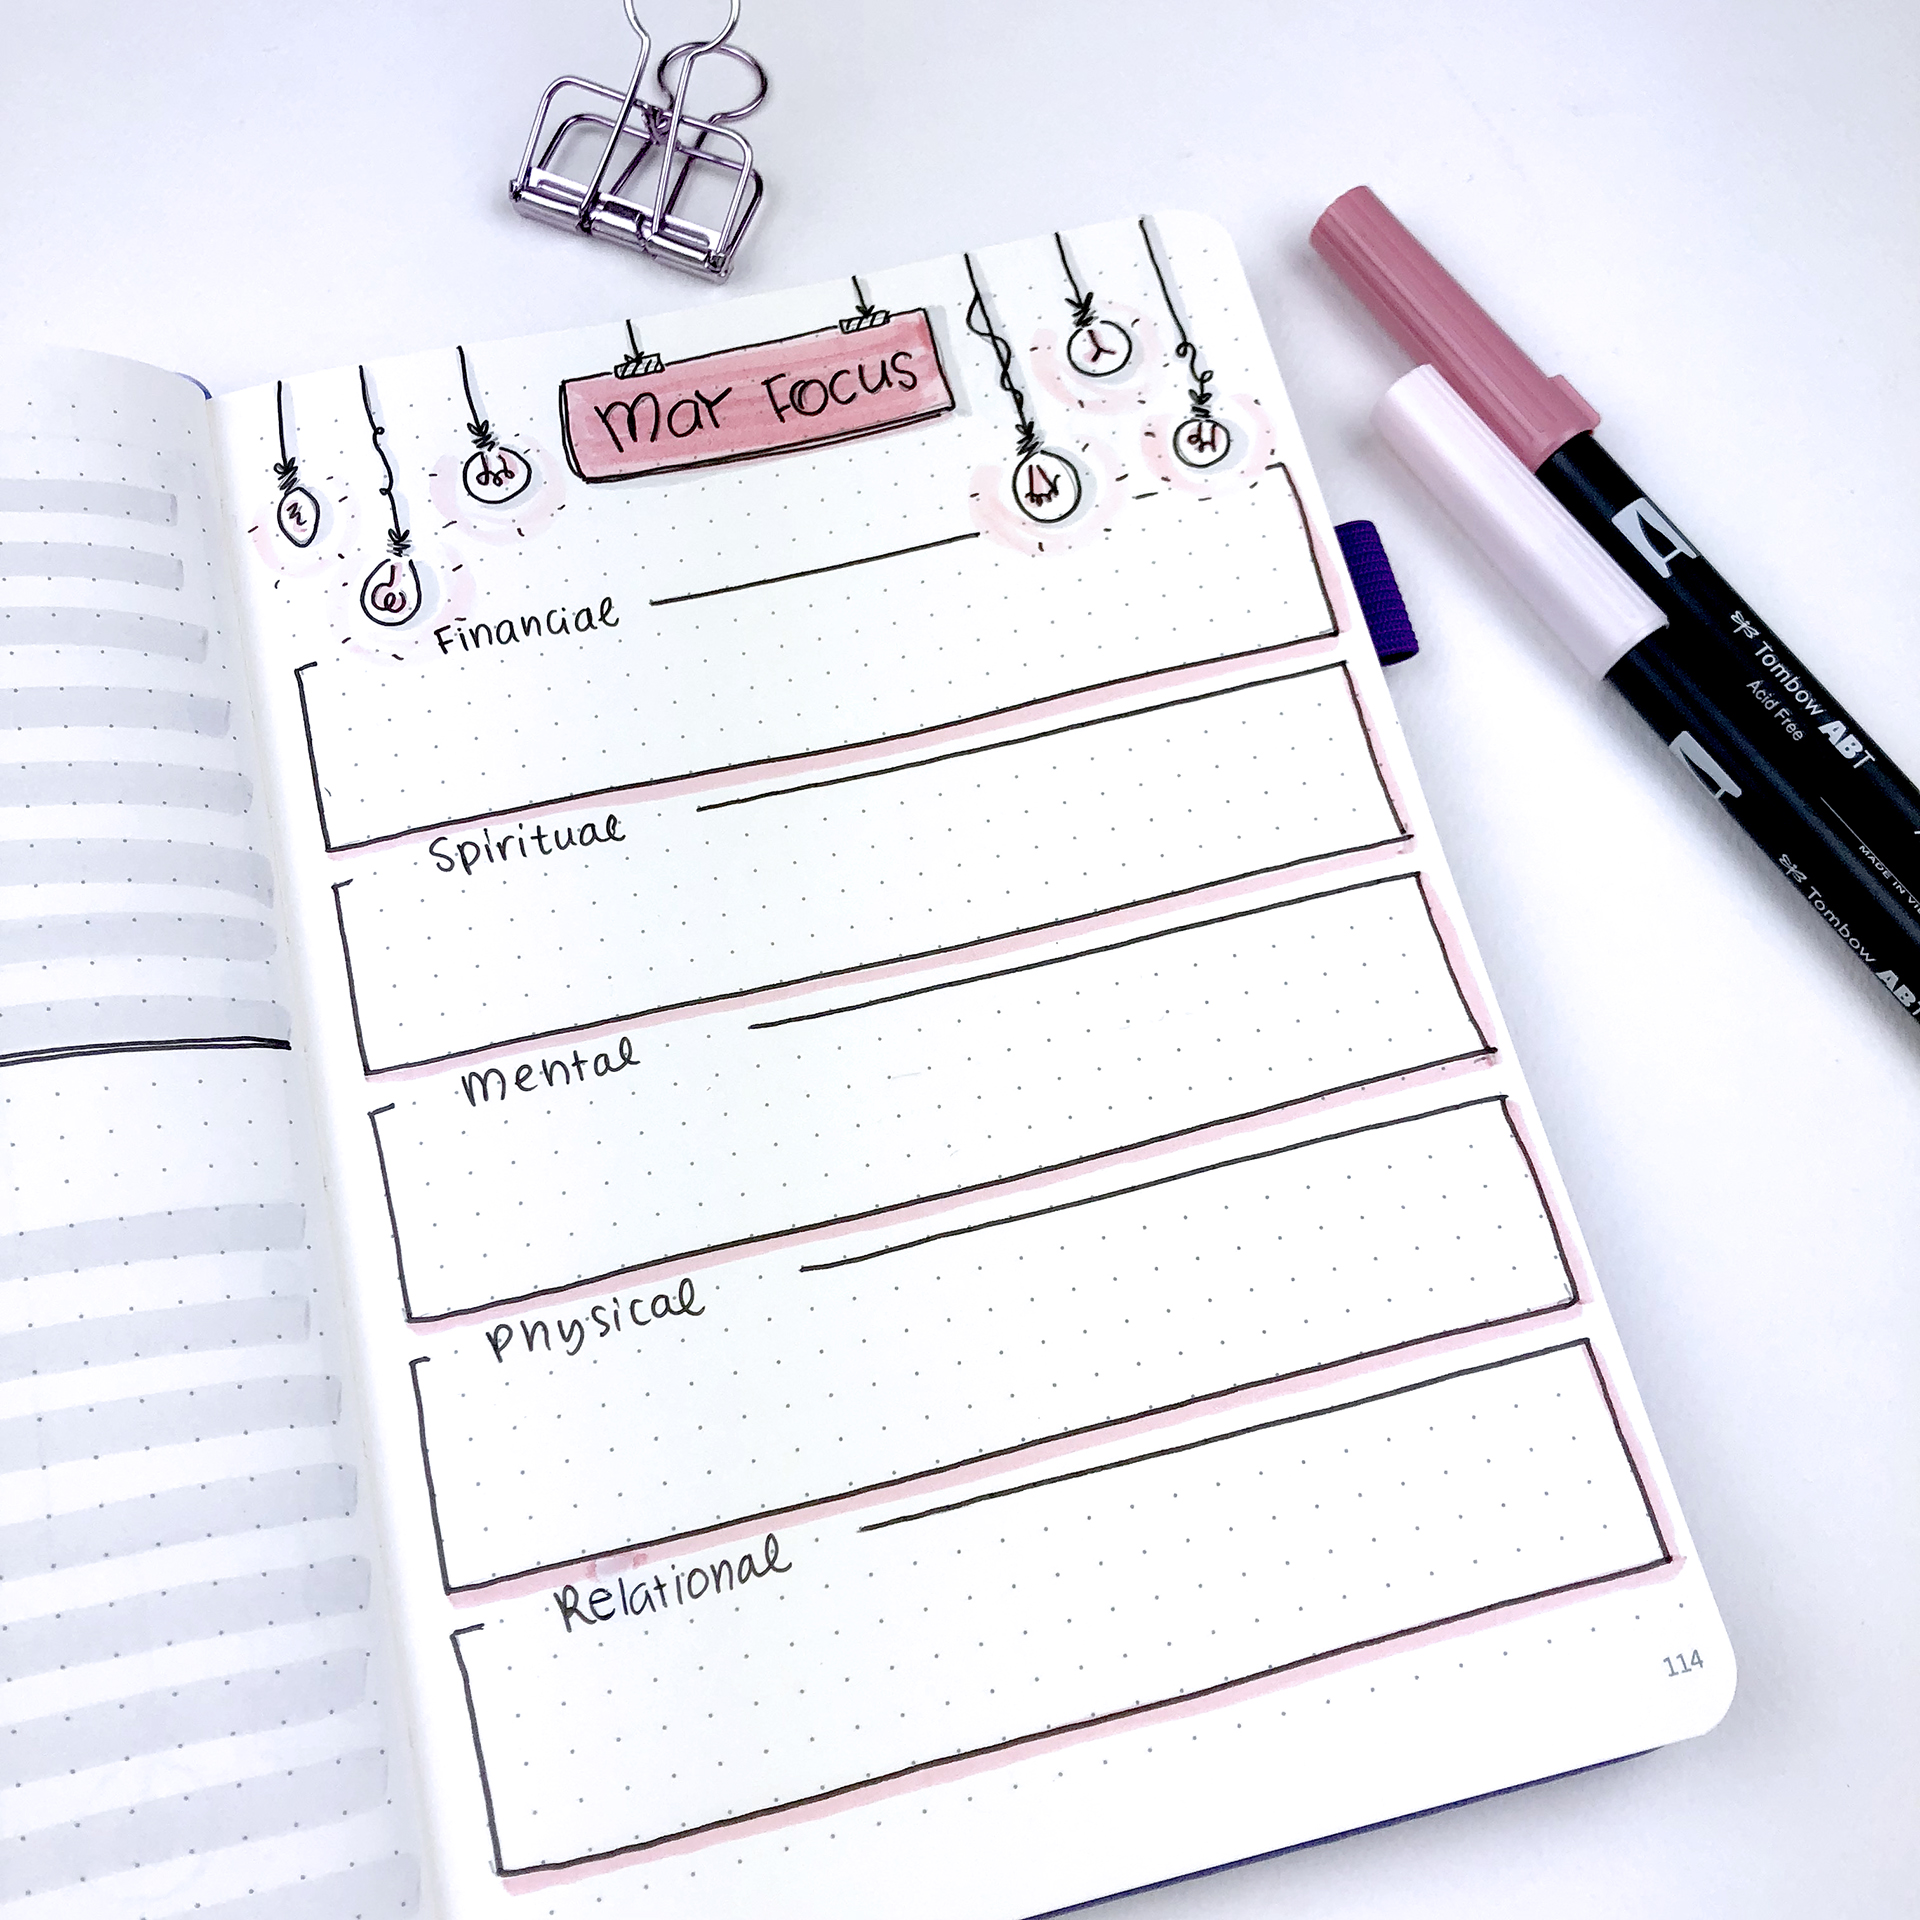
The next page is my monthly focus. I've started using this spread in March and it has become a staple in my monthly set up since then.
I found it in 'Your Best Year 2018' by Lisa Jacobs and decided to added it in my bullet journal. These are my monthly objectives summarised in 5 categories that include Financial, Spiritual, Mental, Physical and Relational.
These are the five pillars of a harmonic life, as taught in 'Harmonic Wealth: The Secret of attracting the life you want' by James Arthur Ray. And on this page you basically write what you want to improve during this month in each of those categories. It's just another way to help you focus more on specific areas of your life in order to move forward and make changes. So, together with my monthly goals page they set up my intentions for each month.

Moving forward, this is my areas of focus / tasks to complete spread. It is the next step of my monthly focus and planning. One more spread inspired by 'Your Best Year 2018'. It helps you to organise your thoughts and what you have to do during the month and turn your plans into actionable steps.
On the left hand page is the areas of focus, where I write everything I want to do during May. To create this list, I look at the previous two spreads. Then I take it a step further and I write all the steps I need to take for each goal, in order for everything to be done. After that, I take those steps and I spread them as the tasks that need to be completed in the 4 weeks of the month. That way, I know exactly what I need to do each week in order to have a successful month, so that I will finish all my projects and tick off all the things from my to-do list.
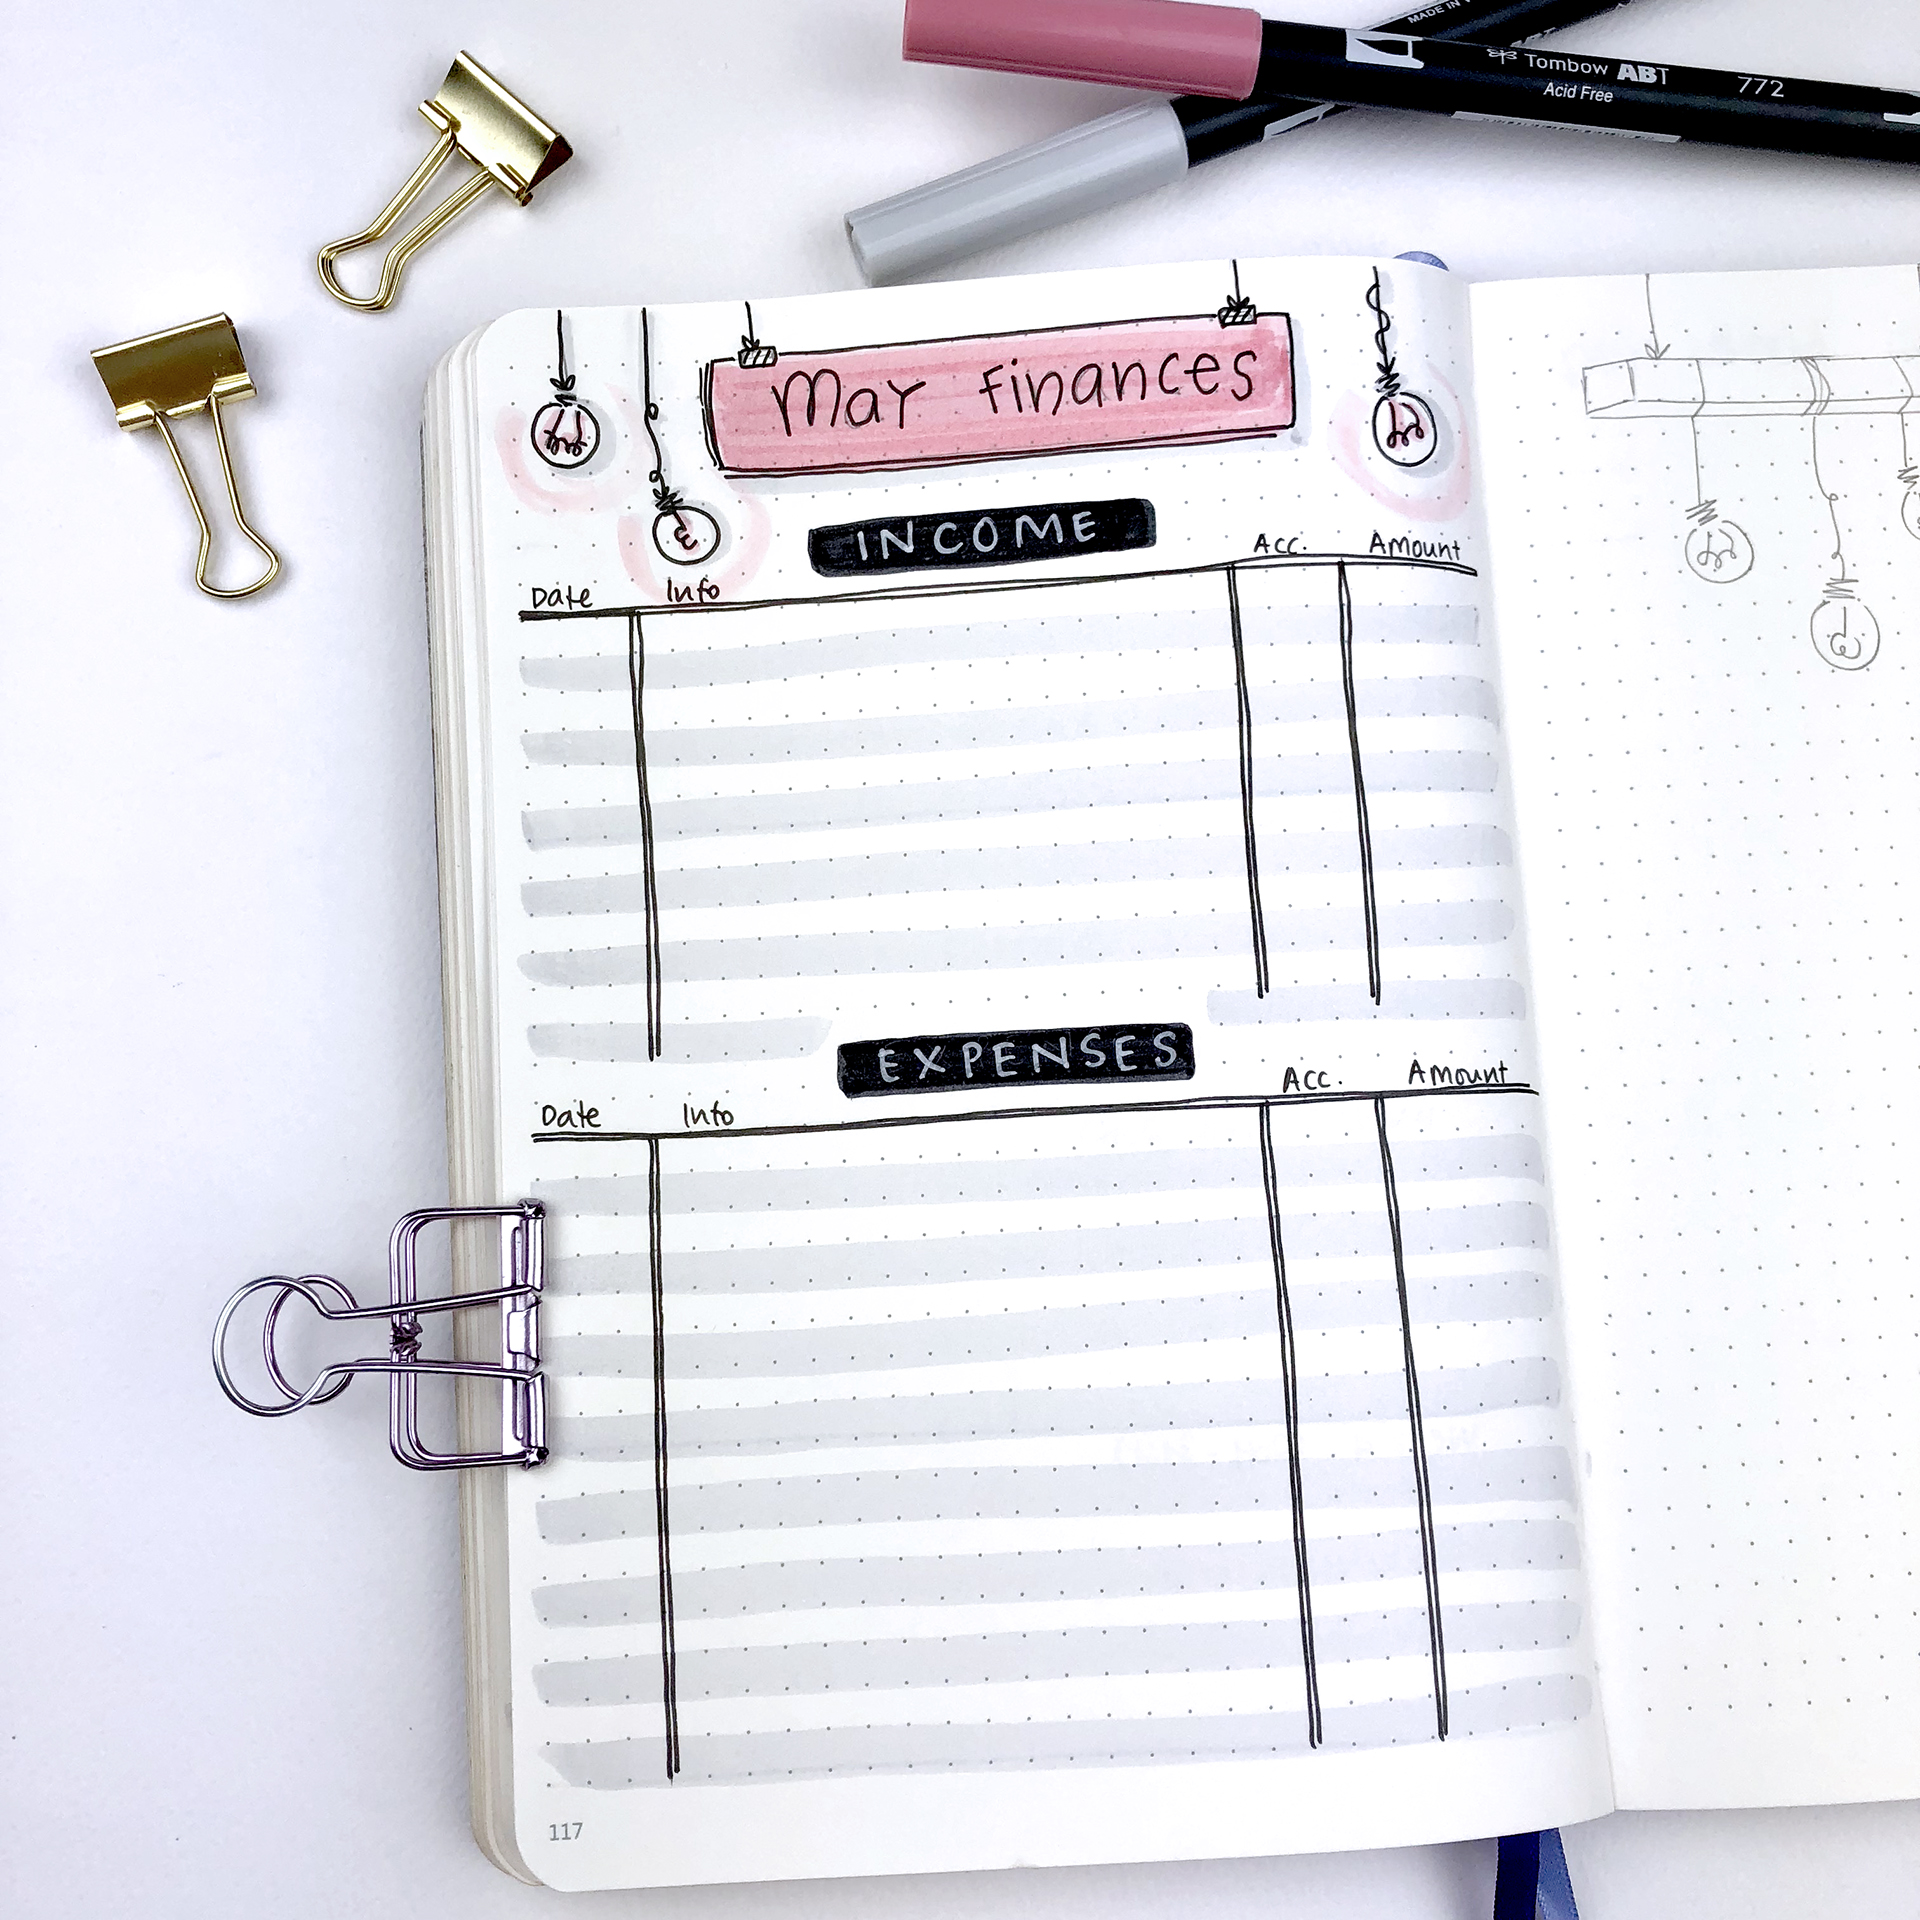
Next comes my monthly finances spread. It's a basic spread for my blog/work income and my expenses. It's become a habit to track my finances, so this spread is a constant for each month.

As always I keep a notes page in my monthly layout. I think every one should have a page like that in their monthly setup. It's such a useful page, that keeps all my random thoughts and notes in one place.
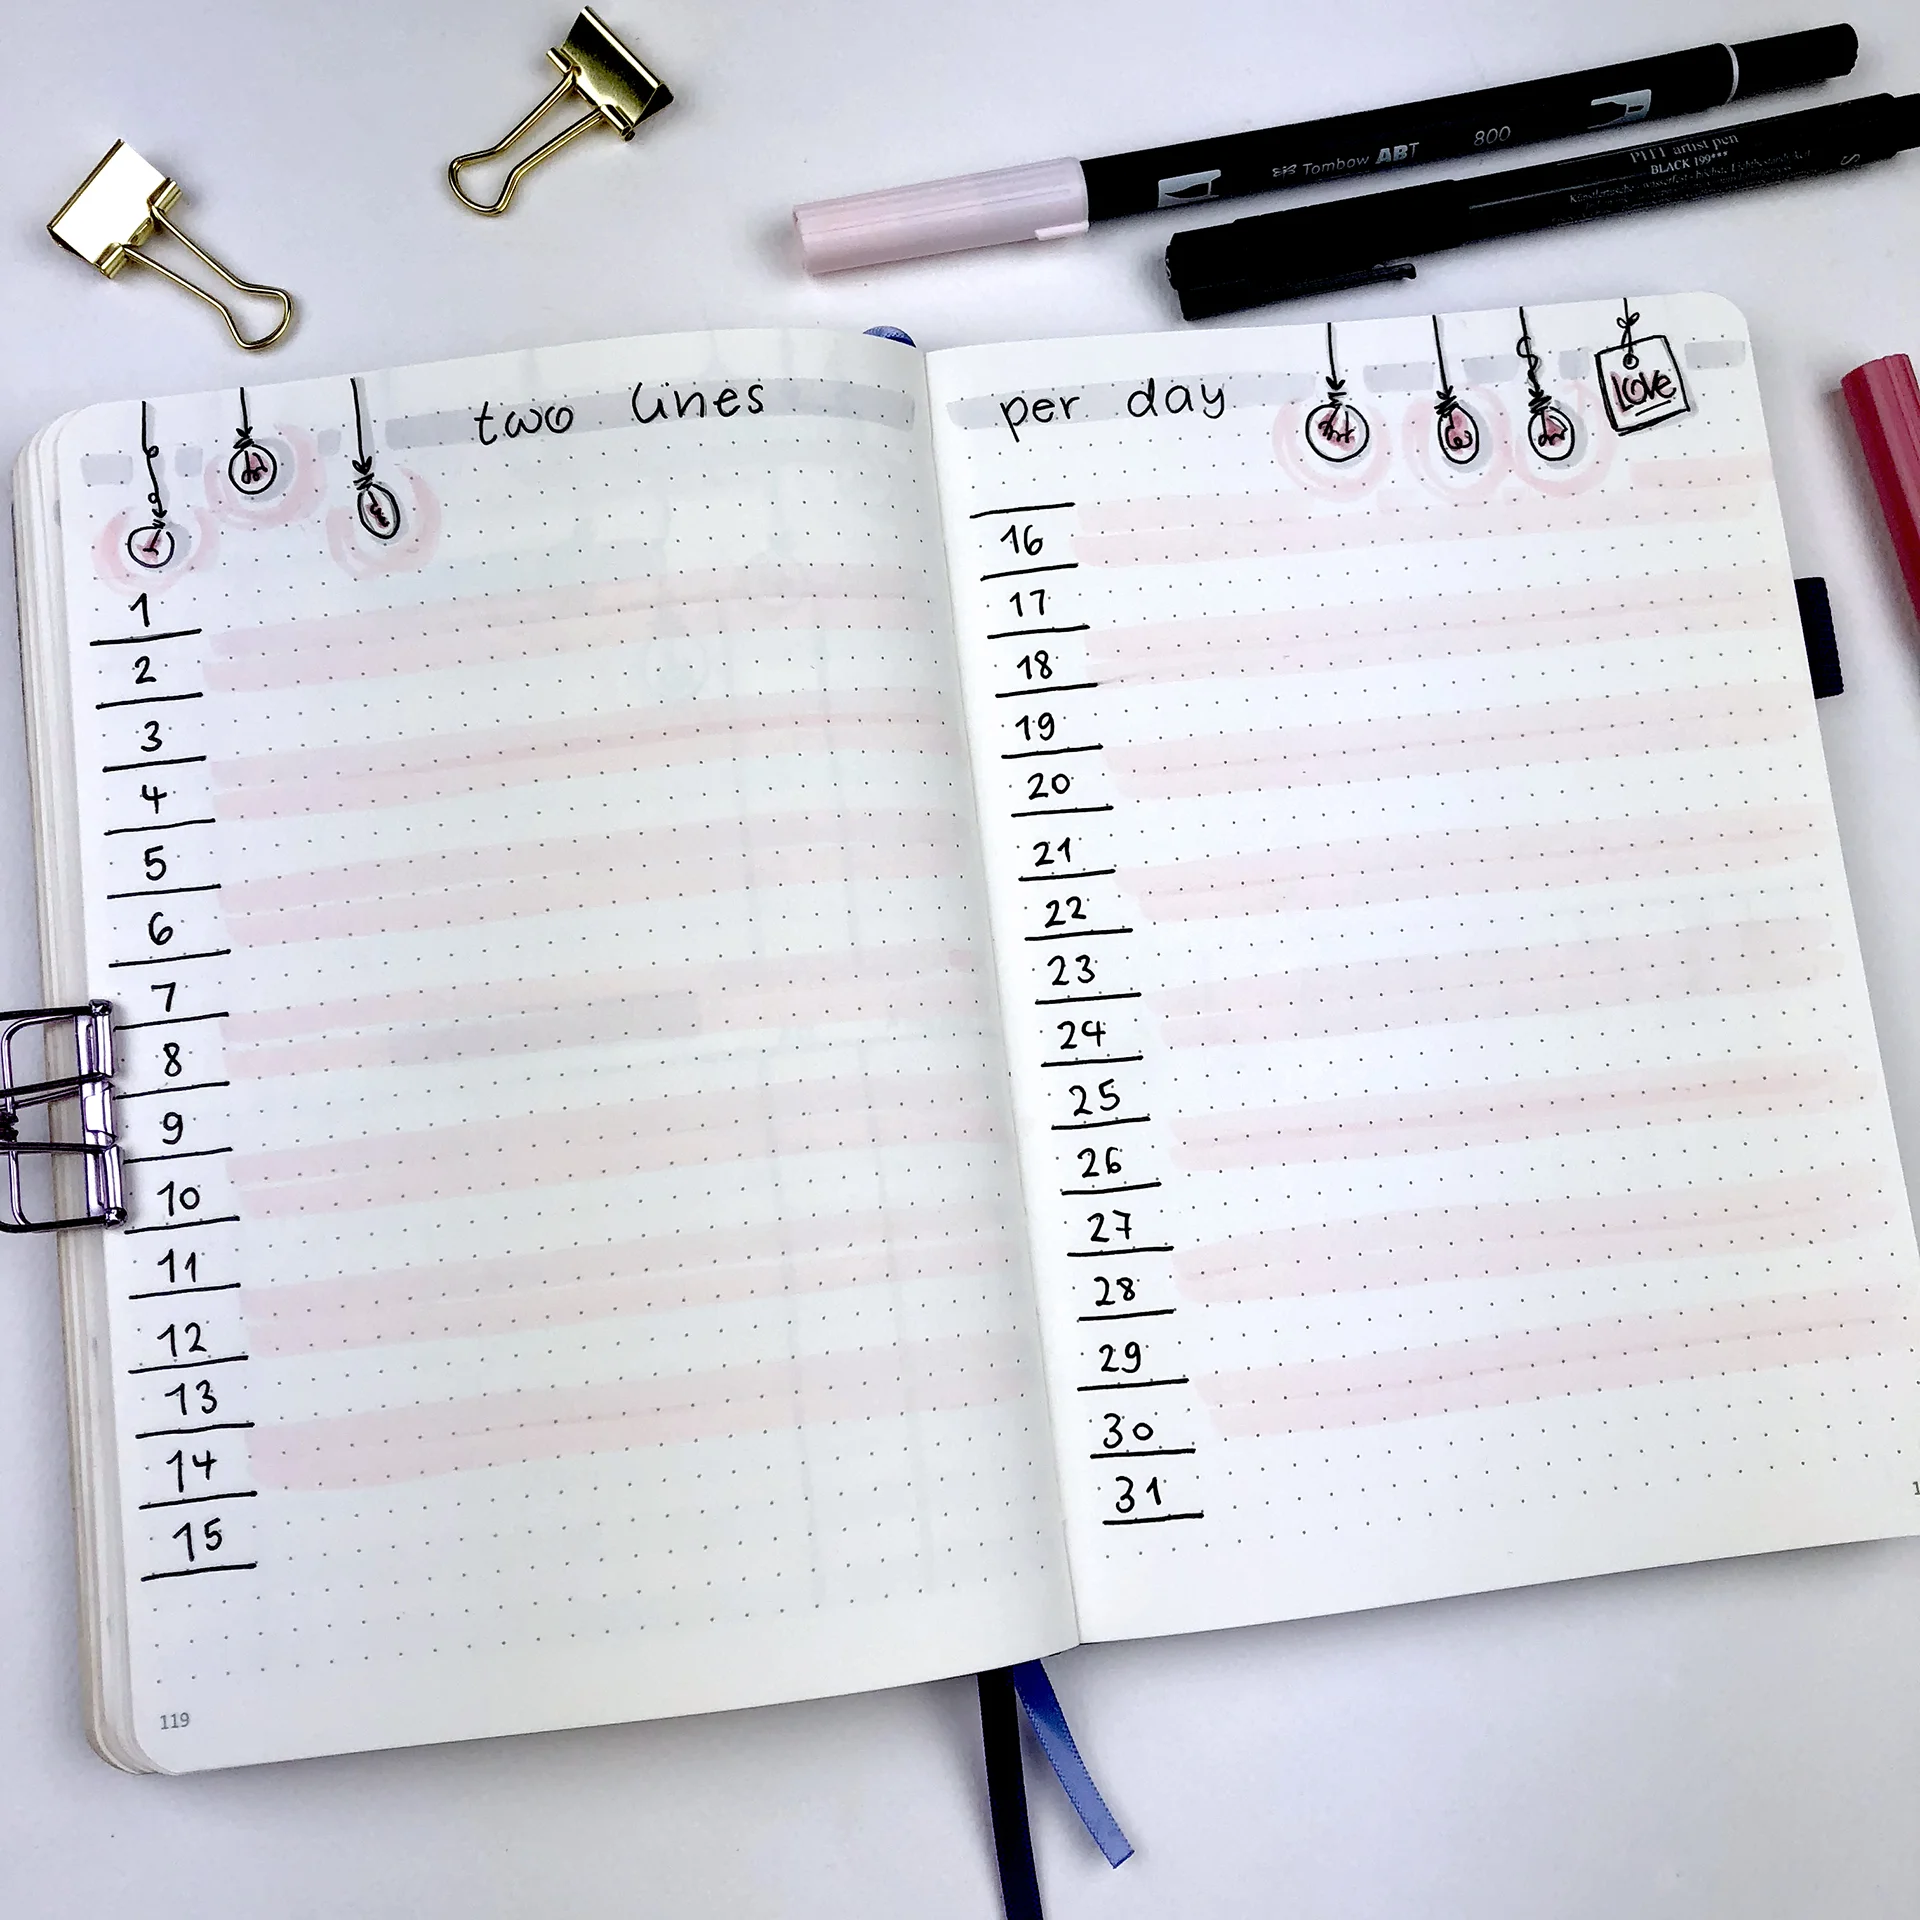
As someone corrected me in last month's plan with me post, this is my 'two lines per day' spread (and not 'one line per day'). It is a spread that I use like a journal - it could be a thought, it could be something that happened during that day, a quote I liked or anything else I want to remember about that particular day. So, instead of having different spreads for gratitude, journaling and so on, I only have this.
I enjoy so much filling in this spread each day! And I love coming back at the end of the month to read all the things I've written.

And lastly, but not least, this is my first weekly spread for May. I used a very simple layout and I've added lots of light bulbs to decorate it. I find that I prefer vertical layouts for my weekly spreads instead of horizontal. So, I've found a few that work for me and I rotate them for the 4 weeks of each month.
And that is one more month planned in my bullet journal. When do you start thinking of next month's theme? And when do you actually start planning your month? Let me know in the comments below. Also, if you use the same theme like me, please send me a picture of it at christina77star@gmail.com


Free Phone Background for April
I decided to do something a bit different for this week's blog post.
If you know me, you'll know that I love design. I'm constantly doodling and sketching whenever I have the time. I wanted to create a background for my phone for April and I came up with the design you can see in the picture below.

I decided to do something a bit different for this week's blog post.
If you know me, you'll know that I love design. I'm constantly doodling and sketching whenever I have the time. I wanted to create a background for my phone for April and I came up with the design you can see in the picture below.

It's full of carrots and daisies, and happy springtime colours!
I decided to share this background with you, for FREE! You'll get a digital file optimized to fit most phone screens at 1080x1920.
JOIN THE GANG!
Subscribe now to my Newsletter to download the FREE phone background.
Plus get access to the Resources Library!
If you're interested in more designs like this, please let me know in the comments below.
I hope you like it.
Improve Your Handwriting Challenge - April
I'm back with one more "Improve your Handwriting Challenge"!
Since I've created the Handwriting Practice Guide, a lot of people showed interest in improving their handwriting, so I thought it would be fun to add a daily challenge that can help you set a daily practice routine in order for your handwriting to become better and better.
It's a fun way to practice daily, keep a photo archive of your handwriting and see how you've improved through time. You can also interact online with other people doing the same challenge, and also you can get inspired by others' handwriting too.
So, for April it's going to be 30 days of handwriting prompts that will hopefully get you to start practicing your handwriting every day. The theme for this month's words is 'animals'.

Here's how to participate:
- Follow me (Christina) @christina77star over on Instagram.
- If you want, you can download and print the monthly prompts here.
- Each day there is a corresponding prompt, that you simply have to write on a piece of paper. You can also choose to have a dedicated notebook for your daily handwriting practice. Try and focus on the word and the letters as you write them. You can repeat the word as many times as you want. Look at the way that you wrote the word the first time and the way you wrote it the last time. Is there a difference? Do you think you need to work on a specific letter?
- Take a photo of your practice and tag it with #improveyourhandwritingchallenge, so that it gets added to the feed.
- At the end of each month look back at your practice pages and see how you've improved.
- Make sure to encourage each other and have fun!
- Please share this post to spread the word and invite others to join in the fun and improve their handwriting as well!
Thank you for joining in!
Christina x

Handwriting Practice Guide
Practice sheets to help you improve your handwriting
Plan With Me: My April Set Up in my Bullet Journal + Video
Time flies by... literally! I can't believe that March is almost over and April is fast approaching...! This time I tried to be prepared and setup my bullet journal quite early. I contemplated a bit on the theme for this month. I wanted it to be relevant to spring, but I didn't want any flowers and such. I wanted something different. So, I came up with a theme that's full of butterflies, bird houses, wooden signs and one air balloon!

Time flies by... literally! I can't believe that March is almost over and April is fast approaching...! This time I tried to be prepared and setup my bullet journal quite early. I contemplated a bit on the theme for this month. I wanted it to be relevant to spring, but I didn't want any flowers and such. I wanted something different. So, I came up with a theme that's full of butterflies, bird houses, wooden signs and one air balloon!
I'm really happy with the way the theme turned out. Though I'm not so happy with myself, because I made a few mistakes while I was planning. But, you just have to accept them, fix them as much as you can and move on... I've also kept most of the spreads the same with March, because they worked so well. Actually, March has been one of the most productive and focused months so far, and I really believe that my bullet journal helped a lot.
Make sure you scroll down to the bottom of the post, because there's also a video, where I'm showing you exactly how I've created each spread.

This is the first page of the month, and the hot air balloon I mentioned earlier. I think it turned out very cute and I also love the colours. I tried to use the same colours throughout the set up, focusing mainly on pastel green, beige and light grey. I have all the details of the products I've used for this setup at the end of this post.
As you can see the mistakes started from the very first page! Oh, well...
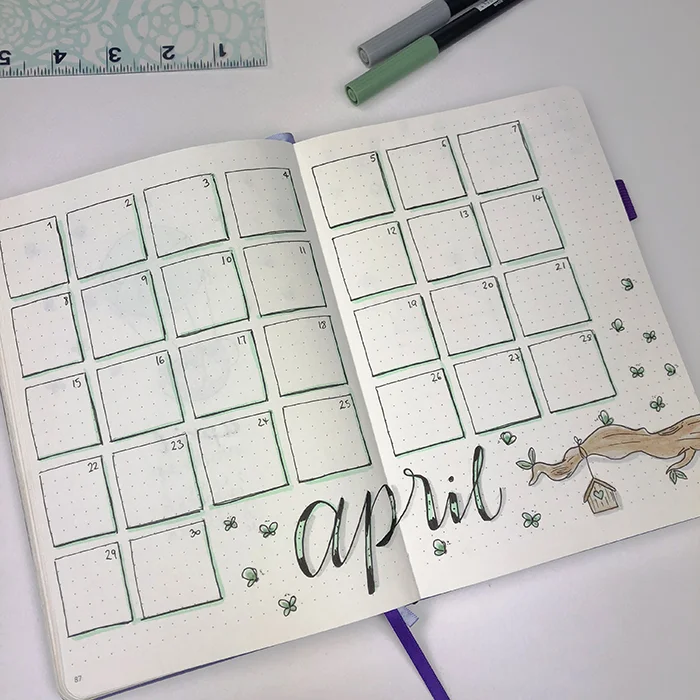
I kept the monthly spread layout the same. The separate boxes seem to work well. And for this month I started the layout from a Sunday, so that the whole month fits in the page.

Separating my monthly goals into two sections: personal and business, has proven very productive. It's such a simple layout but it does really work. And it helps me to focus on the things that matter.

The next page is my monthly focus. I talked about this spread in my March Set Up.
I found it in 'Your Best Year 2018' by Lisa Jacobs and I really really liked that idea, so I decided to added it in my bullet journal as well. These are my monthly objectives summarised in 5 categories that include Financial, Spiritual, Mental, Physical and Relational.
These are the five pillars of a harmonic life, as taught in 'Harmonic Wealth: The Secret of attracting the life you want' by James Arthur Ray. And on this page you basically write what you want to improve during this month in each of those categories. It's just another way to help you focus more on specific areas of your life in order to move forward and make changes.

Moving forward, this is my areas of focus / tasks to complete spread. This worked so well in March, that I decided to keep it for April's layout as well.
It is inspired by 'Your Best Year 2018'. I like how Lisa helps you to organise your thoughts and what you have to do during the month. On the left hand page is the areas of focus, where I will write everything I want to do during April. Then I'll take it a step further and I will be more analytical by writing all the steps I need to take in order for everything to be done. After that, I will take those steps and I will group them as the tasks that need to be completed in the 4 weeks of the month. That way, I know exactly what I need to do each week in order to have a successful month, so that I will finish all my projects and tick off all the things from my to-do list.

Next comes my monthly finances spread, where I clearly made a mistake with the month!!! 🙄
I was so upset with myself, that I didn't even want to fix it. So, I left it as it is.... This is a very basic spread for my blog/work income and my expenses. I find that it's good to track your finances, and keep up with your money and how you spend it.

As always I keep a notes page in my monthly layout. Such a useful page, that keeps all my random thoughts and notes.

I really really enjoyed filling in this spread last month, so of course I had to include it in April as well. This is my 'one line per day' spread where I basically try to write something every day. It is like a journal - it could be a thought, it could be something that happened during that day, a quote I liked or anything else I want to remember about that particular day.

And lastly my first weekly of the month (even though there is only one day of April in there!). This is where I mixed up the dates and I realised my mistake way too late... 😢 I tried to save it as much as I can, but it still shows. I'll admit that I was really tempted to stick the two pages together and make a new one, but I decided against that idea. You don't have to be perfect, and you have to accept that mistakes do happen. So, I kept the page and even though it's a bit messed up I've come to like it.
You can watch also the video here, to see exactly how I created each spread:
And that is one more month planned in my bullet journal. Have you finished your setup for April? What theme did you choose for this month? Let me know in the comments below. Also, if you use the same theme like me, please send me a picture of it at christina77star@gmail.com

Instagram Challenge: #doodlewithusinapril2018
I'm excited to announce our Instagram Challenge for the month of April! 👏🏻
It's the #doodlewithusinapril2018 Instagram Challenge created by me and Alexandra (from @alexandra_plans).
It's going to be 30 days of doodles that will hopefully get you to be creative and have fun! The theme of April's prompts is 'Cooking'. I seriously can't wait to start drawing!
As we did before, all the doodles are part of one big comprehensive picture. Imagine each day to be one piece of the puzzle. So, at the end of the month you will have one big doodle picture! :)
If you decide to follow this way, you'll have to create a table with 5x6 boxes and you shouldn't add the days on the top. You can also make the boxes and dates in pencil, if you don't want the lines to obscure the end result. It's totally up to you.
Of course, if you prefer to draw the doodles in the traditional way, that's absolutely fine as well. The important thing is to have fun!
You can also download a free printable with the daily prompts here.

If you want to join us then:
- Follow me (Christina) @christina77star and Alexandra @alexandra_plans over on Instagram.
- Download the prompts below.
- Draw something according to the day's prompt, take a photo of it, and share it with us on Instagram.
- Don't forget to add the hashtag #doodlewithusinapril2018 and spread the word.
- Everyone is welcome!

We're excited to see what you'll share!
Thank you for joining in!